Playback options are the options that
control when and how the clip plays. Unlike the formatting options you
learned about in the previous sections, these controls affect the action of the clip, the unique qualities it has as a motion video object rather than a static image.
1. Displaying or Hiding Playback Controls
By default, when a video clip plays in Slide Show
view, playback controls appear below it. They make it easy to start and
stop the clip and to skip to a different section of it (by clicking on
the timeline below the clip).
You may sometimes want to hide those controls,
however. To hide them, on the Slide Show tab, clear the Show Media
Controls check box. Note that this setting applies to the entire
presentation; you unfortunately cannot disable or enable playback
controls separately for individual clips.
2. Choosing a Start Trigger
There are a number of ways to specify when a clip starts playing. Let's take a look at some of these.
2.1. Making a Clip Play Automatically or On Click
A video clip's default playback setting is On Click,
meaning that it plays during Slide Show view only when the clip itself
is clicked. You can change this behavior, so that it plays automatically
when it appears, by changing the Start setting on the Video Tools
Playback tab, as shown in Figure 1. (You can also set this on the Animations tab.)

NOTE
If you set the clip to start automatically, you
can optionally specify a number of seconds that should pass before that
occurs. On the Animations tab, enter a number of seconds in the Delay
box to build in this delay.
2.2. Playing the Clip on Mouseover
By default, an inserted clip is already set up to
play on click, but not when the mouse pointer passes over it. To play
the clip only when the mouse pointer passes over it (mouseover) use the
Action command, like this:
Select the clip in Normal view.
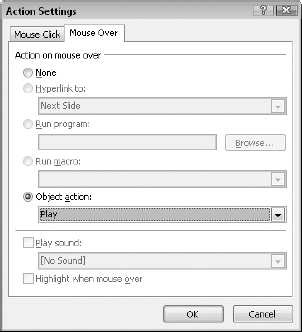
Choose Insert => Action. The Action Settings dialog box opens.
Click the Mouse Over tab.
Select the Object Action button.
Open the drop-down list and choose Play. See Figure 2.
2.3. Triggering Play by Clicking Another Object
Triggers specify
when the action should occur. They enable you to trigger an event as a
result of clicking the event object or something other than the event
object. For example, you could put a piece of clip art on the slide next
to a video, and have the video playback begin when you click the clip
art.
Trigger animation is set automatically for the clip
itself when you insert it, so that the clip starts and pauses when you
click it. To set up a trigger for an object other than the clip itself,
follow these steps:
Place both the video and the trigger object (such as a button or a piece of clip art) on the slide.
Choose Animations =>
Animation Pane. The Animation pane appears. There may already be an
animation listed there which plays and pauses the video clip.
Select the video clip and choose Add Animation => Play. A new animation event appears at the top of the Animation pane.
Right-click this new event and choose Timing. The Play Animation dialog box opens.
Click the Triggers button.
Click Start Effect On Click Of.
Open the drop-down list and choose the object that will serve as the trigger. For example, in Figure 3, the object is an oval that has the word Play in it.
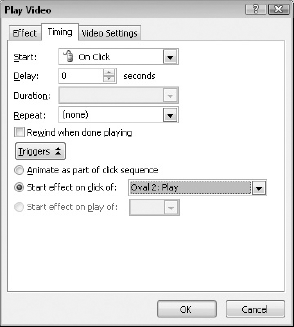
Test the trigger in Slide Show view.
3. Choosing Clip Playback Options
On the Video Tools Playback tab is a group of check
boxes that govern various small details about the clip playback. Mark or
clear any of these as desired:
Play Full Screen: Switches the clip to full-screen size when it is playing in Slide Show View.
Hide While Not Playing: Hides the still image (the poster frame) of the clip.
Loop Until Stopped: Plays the clip over and over until you move to the next slide or stop it using its playback controls.
Rewind After Playing:
When the clip finishes, normally the final frame remains on-screen;
marking this check box makes the first frame appear again instead.
NOTE
If you are using an animated GIF, it plays the
number of times specified in its header. That could be infinite looping
(0), or it could be a specified number of times. You can't set it to do
otherwise. (You can, however, delay its initial appearance with custom
animation.
4. Controlling the Volume
The clip can have a different Volume setting than the
rest of the presentation's audio. That way you can compensate for a
clip that is louder or quieter than the other audio in the presentation.
To do so, click the Volume button on the Video Tools Playback tab and then choose Low, Medium, High, or Mute from the menu.
5. Trimming the Clip
New in PowerPoint 2010, you can trim footage off the
beginning or end of a video clip from within PowerPoint. This makes it
possible for you to do some rudimentary editing without having to use a
separate video editing program.
NOTE
Not all types of clips can be trimmed. If the
Trim Video button is unavailable on the Playback tab, the clip you have
selected can only be trimmed using a third-party program.
To trim a clip, follow these steps:
Select the clip on the slide.
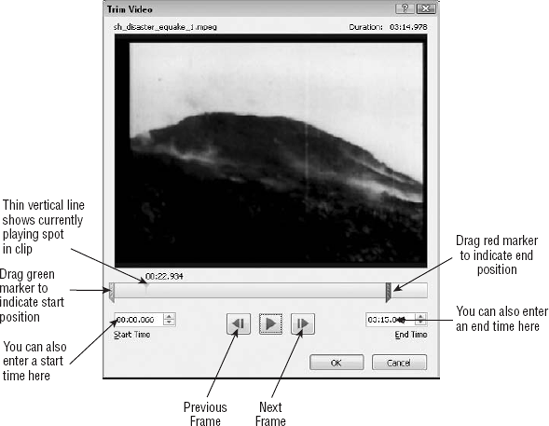
Choose Video Tools Playback => Trim Video. The Trim Video dialog box opens.
To trim off the beginning of the clip, do the following:
Click the Play button (right-pointing triangle) and wait until the part of the clip plays where you want to begin.
Click the Pause button (the two vertical lines). A thin vertical line on the timeline shows where the clip has stopped.
If
you didn't pause it at exactly the right place, use the Next Frame or
Previous Frame buttons to move back or forward one frame per click until
the marker is in the right spot.
You can also drag the thin vertical line to the left or right on the timeline to move it manually.
Drag the green marker on the left end of the timeline to the gray vertical line. See Figure 4.
NOTE
You can also enter a number of seconds in the
Start text box; the number of seconds you specified will be trimmed off
the beginning.
To trim off the end of the clip, do the following:
Click the Play button (right-pointing triangle) and wait until the part of the clip plays where you want to stop.
Click the Pause button (the two vertical lines). A gray vertical line on the timeline shows where the clip has stopped.
Drag the red marker on the right end of the timeline to the gray vertical line.
Click OK to accept the trimming.
NOTE
Compressing the media in the presentation (File => Compress Media) deletes the trimmed parts from the embedded copy of the clip.
6. Setting Fade In and Fade Out Durations
Some clips already begin and/or end with a "fade to
black" effect. If one of your clips doesn't, and you want such an
effect, you can apply it manually from within PowerPoint. (This is new
in PowerPoint 2010.)
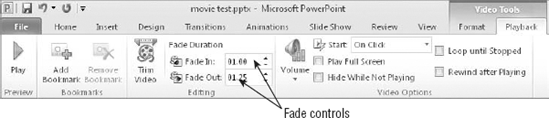
Select the clip, and on the Video Tools Playback tab,
enter values (in seconds) in the Fade In and/or Fade Out boxes. Seconds
are expressed as whole numbers, so 1.25 would be 1.25 seconds. The
larger the number you enter, the longer the effect will take and the
more obvious it will seem. See Figure 5.
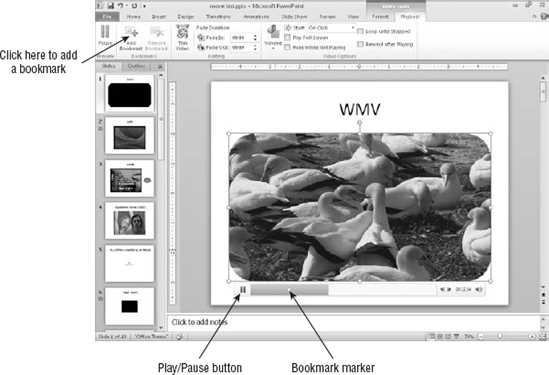
7. Setting a Bookmark
You can set a bookmark (in other words, a marker) at
any point within the video, and then jump among those marked locations
during a presentation. To jump ahead to the next bookmark in a video
clip, you can press Alt+End; to jump backward to the previous bookmark,
use Alt+Home.
To set a video bookmark, follow these steps:
Select the video clip on the slide.
In Normal view, use the Play button (right-pointing triangle) below the video clip to begin a preview of it.
When the video playback gets to the point where you want the bookmark, choose Playback => Add Bookmark.
The clip stops playing, and a bookmark is inserted at
that spot. A bookmark symbol (tiny white or gold circle) appears on the
playback timeline under the clip. See Figure 6.
To remove a bookmark, click the bookmark symbol and then choose Playback => Remove Bookmark.
You can then set up a trigger to a bookmark, so that
something happens when the video playback reaches a certain point. For
example, you could have some text appear over the top of the video at a
certain point, and then disappear and some other text come in at another
point. (Use Send Backward to move the video behind the text box as
needed.)
Here's how to set a trigger to a bookmark.
Add the object to the slide that should appear at a certain point in the video playback. For example, add a text box.
Select the object that should appear, and add an entrance animation effect to it.
With the object still selected, choose Animations => Trigger => On Bookmark and click the desired bookmark.
The bookmarks are consecutively numbered, from left to right on the clip timeline.
If you want the object to exit at a certain point in the video, continue with these steps:
(Optional) Set another bookmark at the point where the object should exit.
Add an exit effect to the object.
Choose Animations => Trigger => On Bookmark and choose the bookmark that represents the position at which it should exit.