Now that you know how to create new drawings
and find plenty of shapes to add to them, let’s look at how to create
and manage pages themselves. Visio documents can contain multiple pages
of different sizes, scales, and orientations. This capability is great
for breaking up complex diagrams into simpler pieces or for keeping
different types of diagrams together in a single project.
1. Inserting Pages
You might want to add pages to a Visio
document for lots of reasons. Some projects require several different
types of diagrams, and keeping them all in a single drawing file but on
separate pages is convenient. For example, the drawings for a system
installation project typically require a title page, several scaled plan
and elevation views that show the site and actual views of real
equipment, plus unscaled schematic and wiring diagrams that show how to
hook everything up.
Other drawings are so complicated that it helps to
break them down into overview and detailed views. Large organizational
charts and complicated process flows benefit from using multiple pages
to “drill down” in the hierarchy. For these diagrams, separate pages in a
Visio document contain simplified high-level views and detailed
low-level views.
Adding Pages Quickly
The fastest way to insert a new Visio page is to click the Insert Page tab on the right end of the page tab bar, as shown in Figure 1. If you use Microsoft Excel, this will be second nature for you.

When you click this tab, a new page is added to the
end of your document. The new page has the same size, scale, and
orientation as the active page. You therefore get a fresh copy of
whichever page is showing but without any shapes.
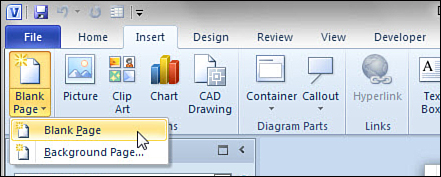
On the Ribbon, the Blank Page button on the Insert tab also lets you add new pages. Figure 2 shows the Blank Page button with expanded choices.

Simply clicking the Blank Page button gives the same
effect as clicking the Insert Page tab at the bottom of the window. Use
the drop-down functionality for finer control.
Adding Pages with the Page Setup Dialog
As you become a more sophisticated Visio user, you
might want more control over the pages you insert. The Page Setup dialog
offers many options for specifying the name, size, scale, measuring
units, layout settings, and more.
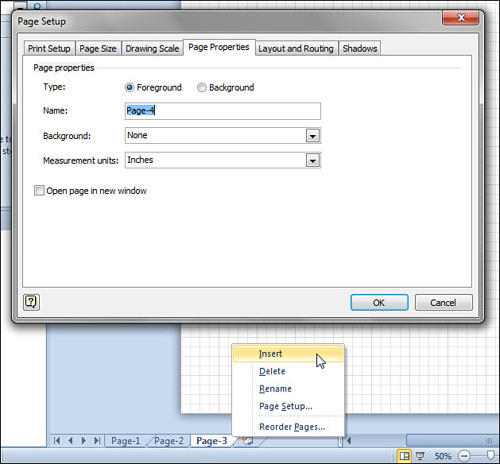
To access the Page Setup dialog, right-click a page
tab for an existing page and then choose Insert. The Page Setup dialog
opens, as shown in Figure 3.

Notice that the Page Setup dialog box has six
different tabs. Clearly, adding a page using this method offers a lot of
control over many aspects of the new page. Page Setup can be used to
fine-tune existing pages as well. Just right-click a page tab for an
existing page and choose Page Setup (see Figure 3).
Adding and Manipulating New Pages
1. | Create a new blank drawing. It should have one page, with one page tab at the bottom displaying Page-1.
|
2. | Quickly
add several pages by clicking the Insert page tab on the right end of
the page tab bar several times. Note that pages are added to the end of
the document and are automatically named in order: Page-2, Page-3,
Page-4, and so on.
|
3. | Draw
different shapes on each page of the document using the Rectangle or
Ellipse tool. Click the page tabs to go back and forth in the document
and view different pages.
|
4. | Note
the rewind, forward, backward, and fast-forward buttons to the left of
the page tabs. They help you to scroll tabs when you have more pages
than can be shown in the page tab area.
|
5. | You
can quickly jump directly to any page in the document by right-clicking
any of these controls and then choosing a page from the list.
|
6. | Rename
any of your pages by double-clicking a page tab. This should activate
text editing so you can type in a new name for the page.
|
7. | Add a new page using the Page Setup dialog. Right-click a page tab for an existing page and choose Insert.
|
8. | In
the Page Setup dialog, type a custom name for the page. Experiment with
other settings on the tab and see what features of the new page you can
control. After you click OK, you should see your new page at the end of
the page tab bar.
|
9. | Change
the name of another page by right-clicking its page tab and then
choosing Page Setup. The name of the page should be highlighted in the
Name field for you to change quickly.
|
10. | Reorder the pages by simply dragging page tabs to and fro. |