4. Renaming Pages
Your pages don’t have to be named Page-1, Page-2, and
so on. You can change them to anything you like. All you have to do is
double-click a page tab and type in a new name. This is the same as
right-clicking a page tab and choosing Rename, but double-clicking is
much easier.
You can also go to the Page Setup dialog to rename a
page. Just right-click a page tab, click Page Setup, and then enter a
new name in the Name field on the Page Properties tab.
5. Reordering Pages
Reordering pages is as simple as dragging the page tabs around, just as you would in Excel.
If your document has lots of pages, dragging tabs
from one end of the document to the other can be difficult. But there’s
help! Right-click any page tab and choose the last menu item: Reorder
Pages. In the dialog that pops up, you can reorder your pages by using
the Move Up and Move Down buttons. Your pages clearly move up and down
in the list box, as shown in Figure 5.
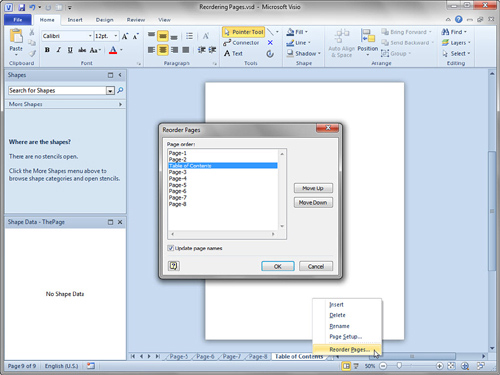
A great feature of the Reorder Pages dialog is the
Update Page Names check box. If you leave this box checked, any pages
that have the default page names (Page-1, Page-2, Page-3, and so on) are
updated to reflect their new positions in the document.
In Figure 2.21
the Table of Contents page is being moved from the end to the beginning
of the document. After the move, Page-1 will become Page-2, Page-2 will
become Page-3, and on. But you might not want this change because the
table of contents is more like a Page-0. In such a case, you should
uncheck Update Page Names before moving any pages.
One last note: background pages always appear at the end of the page tab list, and can’t be reordered.
6. Controlling Page Size and Orientation
You
can set your Visio pages to any size and orientation you want. Perhaps
you want to work with sheets that adhere to standard paper sizes, or
maybe you want your page to expand ad infinitum as your drawing grows.
For wide drawings, you’ll want a landscape orientation; for tall
diagrams, portrait.
Whatever your needs, your first stop is the Design
tab. On the left you find the Page Setup group, which contains three
handy buttons: Orientation, Size, and AutoSize.
Setting Page Orientation
You can set your page to landscape or portrait
orientation in a snap by clicking the Orientation drop-down button.
Switching between wide and tall drawing pages couldn’t be easier!
Setting the Page Size
The next button in the Page Setup group, Page Size, offers you a long drop-down list full of standard office paper sizes.
Engineers
and architects might want to click More Page Sizes at the bottom of the
list. This pops up the Page Setup dialog, with the Page Size tab
highlighted. There you can pick from Metric (ISO), ANSI Engineering, or
ANSI Architectural standard page sizes. You also can enter custom values
for your page size.
It is important to understand that the size of the Visio drawing surface does not
have to match the size of the paper in your printer! When you want to
print, pages can be scaled up or down to fit the printer’s paper or
tiled across several sheets.
Specifying Auto Sizing Pages
Some diagram types have a tendency to meander.
Network diagrams, flowcharts, and other process diagrams can just grow
and grow! For these types of diagrams, the AutoSize button is great, and
saves you a lot of time horsing around with page size settings.
With AutoSize checked, your drawing just grows when
you drop a shape in the blue “off-page” area. Visio automatically
extends your drawing by one sheet of paper in the direction that you are
working, and you never have to worry about running out of space again.
If you remove all shapes from a page tile, then AutoSize will remove the
tile and your page size contracts.
For some folks this feature is a scourge. The
pasteboard (blue off-page area) is great for holding temporary graphics,
clipboard scraps, and other temporary junk that you want to have around
but don’t want in the drawing itself and don’t want to print. If you’re
the type that likes storing bits and pieces “off stage,” then you will
want to turn AutoSize off, which you can easily do by clicking the
AutoSize button on the Design tab. Problem solved.
Using AutoSize Versus Manually Resizing Pages
If you create sprawling network or flowchart
diagrams, you’ll love AutoSize. If you like using the pasteboard, you
won’t like AutoSize. If you like both features, there is a happy middle
ground that lets you quickly and easily resize the page at your leisure
without resorting to the Page Setup dialog.
1. | Start a new drawing using the Basic Flowchart template.
|
2. | Go to the Design tab and turn on AutoSize (it is on by default for this template, but double-check).
|
3. | Drop some flowchart shapes on the page.
|
4. | Try dropping more shapes in the blue pasteboard area. See how Visio automatically extends the drawing surface by one page?
|
5. | In
the View tab, make sure that Show, Page Breaks is checked. As AutoSize
expands your page, you see dashed lines that indicate how your drawing
will be tiled when you print. This capability helps you avoid dropping
shapes in awkward positions that land directly on the page break, where
they might get mangled in printing.
|
6. | Now go to the Design tab and turn off AutoSize.
|
7. | Drop
more shapes in the blue area. The page no longer expands automatically,
and you can store shapes off-page in the pasteboard region. Note that
shapes on the pasteboard won’t print.
|
8. | If
you decide that you want to expand the drawing, there is a shortcut
that lets you quickly and visually expand te page without having to
reactivate AutoSize. In the drawing window, move your cursor to an edge
of the drawing page—where the white meets blue. Hold down the Ctrl key. Your cursor should change to a double-headed resizing arrow.
|
9. | While
still pressing the Ctrl key, hold down the left mouse button and drag
the border of the page to a new location. See how you can quickly resize
the page to any dimensions you like?
|
I think that the manual page resizing is a nice
middle-ground between AutoSize and Not AutoSize. One minor drawback is
that you end up with completely arbitrary page sizes, instead of the
integral numbers of sheets that AutoSize provides. This isn’t a huge
problem because you have a lot of control at print time regarding
scaling and page tiling anyway. If you are adamant about having exact
numbers of page tiles, however, you should use AutoSize.
7. Setting Page Scales
Engineers and architects create drawings that
represent objects in the physical world. They use page scales to relate
real-world sizes to on-paper sizes. Scales allow them to easily draw
objects that are much bigger (or much smaller) than the physical paper,
without doing lots of mathematical conversions in their heads.
For example, imagine your office measures 10 by 12
feet. To fit a drawing of the office onto an 8 ½″ × 11″ letter-sized
page, those 10 feet (120 inches) have to fit onto 8 ½ inches of paper!
This means that each inch on the paper has to cover at least 14.1 inches
in the real world.
Dividing every measurement by 14.1 would be error
prone and tedious. Luckily, Visio supports scaled drawings and
automatically does the math for you! For the office plan, you could use a
standard architectural scale like ½″ = 1′ − 0″. This gives you a ratio
of 1:24, meaning that 1 inch on the paper covers 24 inches of real-world
space—more than enough to fit the office onto a letter-sized page. At
this scale, the page represents 22 × 17 feet of real world space. That’s
enough for your office, a title block, and maybe some notes around the
edges.
You can set the scale of a drawing by going to the Page Setup dialog and then clicking the Drawing Scale tab, as shown in Figure 6.
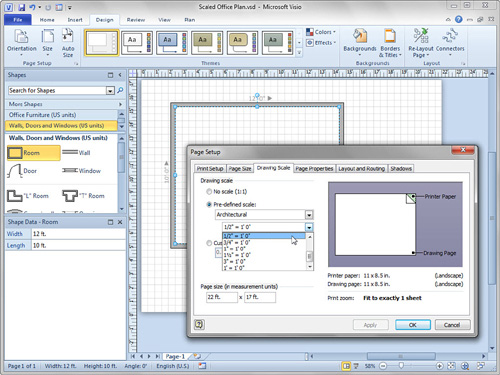
The Drawing Scale tab has three radio buttons for configuring your page’s scale: No Scale, Pre-defined Scale, and Custom Scale.
No Scale is just a 1:1 ratio. You use this scale for
schematic diagrams such as flowcharts, network diagrams, and block
diagrams. For measured drawings, you can choose Pre-defined Scales that
follow Architectural, Civil Engineering, Metric, or Mechanical
Engineering standards. Custom Scales enable you to enter any ratio you’d
like. You could enter 1 cm = 1′ − 2″ if you want! Custom scales are
good for using the paper to its fullest because using standard scales
often leaves left-over space.
The
Office Layout template that ships with Visio comes preconfigured with
the Architectural scale of ½″ = 1′ − 0″ (1:24) for US units and 1:25 for
Metric units. The shapes that open with this template also are created
to scale. For example, the Sofa shape from the Office Furniture stencil
drops on your page at 7 feet × 2 feet 6 inches—a typical sofa size. You
can see the size of a selected shape by looking at the status bar in the
lower-left corner of the Visio application window or by looking at the
Size & Position window (turn it on by choosing View, Show, Task
Panes, Size & Position).
When choosing scales, note the two fields
under Page Size (In Measurement Units). As you change the scale, these
fields update to reflect the width and height that your page represents
in the real world. This lets you double-check that the space on your
page is big enough to fit the object you are drawing.