Depending on how you do it, sharing documents on the
World Wide Web can be easy or clunky. Luckily for me—I hate dealing with
clunkers—Word 2010 makes it easy. And I’m not trying to sound like a
commercial here. If I didn’t think Word’s web-based document-sharing
tools were easy and useful, I’d most likely tell you to skip ‘em and try
a different option . But Word enables you to save a file
directly to your own private little piece of the web, just as easily as
saving it to your own PC’s disk. Oh, and that piece of the web costs
nothing to use.
Arguably, the niftiest new feature of Office 2010 is a set of web-based applications called Web Apps.
Word’s own Web App enables you to view, edit, print, and manage the
Word documents you save online, right from the comfort of your web
browser. If you share those documents with other people, they can use
the Word Web App to work with your documents, too.
The key to all this online-file-sharing magic is SkyDrive, which is one of Microsoft’s Windows Live
online services. If you have a Windows Live account, you can use
SkyDrive as a web-based storage facility for all sorts of documents and
then access them online with the appropriate Web App: Word Web App for
Word documents, PowerPoint Web App for PowerPoint slide shows, and so
on. SkyDrive enables you to create and manage folders the way you do on
your PC; your folders can be private, shared with people or groups you
select, or shared with everyone.
If you have an existing Hotmail, Windows Messenger,
or Xbox LIVE account, you can use that account’s username and password
to access Windows Live. If you don’t have any of these accounts, you can
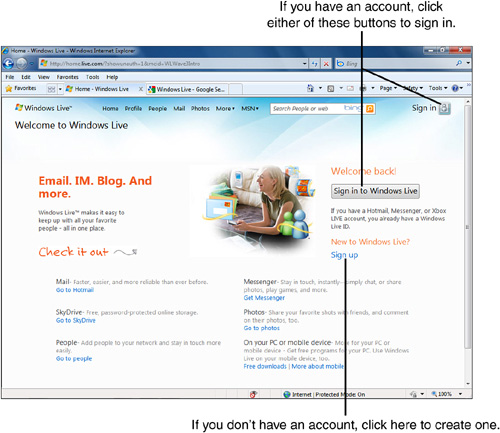
create a new Windows Live account for free by visiting http://home.live.com. On the Windows Live home page (see Figure 1), click the Sign up link and follow the directions to create a new account.

The following sections show you how to save a Word
Document on SkyDrive, share the file with specific people, and open a
document with the Word Web App.
|
Windows Live offers lots of features—many more than I
can mention here. And remember: SkyDrive doesn’t force you to share
anything with anybody. You can keep all your folders private, if you
like.
|
1.1 Working with SkyDrive
File sharing is all the rage these days. Everyone has countless pictures, songs, and other digital trinkets that they absolutely must put online for everyone else
to see. (Sarcasm intended.) This is the thinking behind SkyDrive; the
service is largely meant as a way for users to store and share personal
items. But SkyDrive also provides an easy way for small businesses and
other organizations to share work-related files. This is especially
helpful for any organization that can’t afford to set up a virtual
private network or some other technology that enables private file
sharing.
No
matter whether you use Word for business or pleasure, you can save
documents in a SkyDrive folder, right from Word. You make the file
shareable by storing it in a folder that other people can access.
SkyDrive provides a default set of ready-made folders, but you can also
create your own folders with customized settings for sharing files with
specific people.
|
Because Windows Live is a web-based service, all the
pages you see there are web pages. And because Microsoft is maddeningly
notorious for redesigning its websites and pages every couple of days,
there’s a good chance that the web pages you see on your screen don’t
match the ones shown in the following sections. Likewise, some commands
and links might have changed since this text was written. If this is the
case, just be patient and dig around until to find the pages, buttons,
or links you need.
|
1.1 Saving a Document in a Default Windows Live (SkyDrive) Folder
The following steps assume that you have a Windows
Live account. When your new account is ready, Windows Live creates two
storage folders for you—one private folder and one public folder. Here’s
how to save a Word document in either of the two default folders:
1. | Make sure your document is ready to be shared, and leave it open in Word.
|
2. | On the File tab; click Save & Send.
|
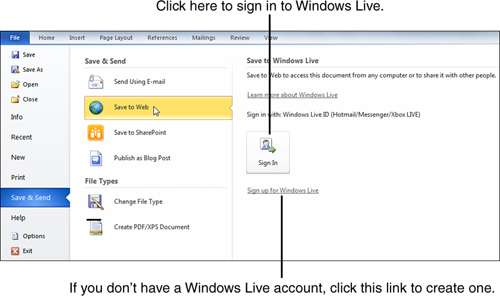
3. | Click Save to Web. If you have a Windows Live account, the page displays a button that enables you to sign in, as shown in Figure 2.

|
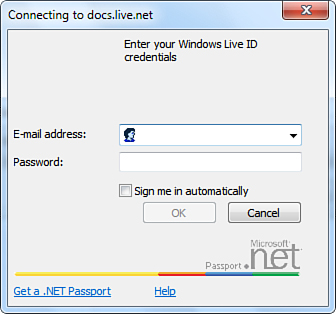
4. | Click Sign In. A sign-in dialog box opens, as shown in Figure 3.

|
5. | Type
your email address and password in the appropriate boxes; then click
OK. When you are logged in, a list of your Windows Live storage folders
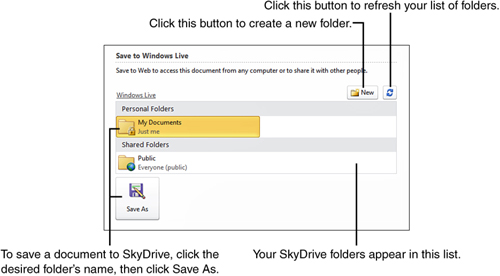
appears on the Save & Send page, as shown in Figure 4. By default, Windows Live creates one folder named My Documents (which is private so nobody else can see its contents) and another folder named Public (which is shared with everyone who can find it).

|
6. | Do one of the following:
- To save the file privately, so no one else can access it online, click the My Documents folder.
- To save the file publicly, so anyone else can access it online, click the Public folder.
|
7. | Click
Save As. The Save As dialog box opens. Because you are saving the
document online, the dialog box does not display any of the drives or
folders on your computer or local network.
|
8. | Type
a name for the file or select a different file type, if necessary. (If
you save the file as anything other than a Word document, other users
cannot open it with Word Web App.)
|
9. | Click Save. Word uploads your file to the Windows Live server.
|