Microsoft went the extra mile in working with
software (and hardware) developers to ensure a high level of
compatibility with Windows 7. The result is a streamlined, user-friendly
installation process for thousands of software applications, without
the glitches experienced when Windows Vista was released.
As
you know, installation of new programs is usually as simple as
inserting a media disc into the drive. The autorun program on most
application discs does the rest. Or, when it doesn’t, you can run the
Setup file on the disc, and the rest is automatic. Ditto for programs
you download from the Internet. The following section explains how to
install software in these different ways.
Note
If you are using a
Standard user account, you will likely be prompted for an Administrator
password when you try to add or remove software programs. If you are
logged in as an Administrator, you will be prompted to click Accept or
OK for the same procedures. |
Installation via CD or DVD
Installing software from a disc is user friendly and easy. Here is what you do:
1. | Insert the disc into your computer.
|
2. | Follow the onscreen instructions.
|
3. | Most
programs will automatically try to start and begin the installation
wizard. If this program automatically tries to install, you will be
presented an AutoPlay dialog box that asks whether you want to run the
installation wizard.
|
4. | Some
programs do not automatically run an installation wizard. In this case,
check to see whether the disc comes with instructions or any
information for installation. If the installation disc does not come
with any instructions, open the disc to view its files. Try to find an install.exe or setup.exe (executable) file, and open that file. This should start the installation wizard and install the rest of the components.
|
5. | The User Account Control dialog box appears, prompting for administrator confirmation that this install is allowed.
|
6. | Enter a password, if prompted, and select Yes to the confirmation, and the software installation will begin.
|
If
you have inserted a disc into the drive but it is not installing, first
make sure that you are installing the software correctly. If
there is still a problem with the install, check the disc to see if
there are any scratches or blemishes that could create a problem.
Scratches on discs can be a major problem and can make the disc reader
fail to read the disc correctly. If the disc is okay, check your disc
reader. If your disc drive is broken or is faulty, take your computer to
a local computer technician. |
|
Installation via Downloaded Program
Installing
a program that was downloaded from the Internet is just as easy as
installing a program from a disc. Before installing a program, do the
following:
Make sure you trust the publisher of the software.
Scan the file for viruses. Sometimes antivirus programs can find harmful viruses that can disrupt your system.
Beware, some programs contain spyware and other software that can be annoying or even harmful.
After you are prepared for installation of your software, follow these steps:
1. | Open your web browser and determine where the software is located online.
|
2. | After you find your software, you will be presented two choices: to open and run the program now or to run at a later time.
Note Sometimes, software can
be downloaded as a ZIP or another type of compressed file. In this
case, download and save the software on your computer, then right-click
the file and select Unzip to uncompress. Windows 7 has a built-in
function to uncompress ZIP files. |
|
3. | If
you want to install your software immediately, click the link to the
software. Select Run or Open and follow the instructions.
|
4. | If
you want to save the software and install later, click the link and
select Save. When you are ready to install this program, find the file
on your computer and double-click it.
|
Viewing and Changing Programs
In Windows 7, you can monitor and change
software that is currently installed on your computer. Windows 7
provides a helpful way to show you what software is on your computer.
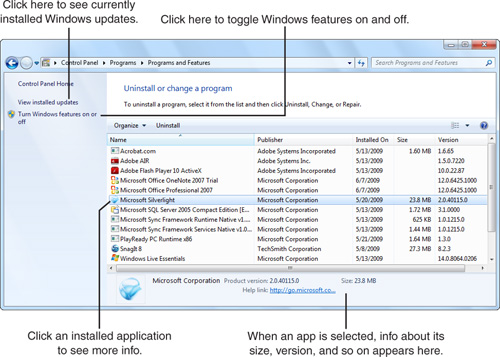
As you can see in Figure 1,
you can view information about all installed programs, including how
many programs there are, who the publisher of each program is, when a
program was installed, and how much space a program takes up. You can
easily organize and change views however you please to better fit your
preferences.

By clicking any of the installed programs on the
list, you can view a program’s detailed information in the lower part
of the applet. This can help you see what version of the program is
installed and allow you to check whether the program is up to date.
On the left side of the window, Windows 7 gives
you a few options. The first link lets you view installed updates; these
are all the Microsoft updates your system contains.
Also on the left side of the Programs and
Features window is a Turn Windows Features On or Off link, which is
described in detail in the next section.