Uninstalling Software
As
you know, many programs come with their own installation (Setup)
programs that handle all the details of installation, such as file
copying, making Registry additions, making file associations, and adding
items to the Start menu. An ever-growing number of applications even
provide their own uninstall routine, which appears as a unique icon
within their Start menu folder. But sometimes programs do not come with
built-in uninstallers, or you just want Windows to handle these
uninstalls.
Most modern applications are written in
compliance with the Microsoft Windows standards for installation and
removal. Thus, you see them in your installed applications list in the
Programs and Features applet. This list is mainly the result of the PC
software industry’s response to kvetching from users and critics about
tenacious programs that are difficult to root out after they’re
installed. Some ambitious programs spread themselves out all over your
hard disk like oil on your garage floor with no easy way of reversing
the process. Users complained about the loss of precious disk space,
unexplained system slowdowns, and so forth.
Tip
Never attempt to remove
an application from your system by deleting its files from the \Program
Files folders (or wherever). Actually, “never” may be too strong.
Removal through manual deletion should only be a last resort. Always
attempt to use the Programs and Features applet or the uninstall utility
from the application first. |
To uninstall software, follow these steps:
1. | Click Start, Control Panel, Programs, Programs and Features.
|
2. | Select the program you want uninstalled or changed.
|
3. | Click the Uninstall button on the toolbar.
|
4. | The Programs and Features dialog box appears, asking if you’re sure you want to uninstall the program. Click Yes.
|
5. | UAC
will ask for administrator confirmation if this uninstall is correct.
Enter the password, if necessary, and select Yes to the confirmation.
The software will uninstall automatically.
|
If
the program you want to uninstall doesn’t appear in Programs and
Features, check its All Programs listing to see if it comes with its own
Uninstall program. You can also search for more information about the
product. Programs usually come with ReadMe notes or have extra
information online. |
|
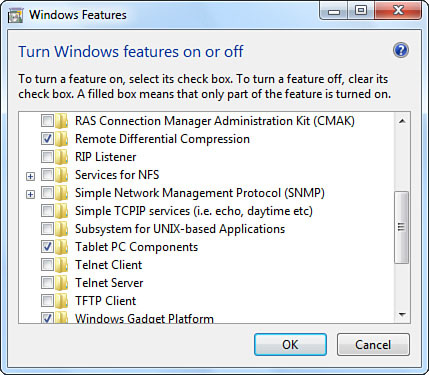
Also with Programs and Features, you can turn on or off any Windows feature, as shown in Figure 2.
Turning off a feature can customize Windows 7 for you. For example, if
you are running Windows 7 on your desktop and only use a mouse and
keyboard for input devices, you can turn off the Tablet PC Components.
You do have the option to turn on any feature that is available as well.
It is up to you which functions you want to use.

Enabling
and disabling features is easy and self-explanatory. Click the Turn
Windows Features On or Off link in the Tasks list. If you want to turn
on a feature, select the check box next to it to fill in the box. If you
do not want a feature, just click the check box to clear it. If you do
want to turn off a feature, make sure that you know what you are turning
off.
Note
Turning off a feature
does not uninstall it completely off your computer as in Windows XP.
Instead, it keeps the feature on your hard drive to give you the later
option of turning it on. This allows you to turn on and off any feature
quickly but does not free up any space on your hard disk. |
Compatibility Issues in 64-Bit Version
Windows 7 64-bit is a unique OS that targets and
utilizes 64-bit processors. It offers the main benefit of breaking the
4GB RAM limitation, enabling your system to run applications faster than
32-bit environments, and run a lot of applications simultaneously
without any noticeable slowdown.
With these great benefits comes a downside.
Windows 7 64-bit has some compatibility issues and other limitations.
Old 16-bit applications, legacy installer applications and 16-bit DOS,
and even 32-bit drivers (you must install x64-bit drivers) are not
supported in Windows 7 64-bit.
|
If you are planning to upgrade
to the 64-bit version of Windows 7, remember you can upgrade only from
64-bit Windows Vista. Also, you can only upgrade your 32-bit Windows
Vista system to 32-bit Windows 7. If you have the capability to install
the 64-bit version of Windows 7 and you have 32-bit Windows Vista
previously installed, you must complete a new clean install. (If you’re
running Windows XP, you can get an upgrade license to Windows 7, but you
must perform a clean install.) Thus, all applications must comply with
the new 64-bit application standards. And, of course, you must have a
compatible 64-bit CPU in your machine. Most recent desktop CPUs from AMD
and Intel support 64-bit versions of Windows 7. To determine whether a
particular processor model can run in 64-bit (x64) mode, check the
processor’s specification sheet at the processor vendor’s website.
|
Windows 7 incorporates Registry redirection and
file redirection that is responsible for all the OS’s applications
compatibilities. However, 64-bit Windows 7 does not incorporate this
feature, and many legacy applications will not run or install.
Other Program Compatibility Issues
While running Windows 7, you might decide to
install an older program or game. However, Windows 7 might not install
the program or might not run the program correctly once installed.
Windows 7 sports a new version of the Program Compatibility Wizard to
help work around this kind of incompatibility.
The Program Compatibility Wizard is designed to
change the compatibility of a certain program and allow that program to
work in Windows 7. To open and use this wizard, follow these
instructions:
1. | Click Start, Control Panel and type Program Compatibility in the Search box at the top of the screen.
|
2. | In the results pane, click the Run Programs Made for Previous Versions of Windows link.
|
3. | Control
Panel starts the Program Compatibility Wizard. If you’re not logged in
as Administrator, click Advanced, click Run As Administrator, enter the
password, and then click Next.
|
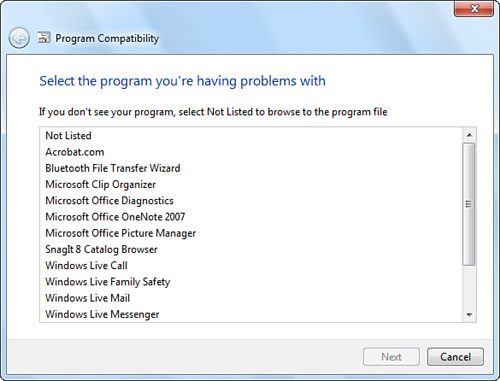
4. | Windows 7 scans your computer for potentially incompatible programs and displays a list (see Figure 3). Select your desired program and click Next.

|
5. | In the Select Troubleshooting Option screen, click Troubleshoot Program.
Tip If your program doesn’t
appear in the list, click Not Listed, click Next, and then click Browse
to locate the program on your hard disk, external drive, or CD or DVD. |
|
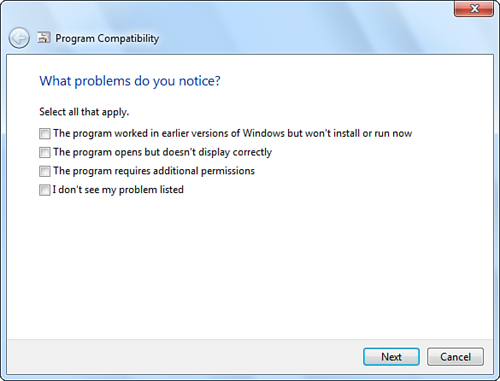
6. | The wizard presents a list of problems you might have encountered (see Figure 4).
Select The Program Worked in Earlier Versions of Windows But Won’t
Install or Run Now. You can also select any of the other options listed,
which might include problems displaying the program or getting
permissions. Click Next.

|
7. | The wizard asks you what prior version of Windows supported the program. Make a selection and click Next.
|
8. | You
have chosen all the basic options, so the wizard now asks you to test
the program to make sure that it works correctly. Click Start the
Program, and then return to the wizard and click Next.
|
9. | After
testing is completed, you are asked whether you want to save these
settings, change the current settings, or report the problem to
Microsoft and check for a solution online.
|
A
new feature in Windows 7 Professional, Ultimate, and Enterprise
editions is the capability to run legacy programs in Windows XP Mode.
This is a virtual environment within Windows 7 that runs Windows XP with
SP 3, enabling you to run all those Windows XP–based programs you can’t
live without.
Side-by-Side Installs and Virtual Registries
Windows 98 Second Edition provided a feature called side-by-side DLLs.
This feature allowed a developer to use the version of DLLs required by
a particular program without overwriting system DLLs (those stored in
the \Windows\System folder). This feature worked only on Windows 98SE and only if the program developer took advantage of the feature.
Windows 2000 introduced Windows File Protection,
which restored system files automatically if they were overwritten by
an application when you installed it or ran it. This protected Windows
from crashing but didn’t do anything about a program that needed a
particular system file version to run.
Side-by-side installs enable users to install
multiple versions of the same product on the same computer. For example,
suppose Microsoft just released a new version of Office. You want to
run a trial version of the new Office suite to learn about new features
and test drive it, but you don’t want to uninstall the current,
well-oiled version. However, multiple programs that use a different
version of the same DLL sometimes cause complications—“DLL Hell.” When
programs use the wrong DLL files, they crash and can take the whole OS
down with them.
Windows XP Professional provided a way to handle DLL Hell. It was called Fusion.
Fusion allowed programs to install whatever system files (DLLs and
others) they needed and redirect any files that would replace system
files to the program’s own folder. When such a program was run, Fusion
created a memory-protected virtual machine to run the program with its
own DLLs. The end result was that even if two or more programs were
running at the same time, using different versions of DLL or other
system files that would “break” the system in past versions of Windows,
both programs would run properly. No other programs could touch the area
of memory granted to each program. Nor could that program or other
programs gain access to the area of memory in which the basics of the OS
were running.
Windows 7 and Windows Vista contain a different
method from the Windows XP solution. Instead of a single Registry, they
use a virtual registry that contains multiple DLLs. A virtualized
application registry eliminates any conflicts between software. So, if
you want to have two versions of Microsoft Office available on the same
computer, for example, the virtual registry lets you run them without
conflicts.
Virtual registries also have one other important
aspect. Because Windows 7 can create and use virtual registries for
data, Microsoft applied this concept to users who do not have
Administrator privileges. By using virtual registries, nonadministrative
guests can use a virtual registry and will not disrupt the main
Registry. Usually, only administrators have the rights that allow one to
install software that writes to the Registry. But now nonadministrators
can install software and other various programs onto the system without
causing any harm. Windows 7 will continue to run and display all
software installed but will not experience any permanent effect from the
data on the virtual registry.