You can send faxes to people in two ways:
right from the Windows Fax and Scan program, or from the program you
used to create the document you want to scan. The end result is the
same either way. Just use whichever method is easiest for you.
1. Faxing from Windows Fax and Scan
To create and send a fax from the Windows Fax and
Scan program, open that program
Click Fax in the left column to ensure you're in the faxing mode. Then
follow these steps:
Click the New Fax toolbar button and choose File => New => Fax from the menu.
If you want to include a cover sheet, click Cover Page and choose the style you want.
|
To create and manage your own fax cover sheets, choose Tools => Cover Pages from the Windows Fax and Scan menu bar.
|
|
To specify recipients, do any of the following:
Type the recipient's fax number directly into the box to the right of the To: button.
If the recipients are already in your Contacts, click To:, use the To => button to add each recipient's name to the Message Recipient's list, and then click OK.
To
add recipients to your Contacts, click To:, click New Contact, and fill
in the recipient's name and fax number (plus any other information you
have). Click OK and then click To => to add the recipient to the Message Recipients list. Click OK.
|
If a recipient's name is red in the To: box, that
means there is no fax number for that recipient. Edit the recipient's
Contact information to include a fax number.
|
|
Fill
in the Subject line with a brief description of the fax. If you send
the fax to another computer, the Subject text will appear in the fax
header, like the Subject line in an e-mail message.
Type
the body of your fax in the main program window. You can use standard
text selection techniques and options in the toolbar to format the
text.
Optionally, to insert a picture or file to send with your fax, click Insert on the menu bar to see the options shown in Figure 1. Then choose whichever option best describes what you want to insert as listed next.
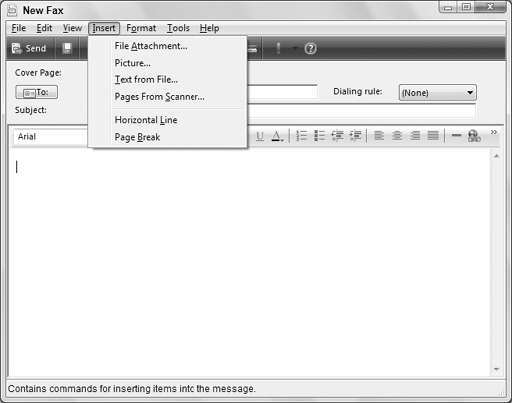
File Attachment:
Choose this option to attach any printable document to your fax. The
file you choose will be converted to a TIF image and sent as part of
the fax.
Picture:
Choose this option to insert a picture into the body of your fax
message. When the picture is in the message, you can size it using the
dragging handles. To wrap text around a small picture, right-click the
picture and choose Properties, then set the Alignment property to Left
or Right.
Text from File: Choose this option to add text from any .txt, .htm, or .html file to your message. You can edit the inserted text using the same techniques used to edit text you typed yourself.
Pages from Scanner: If you have one or more pages in your scanner to send, choose this option to scan the printed page(s) and add them immediately.
Horizontal Line: Insert a horizontal separator line in the fax from margin to margin.
Page Break: Start a new page in the fax.
Optionally, to preview how your fax will look to the recipient, choose View => Preview from the menu. Close the preview window when done.
Finally, to send the fax immediately, click Send. To schedule when the fax is sent, choose Tools => Options to see the options shown in Figure 2. Choose to send the fax when discount rates apply, or at a specific time of day. Then click OK.
The fax message will go to the Outbox until it is
sent to the recipient. Once sent, a copy of the fax will be added to
your Sent Items folder.

2. Sending faxes from programs
As an alternative to going through Fax and Scan, you
can often fax a file using the same procedure you use to print. Open
the document you want to fax using whatever program you typically use
for that type of document. For example, open a document in Word, or a
Web page in Internet Explorer.
|
When you fax a document, you send the recipient a
non-editable image of the document. If you want to send an editable
copy of the document, you should attach it to an e-mail message.
|
|
Next, choose File =>
Print from the program's menu bar as though you were going to print the
document yourself. When the Print dialog box opens, choose Fax from the
list of available printers, as in Figure 2. Then click OK.
A copy of the document is converted to a TIFF
picture and attached to a fax message in the New Fax window. Use the
steps described in the previous section to choose a recipient, enter a
Subject line, add a cover page, and set other options. When you're
ready to send the fax, click Send.
If sent to a standard fax machine, the
recipient sees the document printed on paper only. If the recipient is
using software like Windows Fax and Scan, the document will be a TIFF
image in their Inbox.