1. Executing Commands in the ISE
You can execute any commands in the ISE that you can
execute from the normal PowerShell prompt. Simply enter the command in
the command pane and press Enter. Also, the command pane keeps a running history of your commands just as the normal PowerShell prompt does.
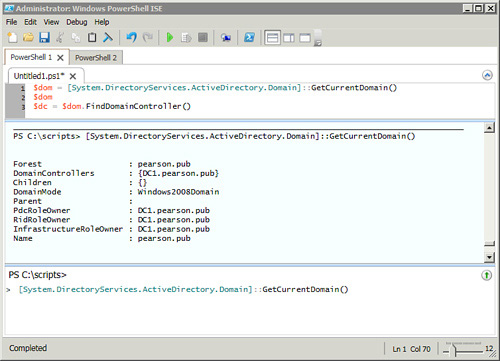
For example, Figure 1 shows the result of entering the [System.DirectoryServices.ActiveDirectory.Domain]::GetCurrentDomain() command.
Tip
Although the figure indicates the command
on the command line in the bottom pane, it actually disappears after
the command is entered. For the figure, the up arrow was pressed before
the screenshot was captured to show the command.
2. Creating and Saving a Script in the ISE
You can build scripts and test the progress from
within the ISE. The steps in the following table show how to build a
script from within the ISE that will
Read a text file of computer names
Store the computer names in an array
Start writing output to a text file beginning with the date
Loop through the list of computer names retrieving a list of hot fixes and writing them to the text file
| Steps | Comments |
|---|
| 1. Use Notepad to create a text file named computerlist.txt in the c:\data folder. | This
text file includes a list of computer names in your network. To start,
you can use a text file with just two computer names, such as DC1 and
DC2. |
| 2. Launch the Windows PowerShell ISE with administrative permissions. | Click Start, type PowerShell in the Search Programs and Files text box, right-click Windows PowerShell ISE, and then click Run As Administrator. |
3. Type the following line in the script pane:
$list = get-content
"c:\data\computerlist.txt"
| Reads the text file and stores the list in the variable named $list. Because there is more than one name in the list, the variable is created as an array. |
| 4. Press F5 to run the script. | This should run successfully.
Note
You can view the contents of the array by entering $list and pressing Enter in the command pane.
|
5. Type the following three lines in the script pane:
$outputline = "Hotfix list as of:"
+ (get-date).tostring
('MMM-dd-yyyy hh:mm')
$outputline | out-file c:\data\
hotfixlist.txt -append
$outputline = "-------------------"
| out-file c:\data\
hotfixlist.txt -append
| The first line creates a variable and populates it with some text and the current date. It then appends it to a text file.
Tip
The MMM in the date format field must be entered as all caps to ensure the month is displayed.
The second line opens the hotfixlist.txt file and sends the Hotfix line to the file.
The third line sends a line of dashes to the text file. All of this is combined to create a header in the output file. |
| 6. Highlight the three lines you just typed and press the F8 key to execute just these lines. | This should run successfully.
Note
You can view the output of this by entering notepad c:\data\hotfixlist.txt and pressing Enter in the command pane.
|
7. Type the following line in the command pane and press Enter:
get-wmiobject
win32_quickfixengineering
-computername localhost
| Retrieves a list of hot fixes installed on the local computer.
Tip
The term localhost runs this on the local computer. However, you can substitute the name of any computer in place of localhost.
The purpose of this line is to ensure that the get-wmiobject command is formatted correctly prior to placing it in the foreach loop in the next step. |
8. Type the following lines in the script pane:
foreach ($i in $list)
    {
    $outputline = "Computername: "
+ $i ;
    $outputline | out-file c:\data\
hotfixlist.txt -append;
    $outputline = gwmi
win32_quickfixengineering
-computername $i
    $outputline = gwmi
win32_quickfixengineering
-computername $i | sort-object
-descending installedon
    $outputline | out-file c:\data\
hotfixlist.txt -append;
    }
| The foreach command loops through the script lines within the curly brackets ({ }). The $list variable is an array of all the computers read from the text file. The $i
holds the value of the first computer name in the list the first time
it loops, then the second name on the next loop, and continues until
the computer list is exhausted.
The loop starts by writing the name of the computer in the file with the first two $outputline lines.
It then populates the $outputline with the hotfix information for the computer after sorting the output in descending order on the installedon column. This lists the most recent hotfixes first.
|
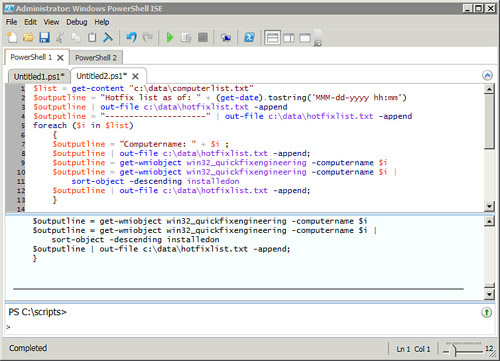
| 9. Press F5 to run the script. | At this point, your display looks similar to Figure 2.
Tip It’s
common to have typos. A simple space added in the wrong place causes
problems. Use the error output and the cursor position information to
identify the line and the position of the error.
|
| 10. Save your script by clicking the Savehotfix.ps1. button. Browse to a location on your computer and save the script as | Note
You might not be able to run the script if the execution policy hasn’t been modified.
If the execution policy has been modified, you can execute the script from the command prompt with the following command:
c:\data\hotfix.ps1
If the script is in the same path as your current path, you can run it with this command:
.\hotfix.ps1 |
If you look at the file created by the hotfix.ps1 script, it looks something like this:
Hotfix list as of: Jan-07-2011 06:19
---------------------
Computername: DC1

Source Description HotFixID   InstalledBy          InstalledOn
------ ----------- --------   -----------          -----------
DC1    Update      KB948610   S-1-5-21-23182879... 1/7/2011 12:04:40 PM
DC1    Update      KB948609   S-1-5-21-23182879... 1/7/2011 12:04:40 PM
DC1    Update      KB968930   S-1-5-21-23182879... 1/7/2011 11:25:37 AM


Computername: DC2
Source Description HotFixID   InstalledBy          InstalledOn
------ ----------- --------   -----------          -----------
DC2    Update      KB948610   S-1-5-21-23182879... 1/7/2011 12:24:40 PM
After you start writing scripts, you’ll probably
realize that there is always an improvement you can add. Getting it to
work is the first objective. You can then tweak it to make it better.
For example, once you see the output of the hotfix.ps1 script, you
might want to adjust it. The following table shows how you can tweak it.
| Breakpoint Shortcut Keys | Comments |
|---|
Test this line from the command pane:
gwmi Win32_QuickFixEngineering |
format-table -property hotfixid,
description, installedon,
installedby
| Changes the output using the format-table cmdlet to pick specific columns.
When you’re happy with the output, you can then put the line into the script.
Tip
You can use | format-table * to view all the possible columns that you can add to the format-table -property list.
|
Modify the tenth line in the script so that it looks like this:
$outputline = gwmi
      Win32_QuickFixEngineering
-computername $i
      | sort-object -descending
installedon
      | format-table -property
hotfixid,
        description, installedby,
installedon
| You can now run the script with the modified line by pressing the F5 key. |
At this point, the modified script looks like the following text.
Tip
The lines are numbered for readability only. Do not
add the numbers. However, they do show the only places where you should
press the Enter key.
1  $list = get-content "c:\data\computerlist.txt"
2  $outputline = "Hotfix list as of: " +
(get-date).tostring('MMM-dd-yyyy hh:mm')
3  $outputline | out-file c:\data\hotfixlist.txt -append
4  $outputline = "---------------------" | out-file 5 c:\data\hotfixlist.txt -append
5  foreach ($i in $list)
6  {
7   $outputline = "Computername: " + $i ;
8   $outputline | out-file c:\data\hotfixlist.txt -append;
9   $outputline = gwmi win32_quickfixengineering -computername $i
10  $outputline = gwmi Win32_QuickFixEngineering -computername $i
| sort-object -descending installedon | format-table -property
hotfixid, description, installedby, installedon
11  $outputline | out-file c:\data\hotfixlist.txt -append;
12  }