|
In most cases, Windows 7 will detect and set up a
printer that’s directly attached to your computer with no help at all.
In some cases, it won’t do this, and you might have to help. This
section will help you in this case. The procedures vary, depending on
how the printer is connected to your computer:
Here’s the basic game
plan, which works with most printers. First, you must be logged on using
a Computer Administrator account. Just follow these steps:
1. | Read
the printer’s installation instructions specific to Windows 7 or, if
there are none, look for Windows Vista, XP, or 2000 instructions. You
may be instructed to install software before connecting the printer to your computer for the first time. This is especially important if your printer connects via USB.
| 2. | If
the printer uses a cable, connect the printer to the appropriate port
on your computer according to the printer manufacturer’s instructions.
| 3. | Locate the type of connection that your printer uses in the following list as directed:
|
Note Many
new computers have no parallel port. If you have a printer that has
only a parallel port connector, but no parallel port on your computer,
you can purchase an add-on parallel port card for your computer.
Alternatively, you can get a network parallel print server device, or
USB-to-parallel printer adapter, and connect to the printer through your
network or a USB port. |
If Windows can’t
automatically detect the make and model of your printer, it will ask you
to assist in selecting the appropriate type.
If the Printer Isn’t Found
If your printer isn’t found
automatically using the options in the preceding section, you have to
fake out Plug and Play and go the manual route. To do so, follow these
steps:
1. | Open
the Devices and Printers window by clicking Start, Devices and
Printers. At the top of the Devices and Printers window, select Add a
Printer.
| 2. | Select Add a Local Printer.
| 3. | Select the port to which the printer is connected. The choices are as follows:
- LPT1:, LPT2:, LPT3:—
These are parallel port connections. Most computers have only one
parallel port connection, LPT1. The higher-numbered ports will still
appear in the list even if your computer doesn’t have them—be careful.
- COM1: through COM4:—
If you know your printer is of the serial variety, it’s probably
connected to COM1 or COM2. If COM1 is tied up for use with some other
device, such as a modem, use COM2.
- File—
If you select this port, when you subsequently print a document, you
will be prompted for the name of a file into which the printer commands
will be stored. The main use for this option is with a PostScript
printer driver, to create a file for submission to a print shop.
- BTH001— This is for printing to a wireless Bluetooth printer if you have one connected to your computer.
- XPS— The XPS port provides another “save to file” function. This port directs print output to an XPS sharable document format file.
- Create a New Port—
This is used to make connections to printers that are directly
connected to your LAN and are to be controlled by your computer.
After selecting the correct port, click Next.
| 4. | Select the manufacturer and model of your printer in the next dialog box, as shown in Figure 1. You can quickly jump to a manufacturer’s name by pressing the first letter of the name, such as H for HP. Then use the up- and down-arrow keys to home in on the correct one.
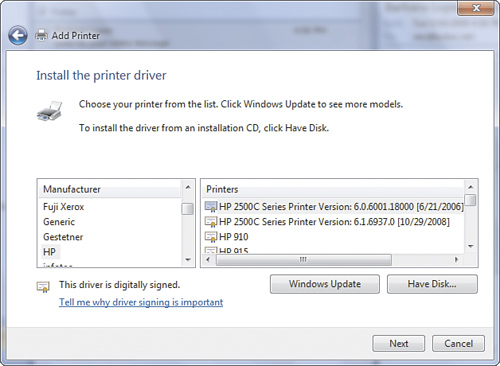
If you can’t find the appropriate model, you have three choices:
If you have an Internet connection, click Windows Update to see if Microsoft has a driver available. This might well work. Get
the manufacturer’s driver on a floppy disk or CD-ROM or download it via
the Internet, open or run the downloaded file to expand its files, and
then click Have Disk. Locate the driver (look for an INF file, the
standard type for driver setup programs) and click OK. Choose
a similar, compatible model and risk getting less-than-perfect output.
This option can often be successful with dot-matrix printers and older
inkjet and laser printers, but is less likely to work with modern cheap
inkjet or laser printers that have no internal “smarts.”
If the wizard finds that the appropriate driver is already
installed on your machine, you can elect to keep it or replace it. It’s
up to you. If you think the replacement will be better, go for it. By
contrast, if no driver is listed on the machine, you may be prompted to
install it or insert a disk from the vendor. On the whole,
manufacturer-provided drivers tend to be newer and better than the
default ones provided with Windows.
When you have selected a printer manufacturer and model, click Next.
| 5. | By default, the printer will be named using its full model name. You can change or shorten this if you wish. Then, click Next.
| 6. | By
default, the printer will be shared on your network. The default share
name is the printer’s name as set in the previous step, but you can
modify or shorten the share name if you wish. Some computers have
trouble with names longer than 31 characters, so if you intend to share
the printer, keep the name short and sweet. To help other users identify
the printer, you can also type in a location and a comment.
If you do not want to share the printer, click Do Not Share This Printer. Then, click Next.
| 7. | If you want this printer to be your default (primary) printer, check Set As the Default Printer.
Click Next. A User Account Control prompt may appear, confirming that you want to install the driver.
| 8. | If you want be sure the printer is working, click Print a Test Page; otherwise, click Finish.
|
Note If
the driver software isn’t “signed” with digital proof that it came from
the manufacturer that it says it came from, Windows may warn you.
Permit the software to be installed only if you know that it came directly from a reputable manufacturer. If it came from a website other than the manufacturer’s, you probably do not want to trust it. On a corporate network you may be prevented from installing any unsigned drivers. |
When you’re finished, the icon for the printer appears in your Devices and Printers window. If you have just set up a
printer that’s connected to a serial (COM) port, right-click the
printer’s icon and select Properties. View the Ports tab, highlight the
correct COM port line (which should be checked), and click Configure
Port. Select the proper data transfer rate in bits per second (baud
rate), data bits, parity, stop bits, and flow control. For most serial printers, these settings should be 9600, 8, None, 1, and Xon/Xoff, respectively. Finally, click OK to save the changes.
What to Do If Your Printer Isn’t Listed
If your printer isn’t
detected with Plug and Play and isn’t listed in the printer manufacturer
and model selection list discussed in the previous section, you’ll have
to find a driver elsewhere.
First, your printer
probably came with a CD-ROM containing driver software. In the printer
manufacturer selection dialog box (refer to Figure 6.2),
click Have Disk, and then click Browse to find the Windows 7 driver
files for your printer. Select the appropriate INF file and click OK.
If you can’t find the disk
or if it doesn’t contain a Windows 7 driver, don’t worry; there’s still
hope. Windows Vista, XP, and Windows 2000 drivers are compatible, and
your disk most likely has drivers for
these OSs. Virtually all printers manufactured since the late 1990s
have Windows XP– or Windows 2000–compatible drivers, and many earlier
printers are supported as well.
The Windows Update
button lets Windows download additional printer drivers from Microsoft,
and this may well obtain the correct driver for you.
If Windows Update
doesn’t help, your next step should be to visit the printer
manufacturer’s website. Check out their Product Support section, and
look for a way to locate and download drivers. If you can find an
appropriate driver, follow the manufacturer’s instructions for
downloading it. It will probably come as a compressed or executable file
that has to be expanded or run, and this will put the installation
files into a folder on your hard drive. You can then use the “Have Disk”
feature discussed earlier to point Windows to this folder.
If neither Microsoft nor
the manufacturer provides a driver, hope is fading. Still, some
off-brand printers or models are designed to be compatible with one of
the popular printer types, such as the Apple LaserWriters, HP LaserJets,
or one of the Epson series. Also, many printer models are very similar
and can use the same driver (with mostly correct results). Check the
product manual or manufacturer’s website to see if your printer supports
an emulation mode. This might help you identify an alternative printer model, and you can try its driver.
Tip Use
the Internet to see if other people have run into the same problem and
have found a solution. For instance, you might use Google to search for "Windows 7
printer driver manufacturer model",
substituting in the manufacturer’s name and model number. However,
don’t download a driver from some random site: It could be infected with
a virus. Download drivers only from a credible corporate or institutional website. |
Assuming that you have obtained a printer driver, follow these instructions to install it:
1. | If
you obtained a driver by downloading it from the Internet, run the
downloaded file. This will either install the drivers directly or
“expand” or “unzip” a set of files into a location on your hard disk.
Take note of the location.
| 2. | Follow steps 1 through 4 in the preceding section.
| 3. | Click the Have Disk button.
| 4. | You’re
now prompted to insert a disk. Click the Browse button. If you
downloaded the driver, locate the folder in which the driver files were
expanded or unzipped. If you have a CD, insert the CD, wait a few
moments, then browse to the driver files on the CD.
The wizard is looking for a file with an .inf extension,
which is the standard file extension the installer setup file provided
with all drivers. You may have to hunt around a bit to find a folder
with drivers for Windows 7, Vista, or XP.
| 5. | When
you have located the folder with INF files, click OK. You might have to
choose a printer model from a list if multiple options exist.
| 6. | Continue through the wizard dialog boxes as explained in the previous section. |
|