|
In most cases, installing and using a printer in
Windows 7 is nearly effortless. Just plugging the printer into your
computer is usually enough. Installation and setup is automatic and
silent. Add ink and paper, and within a few seconds you can start
printing from whatever programs you use, without thinking any more about
it. It doesn’t always go quite this smoothly, though, so we’ve devoted
this chapter to the ins and outs of installing and using a printer in
Windows 7.
Windows gives you control over the printing system through the Devices and Printers window, shown in Figure 1. To get there, click Start, Devices and Printers.
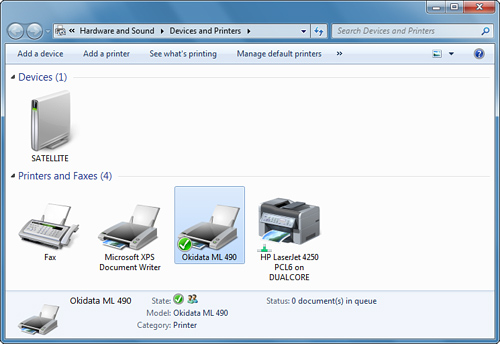
Figure 6.1 shows icons for four output devices:
The HP LaserJet
printer is shared by another computer on the network. The network cable
icon above the letters HP indicates this. The
Okidata printer is the default printer, as indicated by the check mark.
It’s also shared to others on the network, as indicated by the tiny
icon showing two people, next to the word State. (The default printer
check mark supersedes the network or sharing indicators on the printer
icon itself, but all the indicators appear next to the word State.) The
Fax device and XPS Document Writer icons don’t represent actual
printers, but are options for faxing and creating portable XPS documents
directly from within your applications. I’ll discuss this more shortly.
Tip Devices
and Printers should appear in your Start menu, but if it doesn’t,
right-click the Start button and select Properties. Click Customize.
Scroll down through the list of available items, and check Devices and
Printers. |
Initially,
the task ribbon shows just two tasks: Add a Device and Add a Printer.
If you click one of the printer icons, additional items appear: See
What’s Printing, Manage Default Printers, Print Server Properties, and
Remove Device.
You will probably find
that the first time you log on to Windows 7, one or more printer icons
are already present. These may include any or all of the following:
Icons for any printer(s) you have attached to your computer, which were detected by Windows and set up automatically. Icons
for any printer(s) shared by computers attached to your network.
Windows might discover and add these automatically or, on a corporate
network, they might be installed for you by your network administrator. An
icon for Microsoft XPS Document Writer. This is not a printer in the
physical sense. XPS is a type of electronic document format comparable
to Adobe’s Acrobat (PDF) format. It lets any computer view and/or print
the document without having to have the application that created it. If
you select XPS Document Writer as the “printer” in any of your
applications, the program’s print function will create an XPS document
file that you can then send to other people. A
Fax icon. If your computer has a modem with fax capability, or if your
organization has a network fax server, the Fax printer lets you send
faxes directly from your applications without having to first print a
hard copy and then feed it through a fax machine or scanner. Instead,
you simply select the Fax printer from inside your application and use
the normal print function.
In
the next section, I’ll show you how to add for new printers icons that
don’t appear automatically. The subsequent sections will tell you how to
manage your printers. Installing and Configuring a Printer
If your printer is already
installed and operational at this point, you can skip this section and
skim ahead for others that may be of interest. However, if you need to
install a new printer, modify or customize your current installation, or
add additional printers to your setup, read on.
Tip Before you buy a new piece of hardware, it’s always a good idea to check the Windows Compatibility Center on the Web at www.microsoft.com/windows/compatibility.
Or, check the device’s box, manual, or manufacturer’s website to ensure
that it’s compatible with Windows 7 or Vista. If the device is listed
as compatible with XP but not Vista or Windows 7, you might be able to use the device’s XP software, but it’s not guaranteed. You
should know, though, that Windows 7 comes with preinstalled drivers for
more printers than are listed in the Windows Compatiblity Center.
Before assuming that your old printer isn’t supported, go through the
manual installation procedure to see if your printer make and model is
listed as an installation choice. If it’s not, check the manufacturer’s
website for a downloadable driver. |
You might want to add a printer in a few different instances, not all of which are obvious:
You’re connecting a new physical printer directly to your computer (obvious). You’re connecting a new physical printer to your network (obvious). You want to create a formatted print file, usually PostScript file, that can be sent to a print shop (not so obvious). You
want to set up different printer preference schemes, such as “black and
white only” or “photo quality,” for a single physical printer, so that
you can simply select a printer icon instead of having to manually
change your printer settings for each print job (obscure but useful
time-saving idea).
The basic game plan for installing and configuring a printer is as follows:
Read your
printer’s installation manual and follow the instructions for Windows 7
or, if there are none, the instructions for Windows Vista, XP, or 2000. Plug
in the printer. Many newer printers are detected when you plug them
into the parallel or USB port. Your printer might be found and then
configure itself automatically.
If
the printer doesn’t configure itself, you can run the Add New Printer
Wizard (or use a setup program, if one is supplied with your printer).
We’ll go over this procedure in detail in the next section.
Tip Some printer manufacturers ask you to install their driver software before you plug in and turn on the printer for the first time. Heed their advice! If you plug the printer in first, Windows may install incorrect drivers. If
this happens to you, unplug the printer, delete the printer icon, run
the manufacturer’s setup program, and follow their instructions from
there. |
Note You
can select a network printer as your default printer even if you move
from one network to another (as you might with a laptop that you use at
work and at home). Windows 7 is supposed to remember which printer is
the default printer on each network you use. |
At this point, you should
have a functioning printer. You might want to make alterations and
customizations to the printer setup, though. For example, you can do the
following:
- Right-click
the icon for the printer you’ll be using most often and select the
Default Printer option. This way, your printer will be preselected as
the printer of choice when you use the Print function of Windows
applications.
- Set job defaults pertaining to paper tray,
two-sided printing, scaling, type of paper feed, halftone imaging,
printer setup information (such as a PostScript “preamble”), ink color,
and paper orientation. These will be the default print settings that
every Windows application will start with when you select this printer.
- Check and possibly alter device-specific settings such as DPI (dots per inch) and font substitution.
- Share the printer and specify its share name so that other network users can use your printer.
- If
you are on a network and want to control who gets to use your printer,
set permissions on the Security tab of the Properties dialog box. (You
must have Computer Administrator privileges to do this.)
Adding a New Printer
How you go about adding a new printer depends on how you’ll be connecting to it:
If your printer is connected directly to your computer with a USB, parallel, or serial printer cable, you are installing a local printer. Installing a local printer is covered in the next section. If
you want to use a printer that’s shared by another computer on your
network, you still need to set up a printer icon on your own computer.
This is called installing a network printer. A
printer that’s physically connected to the network wiring itself and
not cabled to another computer is called a “local printer on a network
port,” just to make things confusing. If you have a network-attached printer, try the
standard Add Printer procedure we describe in the next section. Windows 7
is pretty smart about finding and using networked printers.
|