2.2 Command-line Backup Tools
The stsadm.exe utility was used to perform
command line operations with SharePoint 2007. It enabled SharePoint
administrators to back up site collections using the command line. This
made it easy to restore a Site Collection (or a single site) if
necessary.
SharePoint 2010 introduces the use of Windows
PowerShell cmdlets, which offer command-line execution of many
SharePoint functions, including backup and restore. PowerShell offers
over 300 new cmdlets that allow a more granular set of functions for
execution than stsadm. Specifically, it allows administrators more
flexibility on what gets backed up or restored. To see a list of
available options for backup, type
Using the PowerShell cmdlets is very useful for
regular backups because you can use the Windows Task Scheduler to
create a recurring backup job. This can be done by creating a
PowerShell script then using the Windows Task Scheduler to execute this
script every day (off-hours).
The backup cmdlet also lets you do a full SharePoint
backup as you would with the Central Administration page. The syntax
looks like this:
Backup-spfarm –directory \\myserver\backuplocation -backupmethod
full
This
command performs a full backup on a SharePoint farm and writes to the
Backup and Restore History on the Central Administration page. You can
then use either the Central Administration interface to restore from
this backup or another command-line command. Backup and restore actions
done via the Central Administration Web interface or the command line
are indistinguishable.
Scheduling a SharePoint Backup
Like MOSS 2007, one of the things you’ll notice on
the Backup and Restore pages is that there is no tool for scheduling
backups. This presents a problem for IT staff interested in ensuring
that SharePoint backups are regularly obtained. As in the previous
version, the best alternative is to use a simple batch file that
executes the SharePoint backup from the command line. This batch file
can then be scheduled using the native Windows Task Scheduler. We
discuss the command-line backup options in the following section.
2.3 Two-level Recycle Bin
The SharePoint Recycle Bin is a convenience for
users who accidentally delete a file or other item. Needing to recover
a single item is a much more common situation than having to recover
from a full-fledged disaster. The Recycle Bin provides an “undelete”
feature to allow end users to recover accidentally deleted files,
documents, list items, lists, and document libraries without running a
content database-level backup and restore. This saves the SharePoint
administrator(s) time and hassle because they can easily recover files
for end users without having to initiate a full-fledged backup and
restore process. In fact, in most cases, users will simply recover
things themselves.
Note
The Recycle Bin captures deleted events. If items go
missing due to errors, data corruption, or other problems, they will
not be recoverable via the Recycle Bin. This is why a full backup
process must also be in place.
When a user deletes an item, it moves to the
first-stage Recycle Bin. Users with contributor rights can recover
their items from the first-stage Recycle Bin. When the item is deleted
from the first-stage Recycle Bin, the deleted item moves to a
second-stage Recycle Bin. SharePoint Administrators can recover items from the second-stage Recycle Bin if the items have not been purged.
Configuring the Recycle Bin
The SharePoint Recycle Bin is a Web application
setting, which means that it can only be enabled or disabled for all of
the Site Collections served by the Web application. If you turn it on,
it’s available on all sites in all Site Collections for that Web application.
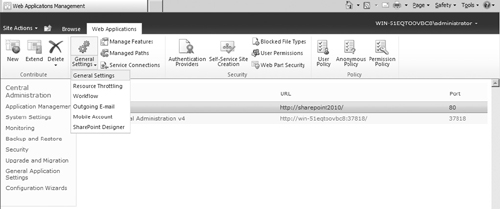
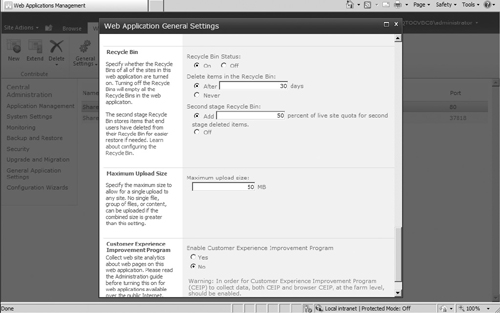
The global settings for the Recycle Bin are part of
the Web application General Settings. These settings are accessed
through the Central Administration by using the ribbon to access
general settings for a specific Web application (see Figure 13). The Recycle Bin settings are at the bottom of the General Settings page (see Figure 14).


We recommend that you configure the Recycle Bin to a
size that is a percentage of the overall site quota and set an
“auto-clean” schedule (the default is 30 days) for permanent file
removal that fits your business needs. Again, these settings will apply
to all Site Collections within the Web application.
Restoring Items from the Recycle Bin
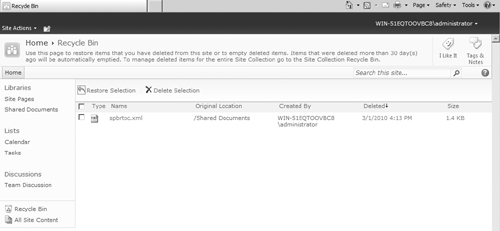
The first level of the Recycle Bin is the user-level Recycle Bin (see Figure 15).
It is accessible by any user with contribution rights associated with
the deleted item and provides a site-level view of deleted content; it
contains all items deleted from a particular site.

Note
The first-level Recycle Bin counts toward the site’s maximum quota.
The second level of the Recycle Bin is the administrative Recycle Bin (see Figure 16).
It is accessible by Site Collection administrators, provides a Site
Collection-level view of deleted content, and contains all items
deleted from a particular Site Collection.

In effect, SharePoint administrators no longer need
to maintain replica environments for item-level restores. In addition,
inadvertent site deletions can be managed through the use of custom
event handlers that automatically back up a site prior to deletion.
Both offer significant support time reductions.
2.4 SQL Server Backup
Microsoft SQL Server Backup and Restore is typically
used by large organizations given that they already have SQL Server
Tools or offsite data centers. It’s also because the person/group
responsible for the databases is a DBA, rather than the SharePoint
Server administrator. If you are in a large organization where this
situation is likely, then we recommend this option. We’ll leave the
steps to back up SQL Server to the DBA.
SQL Enterprise Manager has the capability to
schedule backup tasks, which enables the DBA to automate the backup
process. We recommend that the DBA(s) responsible for the SharePoint
databases get proper training on the structure of the SharePoint
databases.
It is important to note, however, that only
the configuration and content databases get backed up. The “What’s Not
Covered in a SharePoint Backup” section that follows describes other important items that you will need to also back up.