2.2 Detecting and Repairing Disk Errors
NTFS
was introduced and billed as a “robust and self-healing” file system,
as opposed to FAT, which is not. All in all, we have to agree with
Microsoft on this one. We have yet to see an NTFS partition go “sour”
in any way, shape, or form. We’ve had NTFS partitions that would not
boot and key system files that would not run, but for the most part,
these errors were self-inflicted and usually brought on by playing with
fire.
The disk repair program in Windows 7’s GUI is called Error Checking. These are the command-line versions (stored in the %SystemRoot%\System32 folder):
For a description of how each works, just add the normal /?
switch or see Windows online help. The available commands enable you to
turn automatic checking on and off, and repair a “dirty” (improperly
shut down) drive at bootup.
Error Checking
reviews the file system for errors and the drive for bad sectors (bad
spots). To run the program, do the following:
1. | In Computer or Windows Explorer, right-click the drive you want to check.
|
2. | On the context menu, choose Properties.
|
3. | Click the Tools tab.
|
4. | In the Error-Checking section, click Check Now. A dialog box appears, as shown in Figure 6.
|

The meaning of the options is as follows:
Automatically Fix File System Errors—
If file directory errors (for example, lost clusters, files without
end-of-file markers, and so on) are found, this option specifies
whether the program should fix them.
Scan for and Attempt Recovery of Bad Sectors—
This option specifies whether the program should attempt to locate bad
sectors, mark them as bad, and recover data from them by writing it in
a known, good area of the disk. If you select this option, you do not
need to select Automatically Fix File System Errors; Windows fixes any
errors on the disk.
Tip
If
your volume is formatted as NTFS, Windows automatically logs all file
transactions, replaces bad clusters, and stores copies of key
information for all files on the NTFS volume. |
You
can run the error check with neither of the option boxes turned on, and
you are not required to close all open files and programs. However, if
you check either of the boxes, you are told that Windows can’t check
the disk while it’s in use. You are given the option of deferring the
check until the time you restart your system.
2.3 . Disk Defragmenter
When
an OS stores data on a hard disk, it places that information in the
first available “hole” it can find that isn’t already occupied by
another file. However, if the disk already contains several other
files, that location might not be large enough for the complete file.
When this happens, the OS places as much of the file as it can in the
space available and then searches for another open hole for the balance
of the file. This process continues until the entire file has been
written to disk. Any files that are not written to a contiguous disk
location are considered “fragmented.”
The
problem with fragmentation is that it slows down the rate at which your
hard disk can retrieve information and supply it to the requesting
program. Hard disks remain largely mechanical devices and are governed
by the laws of physics. To access files stored on a disk, the drive
must physically move a small arm to the correct location on a spinning
platter. These movements are measured in milliseconds, but milliseconds
add up, especially when a file is spread over a hundred unique
locations.
Fragmentation is not always a
bad thing. If an OS had to find a contiguous section of disk space for
every file it stored, your system would slow down as your drive filled
up. Eventually, your system would reach a point at which the disk still
had ample free space, but none of this space would be in contiguous
blocks big enough to hold a file.
Disk
Defragmenter addresses this fragmentation problem by reorganizing all
the files on your hard disk so that they are stored as complete units
on a single area of the disk. To do so, it identifies any remaining
free areas, moves small files there to open up more space, and uses
this newly opened space to consolidate larger files. This shuffling
process repeats until all the files are moved around in this manner and
the entire disk is defragmented.
In
Windows 7, unlike Windows XP, the Disk Defragmenter process is
automated. You configure when it takes place, and it does the rest.
2.4 Configuring Defrag
The fastest way to open Disk Defragmenter is to click Start, type disk
in the Search box, and select Disk Defragmenter from the results list.
You can also open Disk Defragmenter from All Programs, Accessories,
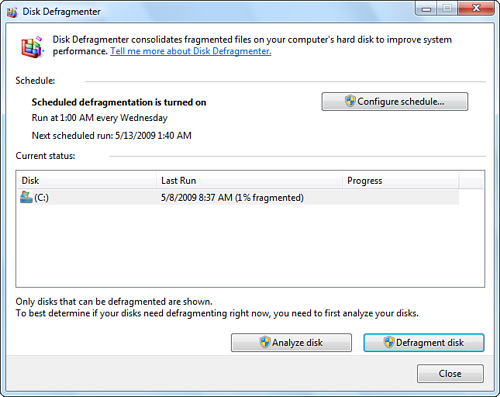
System Tools, Disk Defragmenter. By default, Disk Defragmenter (Figure 7)
runs on a weekly schedule. Click Configure Schedule to specify a
frequency (daily, weekly, monthly), a day of the week, a time, and
which disks to defragment if your system has two or more disks. To
defragment your hard disk immediately, click Defragment Disk.
