Hue/Saturation: Color and Intensity
The third of three essential color correction tools in After Effects is Hue/Saturation. You can use this one to
desaturate an image (or add saturation)
colorize a monochrome image
shift the overall hue of an image
de-emphasize or remove an individual color channel
The Hue/Saturation control allows
you to do something you can’t do with Levels or Curves, which is to
directly control the hue, saturation, and brightness of an image. The
HSB color model is merely an alternate slice of RGB color data. All
“real” color pickers include RGB and HSB as two separate but
interrelated modes that use three values to describe any given color.
Thus you could arrive at the
same color adjustments using Levels and Curves, but Hue/Saturation is
more directly effective. To desaturate an image is essentially to bring
the red, green, and blue values closer together, reducing the relative
intensity of the strongest of them; a saturation control lets you do
this in one step, without guessing.
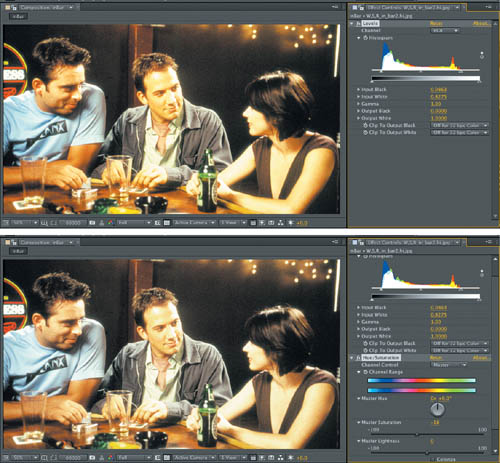
Often colors are balanced
but too “juicy” (not a strictly technical term), and lowering the
Saturation value somewhere between 5 and 20 can be a direct and
effective way to pull an image adjustment together (Figure 1).
It’s essential to understand the delivery medium as well, because film
and even images from the web on your phone can be more tolerant and
friendly to saturated images than television.
The other quick fix with
Hue/Saturation is a shift to the hue of the whole image or of one of its
component channels. The Channel Control menu for Hue/Saturation has
red, green, and blue as well as their chromatic opposites of cyan,
magenta, and yellow. In RGB color, these secondary colors work in direct
opposition, so that lowering blue gamma effectively raises yellow
gamma, and vice versa.
Tip
When in
doubt about the amount of color in a given channel, try boosting its
Saturation to 100%, blowing it out—this makes the presence of tones in
that range very easy to spot. |
The
HSB model includes all six individual channels, which means that if a
given channel is too bright or oversaturated, you can dial back its
Brightness & Saturation levels, or you can shift Hue toward a
different part of the spectrum without unduly affecting the other
primary and secondary colors. This can even be an effective way to
reduce green or blue spill .
There are lots of ways to adjust the color levels of
an image, with new ones emerging all the time, but most rely to some
extent on these same basic component tools. Tip
One
alternative usage of these basic color correction tools is to apply them
via an adjustment layer, because you can then dial them back simply by
adjusting the layer’s opacity or hold them out from specific areas of
the image using masks or track matte selections. |
Color Finesse and Three-Way Color
Colorists define the look of
contemporary film and television. Make your way into the suite of a
high-end colorist, and whether he or she is working with Lustre,
Scratch, DaVinci Resolve, or even Apple Color you will find the same
three or four color pots and accompanying wheeled surface controllers.
This is also known as a three-way color corrector, and it has been the
major missing color tool in the shipping version of After Effects until
now. Synthetic Aperture’s Color Finesse version 3, now included with
After Effects, fills this gap.
Although Color Finesse is a full
color correction application that has been included with After Effects
for many years, major upgrades to the version 3 included with CS5
finally make it a toolset, for two basic reasons. First, it now has a simple
interface that runs in the Effect Controls panel, which provides
three-way color correction and more. Second, the full Color Finesse
application now offers a full complement of features, allowing you to
navigate through time and save your color work in the form of a LUT.
What does all of this
mean? Apply the SA Color Finesse 3 effect and twirl down the Simplified
Interface. Now play with the hue offsets; for a typical modern color
look, try dragging the point at the center of Shadows toward the cobalt
blue 4:00 and Highlights in the opposite direction, toward the orangey
10:00. Gently nudge the midtones toward 2:00 or so for a warm look, or
more like 8:00 for the Matrix (Figure 2).

Note
the other controls right here in the Effect Controls—Curves properties
with identical control to the Curves effect, but a friendlier
multichannel interface, as well as HSL and RGB controls corresponding to
Hue/Saturation and Levels, respectively. These are broken down to
correspond to all four color wheels: Master, Highlights, Midtones, and
Shadow effects.
You could perform all of your
color corrections here, without opening the full Color Finesse
interface, but when you do open it, you’ll find more ways to take
complete control of the color look (Figure 3).
In the lower left are slider controls for all four color modes: HSL,
RGB, its opposites CMY and the YCbCr controls of analog video, along
with full Curves and Levels controls (with histogram), a Levels
alternate called Luma Range, and a Secondary control for particular
colors you might want to isolate and change.
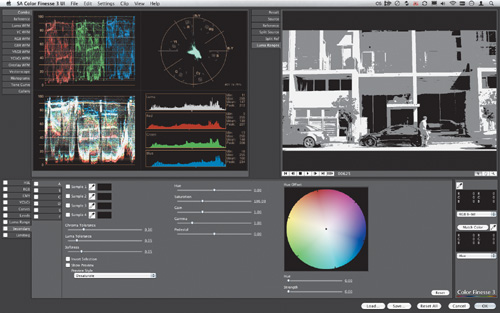
The
top half of Color Finesse contains most of the professional modes of
viewing and analyzing a digital video image for color. Parade,
vectorscope, histogram, and tone curve slices of the image as well as a
split view, a reference image toggle, and a luma range view to look only
for areas that might be blown out or crushed.
Finally, note that under the
File menu of Color Finesse, you can choose Export and t format, and the
application will create a file containing a 3D color lookup table that
can be saved for use in After Effects or used in most of the world’s
leading compositing and color correction applications, including those
you see on the list: Autodesk Lustre and Smoke, LUTher, Scratch, and
Truelight Cube, among others.
Close-up: Looks and Colorista II
Red
Giant Software was first to deliver three-way color correction to After
Effects in the form of its Magic Bullet Colorista plug-in, which it
followed with the more fully featured and unique Magic Bullet Looks,
which has now been followed by the deluxe Colorista II. These are worth
mentioning not only because they’re ubiquitous, but because Looks in
particular works according to a unique UI metaphor. It offers tools that
correspond to all five points from source to image: the subject, any
matte box filters, the lens, the recording medium, and postproduction
effects. It can be fun to concoct your own recipe from these modular
ingredients, or to rely on one of the presets that comes with the
application or can be purchased as add-on packages from Red Giant. |