The text layer was scaled to more than 200%
when you applied the Fit To Comp command to it earlier in this lesson.
Now, you’ll animate the layer’s scale so that the type gradually shrinks
down to its original size.
1. | In the Timeline panel, move the current-time indicator to 3:00.
|
2. | Select the Road Trip text layer, and press the S key to reveal its Scale property.
|
3. | Click the stopwatch icon ( ) to add a Scale keyframe at the current time (3:00). ) to add a Scale keyframe at the current time (3:00).
|
4. | Move the current-time indicator to 5:00.
|
5. | Reduce the layer’s Scale values to 100, 100%. After Effects adds a new Scale keyframe at the current time.
 |
Previewing the scale animation
Now, preview the change.
1. | Move
the current-time indicator to 5:10, and press N to set the end of the
work area. The scale animation ends shortly before 5:10.
|
2. | Watch a RAM preview of the animation from 0:00 to 5:10. The movie title fades in and then scales to a smaller size.

|
3. | Press the spacebar to stop playback after you’ve viewed the animation.
Tip
You can experiment with text scale animation presets,
included with After Effects. They’re located in the Presets/Text/Scale
folder in the After Effects CS5 folder on your hard drive.
|
Adding Easy Ease
The
beginning and end of the scale animation are rather abrupt. In nature,
nothing comes to an absolute stop. Instead, objects ease into and out of
starting and stopping points.
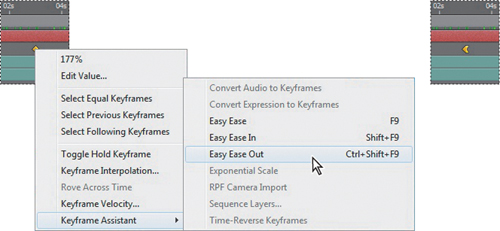
1. | Right-click
(Windows) or Control-click (Mac OS) the Scale keyframe at 3:00, and
choose Keyframe Assistant > Easy Ease Out. The keyframe becomes a
left-pointing icon.
 |
2. | Right-click
(Windows) or Control-click (Mac OS) the Scale keyframe at 5:00, and
choose Keyframe Assistant > Easy Ease In. The keyframe becomes a
right-pointing icon.

|
3. | Watch another RAM preview. Press the spacebar to stop it when you’re done.
|
4. | Choose File > Save. |