Specifying Color Separations
If
you choose either of the two separations print modes, you can specify
additional options for how the color separations will print.
You can choose to print with
the right reading emulsion up or down, and you can choose whether to
print a positive or negative image. You’ll notice that as you choose
these settings, the interactive print preview updates to show you how
the art will print. You can also choose a printer resolution; these
settings are specific to the printer to which you’ve to print. This
information comes from the PPD file chosen for your printer or RIP.
If your file contains
spot colors, you can convert them all to separate as process colors by
selecting the Convert All Spot Colors to Process option. This option is
even available when you’re printing composite proofs.
When you select the Overprint Black option, all objects that are colored 100% K overprint.
|
The
great news is that Illustrator has a Separations Preview panel. The bad
news is that it’s not much more than a bare-bones implementation. Like
the panels found in InDesign and Acrobat, the Separations Preview panel
in Illustrator enables you to preview individual color separations for
both process and spot colors (Figure 13.8)
onscreen. Choose Window > Separations Preview to open the panel, and
then select Overprint Preview to turn the feature on. Then, simply
click the display or hide icon (eye) of your desired color to view or
hide that plate. However, that’s where the similarities stop.
Illustrator doesn’t “sense” what colors are actually being used in the
document. For example, if you add five Pantone spot colors to your file
but use only one, all five are listed in the Separations Preview panel,
even though you didn’t use the other four. In addition, you do not have
options for viewing ink coverage percentages, areas with varnishes, and
other valuable print settings that you find in the Separations Preview
panels in InDesign and Acrobat.
|
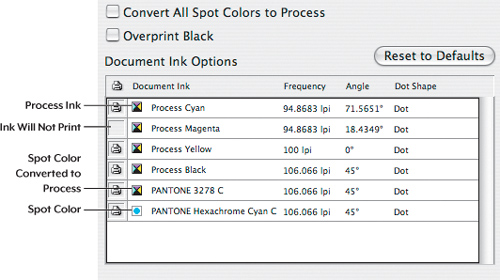
In the Document Ink
Options section of the Output panel, you can specify which plates are
sent to the printer and which settings each plate uses (Figure 7).
Colors that appear with a printer icon on the far left print. To
prevent an ink color from printing, click the printer icon to remove it.
Inks that appear with a four-color icon separate as process colors.
Inks that appear with a solid color icon print to their own plates as a
spot (custom) color. Clicking a solid color icon causes just that color
to separate as a process color. Additionally, you can specify custom
Frequency, Angle, and Dot Shape settings for each ink.
Exploring the Graphics Print Panel
The settings in the Graphics panel of the Print dialog box are mainly for specifying options for your print device.
Prior to the release of
Illustrator CS, the Document Setup dialog box contained an Object
Resolution setting that determined the flatness setting for Bézier paths
at output time. In CS versions of Illustrator the flatness setting is
set by default, based on information from the selected PPD file. You can
override this setting and use the slider to sacrifice path quality for
print performance (although it’s best to leave this setting alone).
By default, Illustrator downloads subsets of fonts to the printer when you print a file. Downloading a subset
simply means that Illustrator sends only the parts of a font that are
required to print the text in your document. For example, if you have
the word me in your document, Illustrator sends only the letters m and e
to the printer instead of the entire font (this practice speeds up
print times). You can override this behavior and choose Complete, which
forces Illustrator to download the entire font to the printer at print
time. Alternatively, you can choose not to download any fonts at all.
You choose this option if you have fonts installed in your printer (some
printers can contain hard drives and store fonts internally).
Tip
If
you have problems printing Illustrator files to older print devices,
try selecting the Compatible Gradient and Gradient Mesh Printing
options. |
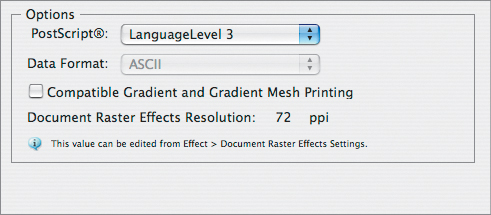
By default, Illustrator
chooses a PostScript language level that your selected printer will
support. LanguageLevel 3 PostScript can print documents with
transparency more reliably, and it contains smooth shading technology
that helps prevent banding from appearing in gradients. You can also
choose to send data to the printer in ASCII or in the default binary
format.
The resolution at which live effects are
rasterized is determined by the setting in the Document Raster Effects
Settings dialog box. Here in the Graphics panel of the Print dialog box,
Illustrator displays the current setting in that dialog box, allowing
you to double-check to make sure the setting is indeed correct for
printing (Figure 9).
Illustrator won’t allow you to change the setting from the Print dialog
box because changing the resolution setting may change the appearance
of your artwork. To change the resolution setting, click the Done button
in the Print dialog box, and choose Effect > Document Raster Effects
Settings. You can then return to the Print dialog box to print your
file.
Exploring the Color Management Print Panel
If you really want to learn everything there is to know about color
management, you should check out Real World Color Management, Second Edition, by Bruce Fraser, Chris Murphy, and Fred Bunting (Peachpit Press, 2005).
However, for the settings
found in the Color Management panel of the Print dialog box:
Document Profile.
The Document Profile setting displays the color profile that is
currently embedded (or assumed) in the file. If you didn’t manually
choose one, the profile you see here is the profile that is chosen in
the Color Settings dialog box.
Color Handling.
The Color Handling setting allows you to determine whether Illustrator
will perform any necessary color adjustments (based on the chosen
printer profile) or whether your printer will handle any required
conversion on its own. Unless you are working within a proprietary
workflow system, you should always let Illustrator determine colors, not
the printer.
Printer Profile.
When the Color Handling option is set to Let Illustrator Determine
Colors, the Printer Profile setting lets you specify a profile for your
printer. This gives Illustrator the information it needs to change
colors so they look correct on your printer. If the Color Handling
option is set to Let PostScript Printer Determine Colors, the Printer
Profile setting is not applicable.
Rendering Intent. If some colors in your document cannot be reproduced on a given output device, the colors are considered out of gamut
and must be converted to colors that will reproduce on the output
device. There are different methods for converting these colors, and the
Rendering Intent setting determines the method used. The most commonly
used method, Relative Colorimetric, moves out-of-gamut colors to the
closest possible color that will print on the device. It also adjusts
other colors so that colors appear to be accurate. The Absolute
Colorimetric setting adjusts only out-of-gamut colors and may result in posterization, where many shades of similar colors are used. The Perceptual method shifts colors so that they appear correct relative to each
other, but it may not represent colors as being the most accurate match
to the original values. The Saturation method enhances colors and makes
them more vibrant and most suitable for business presentations where
bright colors are more important than accurate colors.
Preserve CMYK Numbers.
The Preserve CMYK Numbers setting is active only when Color Handling is
set to the Let PostScript Printer Determine Colors option. With
Preserve CMYK Numbers active, color values remain untouched in native
artwork and text components.
Exploring the Advanced Print Panel
The Advanced panel in the Print
dialog box gives you control over important settings such as
overprinting and transparency flattening.
If your document contains overprint settings, you can choose from one of three settings to control overprint behavior:
Preserve. The Preserve option leaves all overprints intact in your file.
Note
The Print as Bitmap option is available for non-PostScript printers only and rasterizes all artwork in your file for printing. |
Discard.
The Discard option strips your file of any overprint commands. Those
who have proprietary production systems or advanced trapping software in
their RIPs will find this option useful. Rather than use a designer’s
overprint settings, the trapping software applies and determines all
overprint behavior.
Simulate.
The Simulate option, available only when printing composite proofs,
simulates overprints in the printout, giving the correct appearance of
the final output in the proof.
If your document contains
transparency, you can choose from a list of predefined transparency
flattener presets. Illustrator ships with three presets called Low
Resolution, Medium Resolution, and High Resolution, but you can also
define your own custom option for your particular print session by
choosing Edit > Transparency Flattener Presets.
Defining Print Presets
Note
If you delete your application preferences, you won’t lose your saved print presets. |
As you’ve undoubtedly
seen, the Print dialog box in Illustrator contains a plethora of
settings, and going through each panel to make sure the settings are
correct is an exercise in patience. Print presets allow you to capture all the
options set in the different Print dialog box panels so that you can
easily retrieve those settings at any time. To create a print preset,
click the Save Preset button (the disk icon) at the top right of the
Print dialog box; to manage your presets, choose Edit > Print
Presets. Print presets are saved in XML and are cross-platform, so you
can import and export them and distribute them among others.