As a site grows, so does the number of templates it
employs. Overall management of your templates is conducted through the
Templates category of the Assets panel. You can open the Templates
category by choosing Window => Assets and clicking the Template icon on the left side of the Assets panel. The Templates category, shown in Figure 1,
displays a list of the current site's available templates in the lower
pane and a preview of the selected template in the upper pane.
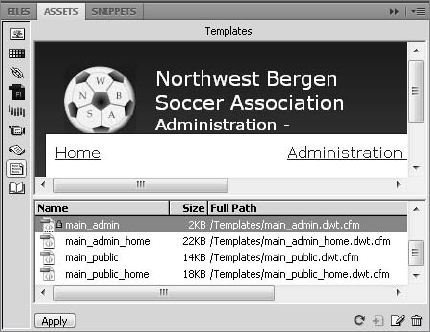
The Templates category has these five buttons along the bottom:
Apply:
Creates a document derived from the currently selected template if the
current document is blank; if the current document is based on a
template, this option changes the locked regions of the document to
match the selected template.
Refresh Site List: Displays the list of all templates currently in the site.
New Template: Creates a new blank template.
Edit: Loads the selected template for modification.
Delete: Removes the selected template.
The Assets panel's context menu offers all these options and more, as explained in Table 1.
Table 1. Template Category Context Menu
| Command | Description |
|---|
| Refresh Site List | Displays the list of all templates currently in the site cache. |
| Recreate Site List | Reloads the template site list into the cache. |
| New Template | Starts a new blank template. |
| Edit | Opens the selected template for modifying. |
| Apply | Creates
a document derived from the currently selected template if the current
document is blank. If the current document is based on a template, this
option changes the locked regions of the document to match the selected
template. The same effects can also be achieved by dragging the template
from the Assets panel to the current document. |
| Rename | Renames the selected template. |
| Delete | Removes the selected template. |
| Update Current Page | Applies any changes made in the template to the current page, if the current page is derived from a template. |
| Update Site | Applies any changes made in any templates to all template-based documents in the site. |
| Copy to Site | Copies the highlighted template, but none of the dependent files, to the selected site. |
| Locate in Site | Opens the Site panel and highlights the selected template. |
1. Creating a blank template
Not all templates are created
from existing documents. Some Web designers prefer to create their
templates from scratch. To create a blank template, follow these steps:
Open the Templates category of the Assets panel by selecting its symbol.
From the Templates category, select New Template. A new, untitled template is created.
Enter a title for your new template and press Enter (Return).
While the new template is selected, click the Edit button. The blank template opens in a new Dreamweaver document window.
Insert your page elements.
Mark any elements or areas as editable regions using one of the methods previously described.
2. Opening and deleting templates
You can edit a template — to change the locked or editable regions — in several ways. To use the first method, choose File => Open and, in the Select File dialog box, change the Files Of Type to Template Files (*.dwt)
on Windows systems, or select Template Files from the Enable drop-down
list on Macintosh systems. Then, locate the Templates folder in your
defined site to select the template to open.
The second method of opening a
template for modification uses the Templates category of the Assets
panel. Select a template to modify and click the Edit button. You can
also double-click your template to open it for editing. Finally, if
you're working in the Site panel, open a template by selecting the
Templates folder for your site and opening any of the files found there.
|
After you've made your
modifications to the template, you don't have to use the Save As
Template command to store the file — you can use the regular File =>
Save command or the keyboard shortcut Ctrl+S (Command+S). Likewise, if
you want to save your template under a new name, use the Save As
command.
|
|
As with any set of files, there
comes a time to clean house and remove files that are no longer in use.
To remove a template, first open the Templates category of the Assets
panel. Next, select the file you want to remove and click the Delete
button.
|
Be forewarned:
Dreamweaver does not alert you if files exist that were created from
the template that you're about to delete. Deleting the template, in
effect, "orphans" those documents, and they can no longer be updated via
a template.
|
|
3. Applying templates
Dreamweaver makes it easy to try
a variety of different looks for your document while maintaining the
same content. After you've created a document from a template, you can
apply any other template to it. The only requirement is that the two
templates have editable regions with the same names. When might this
feature come in handy? In one scenario, you might develop a number of
possible Web site designs for a client and create templates for each
approach, which are then applied to the identical content. Or, in an
ongoing site, you could completely change the look of a catalog
seasonally but retain all the content.
To apply a template to a document, follow these steps:
Open the Templates category of the Assets panel.
Make sure the Web page to which you want to apply the style is the active document.
From the Templates category, select the template you want to use and click the Apply button.
|
You can also drag onto the current page the template you'd like to apply or choose Modify => Templates => Apply Template to Page from the menus.
|
|
If
content exists without a matching editable region, Dreamweaver displays
the Choose Editable Region For Orphaned Content dialog box. To receive
the content, select one of the listed editable regions from the template
being applied and click OK.
The new template is applied to the document, and all the new locked areas replace all the old locked areas.
4. Mapping inconsistent template regions
When Dreamweaver applies a
template to a page, it attempts to map the regions on the two pages to
one another. If there is a one-to-one correspondence between the regions
on the page and on the template — for every editable region in the
template, an editable region exists with the same name on the page —
everything goes smoothly, and the template is applied without incident.
If, however, the region names do not match — for example, the template's
main content area is called theContent, whereas the page's main content area is called mainContent — Dreamweaver gives you the opportunity to place the content properly with the Inconsistent Region Names dialog box, shown in Figure 2.
The Inconsistent Region
Names dialog box appears automatically when Dreamweaver finds regions
that do not match in a template and the document to which the template
is being applied. You can map the content in the document to any region
in the template or discard the content. However, you cannot ignore the
unmapped content; Dreamweaver does not proceed with the template
application until all inconsistently named regions are addressed in some
fashion.
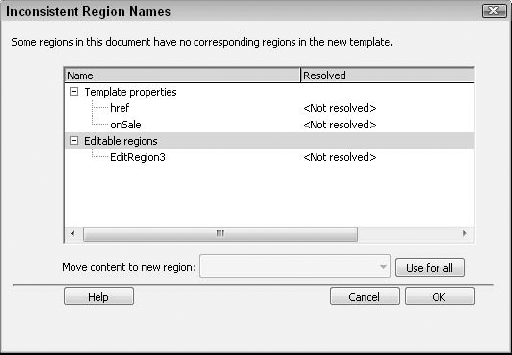
To handle inconsistently named regions, follow these steps:
When the Inconsistent Region Names dialog box appears, select the first unresolved region.
From the Move Content To New Region drop-down list, select the region you want to assign to the unmapped region.
If no region is suitable and you want to discard the content, choose Nowhere from the list.
To use the same choice for all regions displayed, choose the Use For All option.
To map another region, select its name from the list and repeat Steps 2 through 4.
Click OK when you're finished.
You always find certain regions, such as doctitle and head,
listed in the Move Content To New Region list. In general, you would
not want to move any body-area content into these regions.
|
The region names must
match precisely — including the case of the two names — or the
Inconsistent Region Names dialog box appears. |