Every iPad comes with Wi-Fi capability built in. If
you have a 3G model (you can tell it's 3G because there is a black
plastic strip along the top edge), then you have both 3G and Wi-Fi. So
let's take a look at getting connected to the Wi-Fi network. Things to
consider about Wi-Fi connections are:
No additional cost
for network access and data downloads (if you are using your iPad in
your home, office, or a free Wi-Fi hotspot).
Wi-Fi tends to be faster than a Cellular Data 3G connection.
More and more places, including airplanes, provide Wi-Fi access, but you may have to pay a one-time or monthly service fee.
1. Setting Up Your Wi-Fi Connection
To setup your Wi-Fi connection, follow these steps:
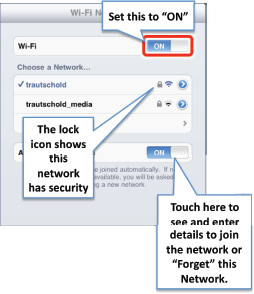
Tap Wi-Fi in the left column to see the screen shown at the right.
Make sure the Wi-Fi switch is set to On. Tap it if it is Off.
Once Wi-Fi is ON, the iPad will automatically start looking for wireless networks.
The list of accessible networks is shown below the Choose a Network... option. You can see in this screenshot that we have two networks available.

To connect to any network
listed, just touch it. If the network is unsecure (does not require a
password), you will be connected automatically.
NOTE
Some places, like
coffee shops, use a web-based login instead of a username/password
screen. In those cases, when you click on the network (or try to use
Safari), iPad will slide up a browser screen and you'll see the web page
along with login options.
2. Secure Wi-Fi Networks—Entering a Password
Some Wi-Fi networks require a
password to log in. This is set when the network administrator creates
the wireless network. You will have to know the exact password,
including whether it is case-sensitive.

If the network does
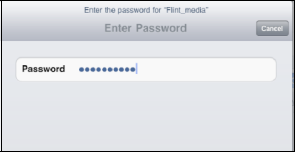
require a password, you will be taken to the password-entry screen. Type
the password exactly as given to you and press the enter key on the
on-screen keyboard (which is now labeled as Join).
On the next network screen: you'll see a checkmark showing that your are connected to the network.
|
You can paste into the
password dialog, so for longer, random passwords, you can transfer them
to your iPad (in an email message) and just copy and paste them. Just
remember to delete the e-mail immediately after to keep things secure.
|
|
3. Switching to a Different Wi-Fi Network
At times you may want to
change your active Wi-Fi network. This might occur if you are in a
hotel, apartment or other place where the network selected by the iPad
is not the strongest network, or you want to use a secure network
instead of an unsecure one.
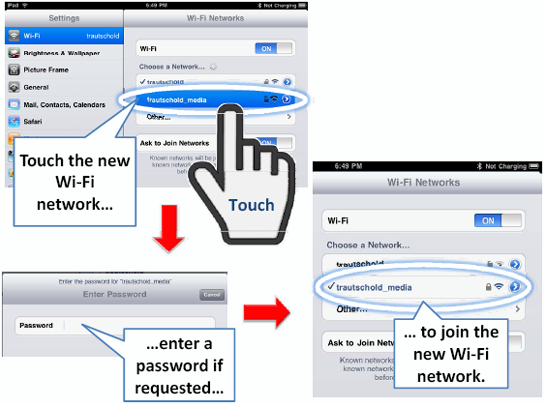
To switch from the currently selected Wi-Fi network, tap the Settings icon, touch Wi-Fi
in the left column, then touch the name of the Wi-Fi network you want
to join. If that network requires a password, you'll need to enter it to
join. (See Figure 1.)

Once you type the correct password (or if you touched an open network), your iPad will join that network.
4. Verifying Your Wi-Fi Connection
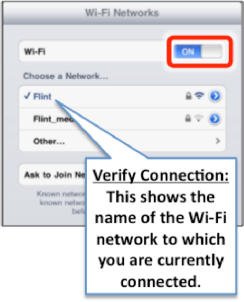
To verify that you are connected to a Wi-Fi network, look for the network name with the checkmark next to it.
When you go back to the Settings screen, you should now see the name of your Wi-Fi network with a checkmark next to it in the list under Choose a Network.
