1. The When and How of Handouts
Presentation professionals are
divided about how and when to use handouts most effectively. Here are
some of the many conflicting viewpoints. I can't say who is right or
wrong, but each of these statements brings up issues that you should
consider. The bottom line is that each of them is an opinion on how much
power and credit to give to the audience; your answer may vary
depending on the audience you are addressing.
You
should give handouts at the beginning of the presentation. The audience
can absorb the information better if they can follow along on paper.
This
approach makes a lot of sense. Research has proven that people absorb
more facts if presented with them in more than one medium. This approach
also gives your audience free will; they can listen to you or not, and
they still have the information. It's their choice, and this can be
extremely scary for less-confident speakers. It's not just a speaker
confidence issue in some cases, however. If you plan to give a lot of
extra information in your speech that's not on the handouts, people
might miss it if you distribute the handouts at the beginning because
they're reading ahead.
You
shouldn't give the audience handouts because they won't pay as close
attention to your speech if they know that the information is already
written down for them.
This
philosophy falls at the other end of the spectrum. It gives the
audience the least power and shows the least confidence in their ability
to pay attention to you in the presence of a distraction (handouts). If
you truly don't trust your audience to be professional and listen, this
approach may be your best option. However, don't let insecurity as a
speaker drive you prematurely to this conclusion. The fact is that
people won't take away as much knowledge about the topic without
handouts as they would if you provide handouts. So, ask yourself if your
ultimate goal is to fill the audience with knowledge or to make them
pay attention to you.
You
should give handouts at the end of the presentation so that people will
have the information to take home but not be distracted during the
speech.
This
approach attempts to solve the dilemma with compromise. The trouble with
it, as with all compromises, is that it does an incomplete job from
both angles. Because audience members can't follow along on the handouts
during the presentation, they miss the opportunity to jot notes on the
handouts. And because the audience knows that handouts are coming, they
might nod off and miss something important. The other problem is that if
you don't clearly tell people that handouts are coming later, some
people spend the entire presentation frantically copying down each slide
on their own notepaper.
2. Creating Handouts
To create handouts, you
simply decide on a layout (a number of slides per page) and then choose
that layout from the Print dialog box as you print. No muss, no fuss! If
you want to get more involved, you can edit the layout in Handout
Master view before printing.
2.1. Choosing a Layout
Assuming you have decided
that handouts are appropriate for your speech, you must decide on the
format for them. You have a choice of one, two, three, four, six, or
nine slides per page.
1: Places a single slide vertically and horizontally "centered" on the page.
2:
Prints two big slides on each page. This layout is good for slides that
have a lot of fine print and small details or for situations where you
are not confident that the reproduction quality will be good. There is
nothing more frustrating for an audience than not being able to read the
handouts!
3:
Makes the slides much smaller — less than one-half the size of the ones
in the two-slide layout. But you get a nice bonus with this layout:
lines to the side of each slide for note-taking. This layout works well
for presentations where the slides are big and simple, and the speaker
is providing a lot of extra information that isn't on the slides. The
audience members can write the extra information in the note-taking
space provided.
4:
Uses the same size slides as the three-slide layout, but they are
spaced out two-by-two without note-taking lines. However, there is still
plenty of room above and below each slide, so the audience members
still have lots of room to take notes.
6:
Uses slides the same size as the three-slide and four-slide layouts,
but crams more slides on the page at the expense of note-taking space.
This layout is good for presentation with big, simple slides where the
audience does not need to take notes. If you are not sure if the
audience will benefit at all from handouts being distributed, consider
whether this layout would be a good compromise. This format also saves
paper, which might be an issue if you need to make hundreds of copies.
9:
Makes the slides very tiny, almost like a Slide Sorter view, so that
you can see nine at a time. This layout makes them very hard to read
unless the slide text is extremely simple. I don't recommend this layout
in most cases, because the audience really won't get much out of such
handouts.
|
One good use for the
nine-slides model is as an index or table of contents for a large
presentation. You can include a nine-slides-per-page version of the
handouts at the beginning of the packet that you give to the audience
members, and then follow it up with a two-slides-per-page version that
they can refer to if they want a closer look at one of the slides.
|
|
Finally, there is an Outline
handout layout, which prints an outline of all of the text in your
presentation — that is, all of the text that is part of placeholders in
slide layouts; any text in extra text boxes you have added manually is
excluded. It is not considered a handout when you are printing, but it
is included with the handout layouts in the Handout Master.
2.2. Printing Handouts
When you have decided which layout is appropriate for your needs, print your handouts as follows:
(Optional)
If you want to print only one particular slide, or a group of slides,
select the ones you want in either Slide Sorter view or in the slide
thumbnails task pane on the left.
Select File => Print. The Print options appear.
Enter
a number of copies in the Copies text box. The default is 1. If you
want the copies collated (applicable to multi-page printouts only), make
sure you mark the Collate check box.
Set options for your printer or choose a different printer.
If
you do not want to print all the slides, type the slide numbers that
you want into the Slides text box. Indicate a contiguous range with a
dash. For example, to print slides 1 through 9, type 1-9. Indicate noncontiguous slides with commas. For example, to print slides, 2, 4, and 6, type 2, 4, 6. Or to print slides 2 plus 6 through 10, type 2, 6-10. To print them in reverse order, type the order that way, such as 10-6, 2.
Alternatively, you can click Print All Slides to open a menu of range choices, and choose one of these from its list:
Print Selection
to print multiple slides you selected before you issued the Print
command. It is not available if you did not select any slides
beforehand.
Print Current Slide to print whatever slide you selected before you issued the Print command.
Custom Range
to print the slide numbers that you type in the Slides text box. When
you enter slide numbers in the Slides text box, this option gets
selected automatically, so usually you don't have to select this option
manually.
Custom Show
to print a certain custom show you have set up. Each custom show you
have created appears on the list. You won't see any custom shows if you
haven't created any.
(Optional)
Hidden slides are printed, by default. If you don't want to print
hidden slides, click the same button again to reopen the menu and click
Print Hidden Slides to toggle the check mark off next to that command.
Click Full Page Slides to open a menu of views you can print.
On the menu that appears, click the number and layout of handouts you want. See Figure 1.
NOTE
You can choose in step 8 to
print an Outline if you prefer. An outline can be a useful handout for
an audience in certain situations.
(Optional) Click the Color button and select the color setting for the printouts:
Color:
This is the default. It sends the data to the printer assuming that
color will be used. When you use this setting with a black-and-white
printer, it results in slides with grayscale or black backgrounds. Use
this setting if you want the handouts to look as much as possible like
the on-screen slides.
Grayscale:
Sends the data to the printer assuming that color will not be used.
Colored backgrounds are removed, and if text is normally a light color
on a dark background, that is reversed. Use this setting if you want
PowerPoint to optimize the printout for viewing on white paper.
Pure Black and White: This format hides most shadows and patterns, as described in Table 1. It's good for faxes and overhead transparencies.
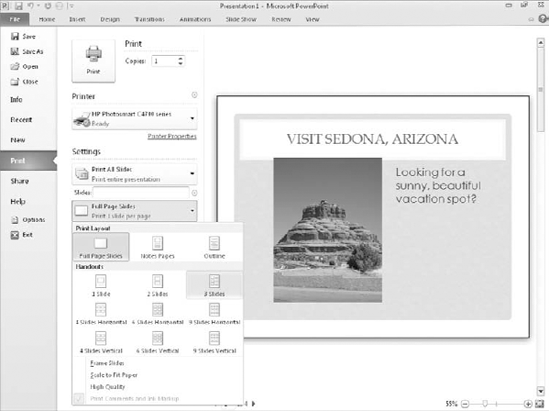
Table 1. Differences Between Grayscale and Pure Black and White
| Object | Grayscale | Pure Black and White |
|---|
| Text | Black | Black |
| Text Shadows | Grayscale | Black |
| Fill | Grayscale | Grayscale |
| Lines | Black | Black |
| Object Shadows | Grayscale | Black |
| Bitmaps | Grayscale | Grayscale |
| Clip Art | Grayscale | Grayscale |
| Slide Backgrounds | White | White |
| Charts | Grayscale | White |
|
To see what your
presentation will look like when printed to a black-and-white printer,
on the View tab click Grayscale or Pure Black and White. If you see an
object that is not displaying the way you want, right-click it and
choose Grayscale or Black and White. One of the options there may help
you achieve the look you're after.
|
|
(Optional)
If desired, open the drop-down list from which you chose the handout
layout and select any of these additional options:
Frame Slides: Draws a black border around each slide image. Useful for slides being printed with white backgrounds.
Scale to Fit Paper:
Enlarges the slides to the maximum size they can be and still fit on
the layout .
High Quality: Optimizes the appearance of the printout in small ways, such as allowing text shadows to print.
Print Comments and Ink Markup: Prints any comments that you have inserted with the Comments feature in PowerPoint.
Check the preview of your handouts, which appears at the right. Make any necessary changes.
Click Print. The handouts print, and you're ready to roll!
NOTE
Beware of the cost of
printer supplies. If you are planning to distribute copies of the
presentation to a lot of people, it may be tempting to print all of the
copies on your printer. But the cost per page of printing is fairly
high, especially if you have an inkjet printer. You will quickly run out
of ink in your ink cartridge and have to spend $20 or more for a
replacement. Consider whether it might be cheaper to print one original
and take it to a copy shop.
2.3. Setting Printer-Specific Options
In addition to Print
settings in PowerPoint that you learned about in the preceding section,
there are controls you can set that affect the printer you have chosen.
Notice that a printer's name appears under the Printer heading in Figure 19-1.
Click that printer's name to open a menu of additional printers you can
select instead. These are the printers installed on your PC (either
local or network).
NOTE
Some of the "printers"
listed are not really physical printers but drivers that create other
types of files. For example, Fax saves a copy of the file in a format
that is compatible with the Fax driver included in Windows. It doesn't
produce a hard copy printout.
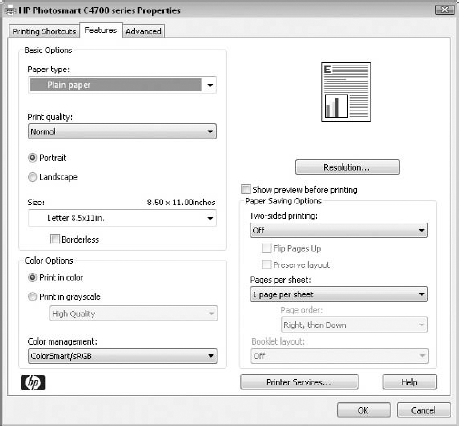
After selecting
the desired printer, click the Printer Properties hyperlink beneath the
name. A Properties dialog box opens that is specific to that printer. Figure 2
shows the box for my HP PhotoSmart C4700 printer, an all-in-one inkjet.
Notice that there are three tabs: Printing Shortcuts, Features, and
Advanced. The tabs may be different for your printer.
These settings affect how the
printer behaves in all Windows-based programs, not just in PowerPoint,
so you need to be careful not to change anything that you don't want
globally changed. Here are some of the settings you may be able to
change on your printer. (Not all of these are shown in Figure 2.)
Paper Size: The default is Letter, but you can change to Legal, A4, or any of several other sizes.
Paper Source: If your printer has more than one paper tray, you may be able to select Upper or Lower.
Paper Type:
Some printers print at different resolutions or with different settings
depending on the type of paper (for example, photo paper versus regular
paper). You can choose the type of paper you are printing on.
Print Quality:
Some printers give you a choice of quality levels, such as Draft,
Normal, and Best. Draft is the quickest; Best is the slowest and may use
more ink.
Duplex or Print on Both Sides:
Some printers enable you to print on both sides of the paper. Some
printers flip the paper over automatically but most prompt you to flip
it over manually.
Orientation:
You can choose between Portrait and Landscape. It's not recommended
that you change this setting here, though; make such changes in the Page
Setup dialog box in PowerPoint instead. Otherwise, you may get the
wrong orientation on a printout in other programs.
Page Order: You can choose Front to Back or Back to Front. This determines the order the pages print.
Pages Per Sheet:
The default is 1, but you can print smaller versions of several pages
on a single sheet. This option is usually only available on PostScript
printers.
Copies:
This sets the default number of copies that should print. Be careful;
this number is a multiplier. If you set two copies here, and then set
two copies in the Print dialog box in PowerPoint, you end up with four
copies.
Graphics Resolution:
If your printer has a range of resolutions available, you may be able
to choose the resolution you want. My printer lets me choose between 300
and 600 dots per inch (dpi); on an inkjet printer, choices are usually
360, 720, and 1,440 dpi. Achieving a resolution of 1,440 on an inkjet
printer usually requires special glossy paper.
Graphic Dithering: On some printers, you can set the type of dithering that makes up images. Dithering
is a method of creating shadows (shades of gray) from black ink by
using tiny crosshatch patterns. You may be able to choose between
Coarse, Fine, and None.
Image Intensity: On some printers, you can control the image appearance with a light/dark slide bar.
Some printers, notably
inkjets, come with their own print-management software. If that's the
case, you may have to run that print-management software separately from
outside of PowerPoint for full control over the printer's settings. You
can usually access such software from the Windows Start menu.
2.4. Using the Handout Master
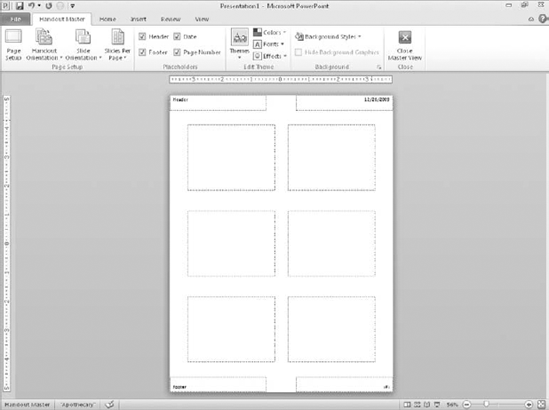
Just as the Slide
Master controls your slide layout, the Handout Master controls your
handout layout. To view the Handout Master, on the View tab click
Handout Master, as shown in Figure 3. Unlike the Slide Master and Title Master, you can have only one Handout Master layout per presentation.
You can do almost exactly the
same things with the Handout Master that you can with the Slide Master.
The following sections describe some of the common activities.
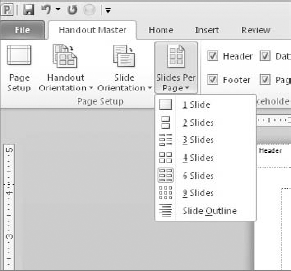
2.5. Setting the Number of Slides Per Page
You can view the Handout
Master with various numbers of slides per page to help you see how the
layout will look when you print it. However, the settings are not
different for each number of slides per page; for example, if you apply a
header or footer, or page background, for a three-slides-per-page
layout, it also applies to all the others. To choose the number of
slides per page to display as you work with the Handout Master, click
the Slides Per Page button and then make your selection from its menu.
See Figure 4.
2.6. Using and Positioning Placeholders
The Handout Master
has four placeholders by default: Header, Footer, Date, and Page Number,
in the four corners of the handout respectively:
Header:
Appears in the upper-left corner, and is a blank box into which you can
type fixed text that will appear on each page of the printout.
Footer: Same thing as Header but appears in the lower-left corner.
Date: Appears in the upper-right corner, and shows today's date by default.
Page Number:
Appears in lower-right corner and shows a code for a page number
<#>. This will be replaced by an actual page number when you
print.
In each placeholder box, you
can type text (replacing, if desired, the Date and Page codes already
there). You can also drag the placeholder boxes around on the layout.
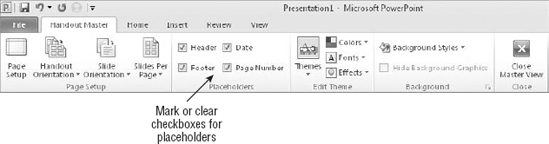
There are two ways to remove
the default placeholders from the layout. You select the placeholder box
and press Delete, or you can clear the check box for that element on
the Handout Master tab as shown in Figure 5.
NOTE
Because the header and
footer are blank by default, there is no advantage to deleting these
placeholders unless they have something in them you want to dispose of;
having a blank box and having no box at all have the same result.
|
You can't move or resize the slide
placeholder boxes on the Handout Master, nor can you change its
margins. If you want to change the size of the slide boxes on the
handout or change the margins of the page, consider exporting the
handouts to Word and working on them there.
|
|
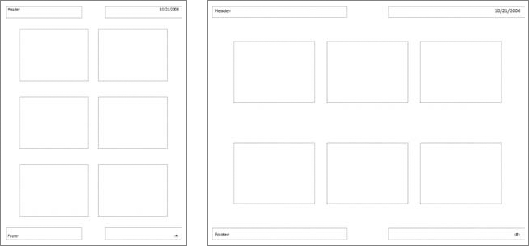
2.7. Setting Handout and Slide Orientation
Orientation refers to the
direction on the page the material runs. If the top of the paper is one
of the narrow edges, it's called Portrait; if the top of the paper is a
wide edge, it's Landscape. Figure 6 shows the difference in handout orientation.
You can also set an orientation
for the slides themselves on the handouts. This is a separate setting
that does not affect the handout page in terms of the placement of the
header, footer, and other repeated elements. Figure 7 shows the difference between portrait and landscape slide orientation on a portrait handout.

To set either of these orientations, use their respective drop-down lists on the Handout Master tab, in the Page Setup group.
2.8. Formatting Handouts
You can manually format any
text on a handout layout using the formatting controls on the Home tab,
the same as with any other text. Such formatting affects only the text
you select, and only on the layout you're working with. You can also
select the entire placeholder box and apply formatting.
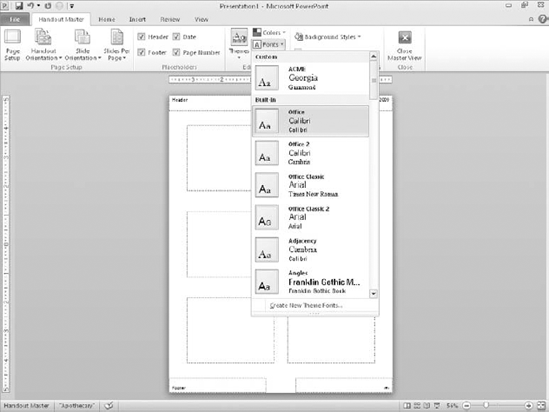
You can also apply Colors, Fonts, and/or Effects schemes from the Edit Theme group, as shown in Figure 8,
much like you can do for the presentation as a whole. The main
difference is that you cannot select an overall theme from the Themes
button; all the themes are unavailable from the list while in Handout
Master view. The settings you apply here affect only the handouts, not
the presentation as a whole.
NOTE
You probably won't have
much occasion to apply an Effects scheme to a handout layout because
handouts do not usually have objects that use effects (i.e., drawn
shapes, charts, or SmartArt diagrams).