IT tutorials
 
Office
 

Microsoft Word 2010 : Sharing a Document Through Windows Live and Word Web App (part 2) - Working with SkyDrive - Saving a Document in a Custom Windows Live Folder

- Free product key for windows 10
- Free Product Key for Microsoft office 365
- Product Key Free : Microsoft Office 2019 – Serial Number
6/14/2013 7:26:09 PM
1.2 Saving a Document in a Custom Windows Live (SkyDrive) Folder

You can create and manage your own folders on SkyDrive through the Windows Live website. Word also enables you to create a new SkyDrive folder while you’re saving a document to the web. Here’s how to create a new SkyDrive folder while saving a document:

1.
Make sure your document is ready to be shared and is open in Word.

2.
On the File tab, click Save & Send.

3.
Click Save to Web.

4.
Click Sign In.

5.
Type your email address and password in the sign-in dialog box; then click OK.
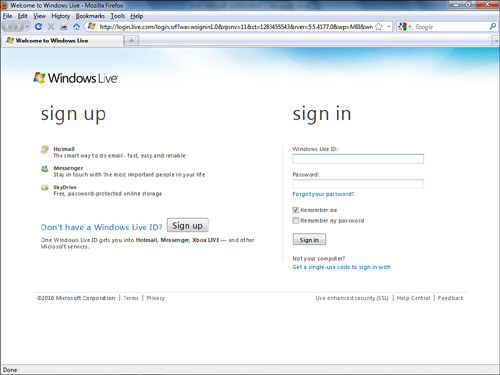
6.
When Word displays the list of your available Windows Live folders, click New. Your web browser opens and displays the Windows Live sign-in page, as shown in Figure 5.
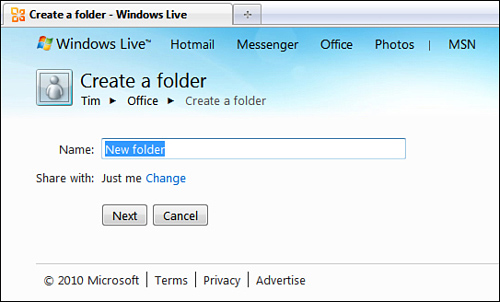
Figure 5. Signing in to the Windows Live website.

7.
Type your email address and password, if necessary; then click Sign In. The Create a Folder page appears in your browser, as shown in Figure 6.

Figure 6. Creating a new SkyDrive folder.

8.
Click the Name box and type a new name for the folder.
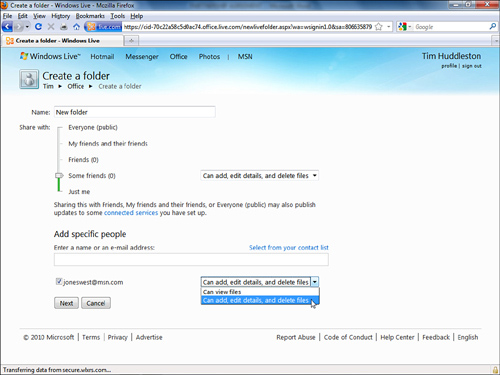
9.
Click the Change link next to the Share With option, and click one of the following options:

  • Everyone (Public): Makes the folder available to anyone who happens to stumble across it. Don’t put anything in such a folder unless you’re OK with the idea of the whole world seeing it.

  • My Friends And Their Friends: Makes the folder available to the people who belong to your Windows Live network, and members of their networks too.

  • My Friends: Makes the folder available to the people who belong to your Windows Live network, meaning they are included in your Windows Live contact list. (That’s the list of email addresses you have saved in Hotmail or Windows Live Mail.)

  • Some Friends: Enables you to select certain friends from your network.

  • Just Me: Keeps the folder private, so only you can access it.

  • Add Specific People: Lets you pick the people or groups that can share the new folder. To select individuals from your Windows Live contact list, click the Enter a Name or an E-mail Address box and start typing a name or email address. If any names or addresses match what you type, they appear in a drop-down list; click the one you want to add to the list of shares. Alternatively, you can click the Select From Your Contact List link to open a list that shows all your existing Windows Live contacts.

When you select an option, a drop-down menu of access privilege options appears next to it, as shown in Figure 7.

Figure 7. Setting access privileges for an individual who shares the new folder.

10.
Click the drop-down arrow; then click one of the following options to assign a level of access privileges to each person you select:

  • Can View Files: The selected individual can open and read files in the folder.

  • Can Add, Edit Details, and Delete Files: The selected individual can read, revise, and delete files in the folder.

11.
Select additional individuals and set their access privileges, as needed.

To remove anyone from the list of shares, clear the check box next to the name of that network, category, or individual.
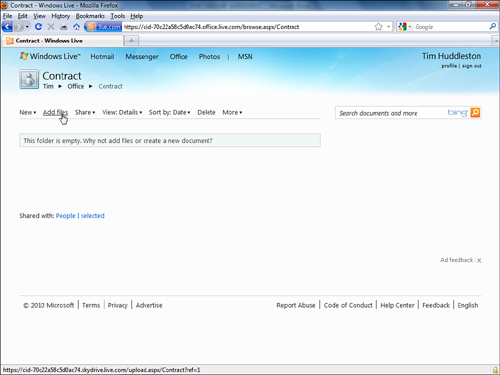

12.
Click Next. Your browser displays a new page representing the new, empty folder, as shown in Figure 8.
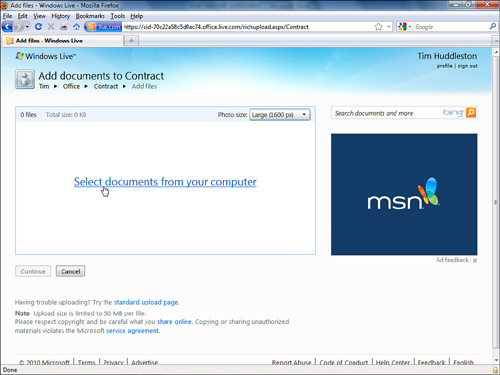
Figure 8. The new SkyDrive folder is ready for you to add files.

13.
Click the Add Files link. The page updates to display a large box where you can upload documents, as shown in Figure 9. However, since we started this process in Word, let’s go back there to finish.

Figure 9. You can use this page to upload files from your computer to your new SkyDrive folder.

14.
Return to Word and click Refresh. Word updates the list of SkyDrive folders to include the one you just created.

15.
Click the new folder’s name; then click Save As. The Save As dialog box opens.

16.
Click Save to store the document in the new SkyDrive folder.

You and anyone on the shared list can now access the document from the SkyDrive folder in a web browser.

 
Others
 
- Microsoft Word 2010 : Sharing a Document Through Windows Live and Word Web App (part 1) - Working with SkyDrive - Saving a Document in a Default Windows Live Folder
- Microsoft OneNore 2010 : Inserting Pictures and Screen Clippings (part 4) - Collecting All Future Screen Clippings in One Place
- Microsoft OneNore 2010 : Inserting Pictures and Screen Clippings (part 3) - Inserting a Screen Clipping with Quick Filing
- Microsoft OneNore 2010 : Inserting Pictures and Screen Clippings (part 2) - Inserting a Picture from a Scanner, Inserting a Screen Clipping on the Current Page
- Microsoft OneNore 2010 : Inserting Pictures and Screen Clippings (part 1) - Inserting a Picture from a File, Inserting Pictures into Notes
- Microsoft OneNore 2010 : Collecting and Researching Information - Meet the OneNote Screen Clipper and Launcher
- Microsoft Outlook 2010 : Using RSS Feeds in Outlook (part 3) - Managing Messages
- Microsoft Outlook 2010 : Using RSS Feeds in Outlook (part 2) - Managing Folders
- Microsoft Outlook 2010 : Using RSS Feeds in Outlook (part 1) - Adding RSS Feeds, Viewing RSS Feeds
- Microsoft Access 2010 : Customizing Fields - Indexing Field Values, Validating Data Entry
 
 
Top 10
 
- Microsoft Visio 2013 : Adding Structure to Your Diagrams - Finding containers and lists in Visio (part 2) - Wireframes,Legends
- Microsoft Visio 2013 : Adding Structure to Your Diagrams - Finding containers and lists in Visio (part 1) - Swimlanes
- Microsoft Visio 2013 : Adding Structure to Your Diagrams - Formatting and sizing lists
- Microsoft Visio 2013 : Adding Structure to Your Diagrams - Adding shapes to lists
- Microsoft Visio 2013 : Adding Structure to Your Diagrams - Sizing containers
- Microsoft Access 2010 : Control Properties and Why to Use Them (part 3) - The Other Properties of a Control
- Microsoft Access 2010 : Control Properties and Why to Use Them (part 2) - The Data Properties of a Control
- Microsoft Access 2010 : Control Properties and Why to Use Them (part 1) - The Format Properties of a Control
- Microsoft Access 2010 : Form Properties and Why Should You Use Them - Working with the Properties Window
- Microsoft Visio 2013 : Using the Organization Chart Wizard with new data
Technology FAQ
- Is possible to just to use a wireless router to extend wireless access to wireless access points?
- Ruby - Insert Struct to MySql
- how to find my Symantec pcAnywhere serial number
- About direct X / Open GL issue
- How to determine eclipse version?
- What SAN cert Exchange 2010 for UM, OA?
- How do I populate a SQL Express table from Excel file?
- code for express check out with Paypal.
- Problem with Templated User Control
- ShellExecute SW_HIDE
programming4us programming4us