1. Understanding Groups
Because Microsoft Windows Server 2008 R2 is the underlying
operating system for Windows Small Business Server (SBS) 2011, all the
built-in security groups integral to Windows Server 2008 R2 still
exist. However, many of these groups are intended for much larger,
multidomain networks, so the designers of SBS 2011 created a subset of
organizational units to simplify administration.
In practice, a group is usually a
collection of user, and sometimes computer, accounts. The point of
groups is to allow the network administrator to assign rights and
permissions to groups rather than to individual users. Groups can be
customized and users added or removed in a single step.
SBS allows two group types: security and distribution. Most
groups are security groups because they’re the
only groups through which permissions can be assigned. Each security
group is also assigned a group scope, which
defines how permissions are assigned to the group’s members, and
members of a security group must be securable
objects in the SBS domain. Securable objects include users,
groups, and computers. Contacts are not securable objects and can be
added only to distribution groups, not to security groups.
User rights are assigned to security groups to establish what
members of the group can or cannot do. Some rights are automatically
assigned to some groups—for example, a user who is a member of the
Remote Web Workplace Users group has the ability to connect using
Remote Web Workplace.
Email distribution groups, on the other
hand, are not security-enabled and can be used
only with email applications to send email to
sets of users and contacts.
|
Groups are an effective way of simplifying administration. If
you have just a few users, it’s possible to manage permissions for
each user manually, though it’s additional work most administrators
won’t welcome. And with SBS, it could prove to be positively onerous
because SBS controls access to many features based on group
membership. You can easily use SBS without changing any of the
default groups or adding to them at all. Just use the built-in
wizards to add users and you’ll end up with the correct permissions
and rights.
The real strength of groups is that when you change the rights
of the group, you change them for everyone in the group, without
having to do anything else. This makes it easy to update the rights
of users on your network without having to go in and change every
single account.
For example, when you have a number of people who travel or
telecommute, you don’t need to keep track of which users have the
right to log on remotely if you add them all to the Virtual Private
Network Users group. Changes to that group—granting access to a
special share, for example—require only that you assign the right to
the group, in just one step.
Email distribution groups don’t define rights for users, but
they do make it easy to communicate to a defined group of entities.
You can create an external email contact for a user and add that
contact to an email distribution group to allow a remote user to
receive emails at a different location without having to log on to
the network, for example.
|
User rights are assigned to security groups to establish
what members of the group can or cannot do.
Note:
Permissions and user rights are different creatures, though easily
mistaken for one another. Permissions determine what resources
members of a group can access. User rights determine what members of a group can or
cannot do.
2. Creating Groups
Creating new groups is exceedingly easy in Windows SBS 2011—so
easy that you should think carefully before you overcomplicate your
network with too many groups. Too many distribution groups is merely a nuisance, but too many
security groups can have unforeseen consequences such as conflicting
permissions that can keep people from getting access to the resources
they need.
2.1. Setting Up a Distribution Group
To create a new distribution group, follow these
steps:
Open the Windows SBS Console and select Users And
Groups.
Click the Groups tab and then select Add A New Group in
the Tasks pane. The Add A New Group Wizard launches. Read the
Getting Started text and then click Next.
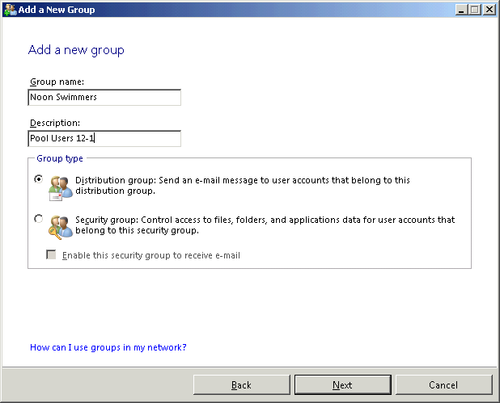
In the Add A New Group dialog box, as shown in Figure 1, type your
information in the Group Name and Description fields. Select
Distribution Group in the Group Type box and then click
Next.
On the Create A Group E-Mail Address page, the group name
will be automatically entered. You can change the email address
for this group, although the default name—linked as it is to the
group name—is probably the easiest to remember and use. In the
E-Mail Delivery Options box, you can select the check box to
allow people external to your organization to send mail to the
address. Leave the check box cleared if you want the address to
be completely internal. Click Next.
Select the groups or individuals you want to include in
this distribution group. When all members have been
added to the Group Members list, click Add Group.
Note:
If you’re not ready to add members to the group yet, you can
simply click Add Group. Even without members, the group will be
created and added to the list of groups.
2.2. Creating a Security Group
The process of adding a security group is slightly more
complicated than creating a distribution group, but it’s still
simple. Use the following steps to create a new security
group:
Open the Windows SBS Console, and select Users And
Groups.
Click the Groups tab and then select Add A New Group in
the Tasks pane. The Add A New Group Wizard launches. Read the
Getting Started text and then click Next.
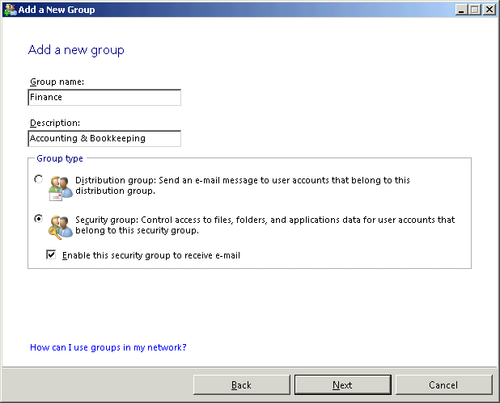
Enter your information in the Group Name and Description
fields. In the Group Type area, select Security Group. If you
want to be able to send email to this group, select the Enable
This Security Group To Receive E-mail check box, as shown in
Figure 2.
Click Next.
Note:
If your security group will not be receiving email as a
group, the wizard will skip to the page described in step
5.
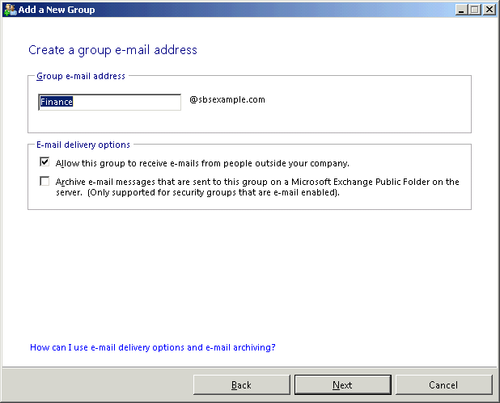
On the Create A Group E-Mail Address page, the group name
will be automatically entered. You can change the email address
for this group, although the default name is probably the
easiest to remember and use. In the E-Mail Delivery Options box,
you can select the check box to allow people external to your
organization to send mail to the address. Leave the check box
cleared if you want the address to be completely internal. As
shown in Figure 3,
email-enabled security groups have the additional option of
allowing messages to be archived on Exchange Public Folders.
Click Next.
On the Select Group Members For page, select the groups or
individuals you want to include in this security group. When all
members have been added to the Group Members list, click Add
Group.
Note:
If you’re not ready to add members to the group, just click
Add Group. The group will be created, and you can return to it and
add members at some future time.
The wizard will report that the group has been created. You
can view the group in the SBS Console under Users And Groups by
clicking the Groups tab.