Even with Vista's much improved image-based
installation, installation naturally requires input from the user.
Partitions must be created and formatted, product keys must be entered,
network settings must be configured, and regular post-installation
changes must be made. These steps hold true if you are using the default
image on the Windows DVD or if you plan to use customized images.
You may be familiar
with Setup Manager and INI formatted answer files from previous versions
of Windows that allow you to automate these tasks and settings. Windows
Vista has grown up, so to speak. It has outgrown the simplistic INI
file format used with previous Windows versions and now uses XML
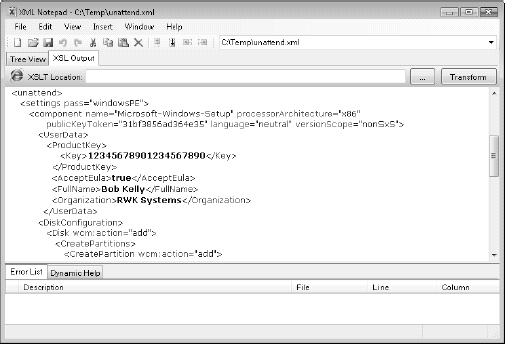
formatted files to provide answers for setup. Figure 1 shows an example of an XML-based answer file.
NOTE
Although the Setup
Image Manager (SIM) is the tool to use when it comes to creating and
editing these particular XML files, a handy tool for viewing (and also
editing) XML files in general is the free XML Notepad 2007 utility from
Microsoft.
Although setup
progresses normally without an answer file, it requires that the same
settings and answers be provided for every individual installation.
That's fine at home but clearly impractical when it comes to installing
hundreds or thousands of computers at work.
1. Getting familiar with configuration passes
Windows installation is broken into various configuration passes.
Configuration passes are generally separated by a restart. Specific
actions may be performed during each configuration pass. Unattended
answer files are broken into sections with corresponding names. For
example, notice that on Figure 1,
near the top, a line that specifies a settings pass of windowsPE. This
means that all automation settings made in this section will be applied
during the windowsPE configuration pass. The settings you specify here
should match those you set during the Windows PE section of a manual
Windows installation up to the first reboot after applying the Windows
image. Those settings might include creating and formatting a partition,
accepting the End User License Agreement, and specifying an
installation product key. For the most part, settings have a specific
configuration pass to which they must always be applied.
To effectively design
and implement an unattended answer file, you must understand what
happens during each configuration pass. Also, you need to understand
which configuration passes are used for specific scenarios. The
available configuration passes include:
windowsPE
offlineServicing
generalize
specialize
auditSystem
auditUser
oobeSystem
windowsPE
The windowsPE
configuration pass is used to automate the initial image installation.
This includes configuring a setup language, partitioning and formatting
the hard drive, configuring the upgrade type, and providing a product
key. These actions take place while the system is booted to Windows PE,
thus the name.
offlineServicing
The offlineServicing configuration pass is only used to edit an existing WIM file. One feature of WIM files
for image storage is the ability to edit the images in the WIM file
offline. The Package Manager utility (pkgmgr) from the WAIK uses the
offlineServicing configuration pass to add language packs, security
updates, drivers, and packages to an image in a WIM file offline. When
used, this is typically the only configuration pass defined in the
answer file.
generalize
The generalize
configuration pass is used to automate the Sysprep utility when
generalizing the system for imaging. Typical settings for this section
include power scheme configuration, owner information, and Plug and Play
detection of devices after running Sysprep.
specialize
The specialize
configuration pass is typically run immediately following the windowsPE
configuration pass, but before starting the Microsoft Windows Vista Out
of Box Experience (OOBE). During this pass, machine specific settings
are made. Settings may include assigning a computer name, configuring an
IP address, and joining a domain.
auditSystem
The auditSystem
configuration pass is used when starting in audit mode. Settings made in
this configuration pass are run in the context of the local system.
This section is used to typically add device drivers and configure a
computer name for the audit pass.
auditUser
The auditUser
configuration pass is used when starting in audit mode. Settings in this
pass are applied immediately after the auditSystem pass. These settings
are applied in the context of the locally logged-on user and would
typically include scripts to install software or customize the system.
oobeSystem
The oobeSystem
configuration pass is used to automate the Out of Box Experience, also
called Windows Welcome. The settings typically made during this past
would include creating user accounts, setting the time zone, and running
post-installation scripts.
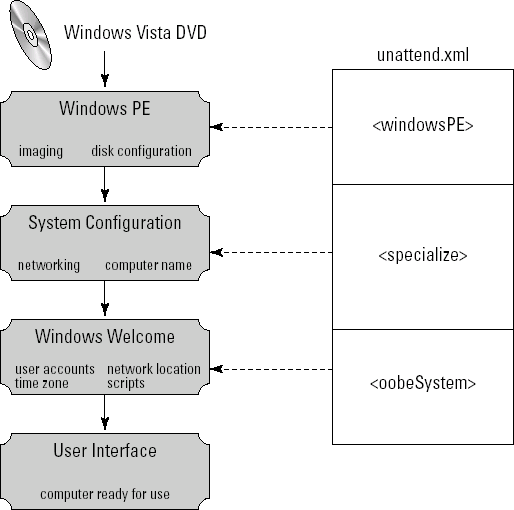
As you might have guessed, you will not use all configuration passes for any particular scenario. In Figure 2
you can see the configuration passes used in a generic installation of
Windows Vista. If you are editing an existing image or preparing a
reference image, you may use other configuration passes.
Confused? No need to
worry. Although it is good to know what is done where, you need not edit
your answer files by hand. The Windows System Image Manager (SIM) tool
used to author your XML answer files will not let you place a component
(action) in the wrong configuration pass. If you spent any time editing
Sysprep and unattended files by hand in Notepad in the past, you are
going to appreciate SIM.
2. Navigating the Windows System Image Manager
You saw from the example in Figure 1
that the format and number of options can be daunting at first. The
good news is that the Windows System Image Manager (SIM) offers a
graphical tool to build these complex answer files. The interface is not
as simple as a wizard, but neither is the setup. At first glance (see Figure 3), the tool can seem intimidating, but after you've worked with it for a little while, the logic of its operation becomes clear.
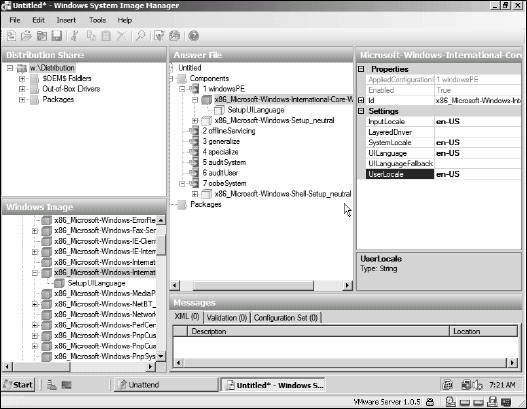
One of the first things to
understand before you can become productive in SIM is to understand the
various panes and their purposes. The panes provided are marked as
follows:
Distribution Share
Windows Image
Answer File
Properties
Messages
Understanding the Distribution Share pane
The first pane is used
to manage the distribution share. Building customized images may require
additional files, drivers, and applications to be included. A distribution share
is a network share used to host these additional files. SIM can be used
to both manage and create distribution shares. The primary benefit of
using SIM to manage this share is that any answer files you create with
the Windows SIM will automatically include the proper full path to the
distribution share.
NOTE
If using unattended
answer files is as far as you plan to take automation, then using this
tool to create the distribution share can be helpful. However, if you
plan to take advantage of the Microsoft Deployment Toolkit, its
Deployment Workbench utility should be used to handle this task.
Use of a distribution
share is optional. It is possible to include all necessary files and
applications directly in the customized image. However, some
applications, such as those that employ a client agent (antivirus,
systems management, and so on) will not function properly when included
as part of the image without taking specific steps documented by the
vendor. Including only necessary drivers is another advantage that can
increase stability, and reduce the size of, the final deployment image.
To build a distribution share using Windows SIM, follow these steps:
Start Windows System Image Manager.
In the Distribution Share pane, right-click in the Distribution Share pane and select Create a Distribution Share.
Browse to a drive and folder in which you want to store your distribution files. You may select an existing folder or type in the name of a new folder (for example, W:\Distribution).
NOTE
Answer files may
contain sensitive information, but the NTFS and share permissions are
created with access open to all users by default. You may choose to
restrict access to the distribution share and files by modifying these
permissions so that access is limited to only those accounts which
require access.
Understanding the Windows Image pane
The bottom pane on the
left is used to display components and packages that may be configured
and referenced in your unattended answer file. This list is generated by
creating a catalog of options read from the selected Windows Image
(WIM) file.
NOTE
The Windows Image
file that you want to catalog must be in a writable directory, which
means it cannot be selected directly from DVD.
When an image file is selected, this pane contains a tree view of sections that make up its available contents including:
Exploring the components section
The components
section is a list of built-in Windows components and settings that may
be customized or automated as part of Windows installation. Typical
settings include disk configuration, network settings, and post-install
configuration and scripts. The component names tend to be quite long and
very descriptive. Each component begins with its architecture type and
ends with a version number. While these have importance, they can
initially be ignored as they tend to add more complexity while trying to
learn the layout and location of the components.
NOTE
A full list of
components that can be added to an unattended answer file can be found
in the Unattended Windows Setup Reference, included as part of the WAIK.
It comes in the form of a help file that can be most easily accessed by
selecting the component of interest and pressing the F1 key.
After a specific
component to be automated has been located, it may be added to the
answer file by right-clicking on the component and selecting the
appropriate configuration pass to add the setting. In most cases only
one configuration pass is available. In the case where multiple
configuration passes are available, you will have to make the decision
as to which pass the component setting should be applied. A general rule
in making such a decision would be to ask, "During a normal
installation, when would this setting be configured?"
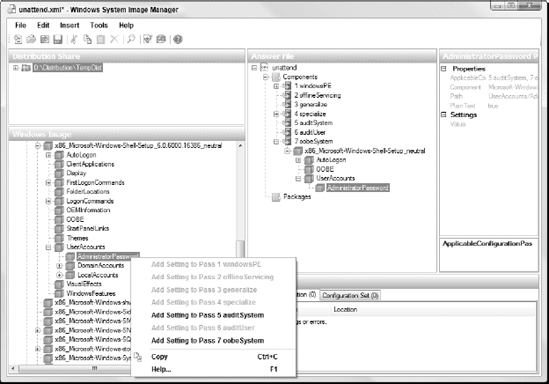
When adding components to
your answer file, it is only necessary to add the root component to the
answer file, and all parent components will be automatically added. For
example, in Figure 4
the Administrator password can be added to the answer file by
right-clicking the Administrator Password component and selecting Add
Setting to Pass 7 oobeSystem (it is not necessary to first add the
UserAccounts component specifically).
Exploring the packages section
The packages section
of the Windows Image pane contains a list of packages that can be
optionally included and configured with the installation. An easy
example is the Microsoft Windows Foundation Package. It allows you to
include and configure optional packages, such as fax services, games,
IIS, and corporate help customizations.
Understanding the Answer File pane
As each component and
package is added to the answer file, it is displayed in the Answer File
pane under the selected configuration pass. Essentially, this pane
displays all of the sections that are included in the answer file. It
serves as a browser for the answer file, where when selecting a
component or package, its settings may be viewed and adjusted. Items may
also be removed from the answer file by right-clicking on an item and
selecting Delete.
|
When a component is
selected and configured, the building block icon for that component
becomes dark blue. This differentiation provides a quick visual
indicator of any settings that have been overlooked and left in an
unconfigured state.
|
|
NOTE
The numbers beside
each pass are simply numerical identifiers that roughly indicate the
order in which the configuration passes will be applied. The numbers are
a bit esoteric but do occasionally show up in documentation and
scripts, so it may be worth noting that configuration passes have not
only friendly names but numerical identifiers as well.
Understanding the Properties pane
After an answer file
has been created and various components and packages have been added,
the Properties pane offers the place to dictate the values for any of
the added components. Each specific setting is configured by first
highlighting the component in the Answer File pane and then using the
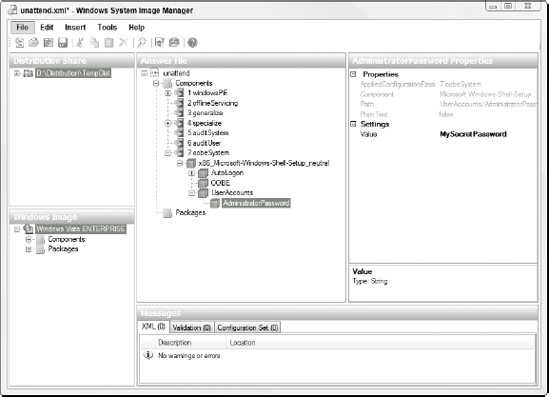
Properties pane to enter any desired values. Figure 4
shows how to add a section to the answer file for defining an
Administrator password. Now by highlighting the AdministratorPassword
component in the Answer File pane, the desired password may be entered,
as shown in Figure 5.
Some properties offer
free-form text boxes to enter a value while others provide pull-down
menus. Some text boxes are limited to what can be entered. The very
bottom part of the Properties pane often helps by listing the type of
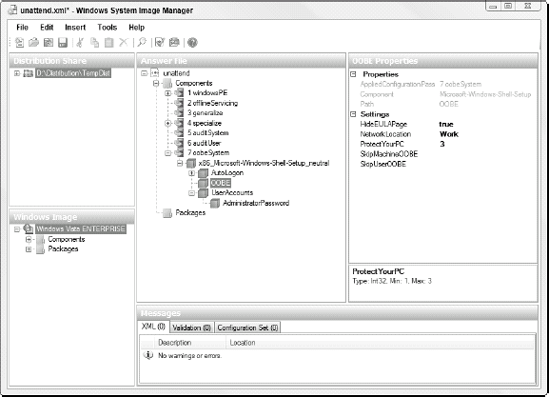
data that can be entered into each setting. Notice in Figure 6 that the ProtectYourPC setting must be an integer (Int32) ranging from 1 to 3.
Messages
The messages section of
the Windows SIM is used to inform the user of detected configuration
errors that may be present in the answer file. This feature does not
prevent errors, but it does detect XML errors as well as mismatched or
deprecated settings. XML errors should only exist if the answer file has
been edited outside SIM. To display any detected errors, select
Validate Answer File from the Tools menu to scan the answer file.
In general, messages are
classified as messages with a small yellow icon or an error with a small
red icon. As a general rule you should understand any warnings and
eliminate them whenever possible. In some cases, the warnings are from
situations that cannot be avoided. So long as the repercussions are
understood, such warnings may be disregarded. Errors, on the other hand,
should always be corrected when encountered.
You can use the
following steps to create a generic answer file that will automate
Windows Vista setup. It will most likely not meet the exact needs of
your organization but can be used as a starting point for creating your
own customized answer file.
|
The following steps
assume that you are deploying Windows Vista Enterprise Edition using a
Volume Activation Key (VAK). If using a retail or OEM license to deploy
an image, a prompt for the product key will be displayed during
installation (or you may include it in the answer file).
|
|
To create a new answer file using SIM, perform the following steps:
Create a directory for working with your new answer file to keep it separate from your existing files, for example, W:\Unattend.
Copy the install WIM from the sources directory (\sources\install.wim) on the Windows Vista DVD to your new unattend directory. Ensure that the read-only attribute has been removed from this file (right-click => Properties).
Launch the Windows System Image Manager (located in the Microsoft Windows AIK program group).
From the File menu, choose Select Windows Image and select the install.wim file you copied in Step 2 (W:\Unattend\install.wim).
Because
the WIM file contains more than one image, a prompt is displayed so the
desired image within the WIM may be specified. Choose Windows Vista
Enterprise edition. Because this is the first time the WIM has been opened, a prompt to build a catalog file will be presented.
Select Yes to allow the system to build a catalog of the image.
From the File menu, choose New Answer File.
Use
Table 1
to add the
specified components to the answer file. Expand the components node of
the Windows Image panel and either right-click and add, or drag and
drop, the following components to the designated configuration pass in
the Answer File pane.
Use
Table 2
to make the settings on the components you have added to the answer file.
From the Tools menu, select Validate Answer File. A warning appears about the SkipMachineOOBE setting; you may safely ignore it for now.
Save your answer file in your unattend folder as
basic_unattend.xml.
Table 1. Step 8 Component Selections
| Component | Configuration Pass |
|---|
| <arch>_Microsoft-Windows-International-Core-WinPE_<version>
(Used to configure Windows PE for the correct locale) | 1 - windowsPE |
<arch>_Microsoft-Windows-Setup_<version>
DiskConfiguration Disk CreatePartitions CreatePartition
(Used to automatically create a single partition) | 1 - windowsPE |
<arch>_Microsoft-Windows-Setup_<version>
ImageInstall OSImage InstallTo
(Used to specify the partition to be used for installation) | 1 - windowsPE |
| <arch>_Microsoft-Windows-Setup_<version>
(Allows you to skip the EULA) | 1 - windowsPE |
| <arch>_Microsoft-Windows-Shell-Setup_<version>
(Lets you enable AutoLogon as Administrator to enable the account) | 7 - oobeSystem |
| <arch>_Microsoft-Windows-Shell-Setup_<version>
(Used to automate the Out of Box Experience (OOBE)) | 7 - oobeSystem |
<arch>_Microsoft-Windows-Shell-Setup_<version>
UserAccounts AdministratorPassword
(Used to set the local Administrator's password) | 7 - oobeSystem |
Table 2. Step 9 Component Settings
| 1 windowsPE
Microsoft-Windows-International-Core-WinPE | |
| InputLocale | en-US (or other valid locale) |
| SystemLocale | en-US (or other valid locale) |
| UILanguage | en-US (or other valid language) |
| UserLocale | en-US (or other valid locale) |
| | |
| 1 windowsPE
Microsoft-Windows-International-Core-WinPE => SetupUILanguage | |
| UILanguage | en-US (or other valid language) |
| 1 windowsPE
Microsoft-Windows-Setup => DiskConfiguration | |
| WillShowUI | OnError |
| | |
| 1 windowsPE
Microsoft-Windows-Setup => DiskConfiguration => Disk | |
| DiskID | 0 |
| WillWipeDisk | true |
| | |
| 1 windowsPE
Microsoft-Windows-Setup => DiskConfiguration => Disk => CreatePartitions => CreatePartition | |
| Extend | true |
| Order | 1 |
| Type | Primary |
| | |
| 1 windowsPE
Microsoft-Windows-Setup => ImageInstall => OSImage | |
| WillShowUI | OnError |
| | |
| 1 windowsPE
Microsoft-Windows-Setup => ImageInstall => OSImage => InstallTo | |
| DiskID | 0 |
| Partition | 1 |
| | |
| 1 windowsPE
Microsoft-Windows-Setup => UserData | |
| AcceptEula | true |
| FullName | <Owner Name> |
| Organization | <Company Name> |
| 1 windowsPE
Microsoft-Windows-Setup => UserData => ProductKey | |
| Key | <Database Master Key for Vista Enterprise> |
| WillShowUI | OnError |
| | |
| 7 oobeSystem
Microsoft-Windows-Shell-Setup => AutoLogon | |
| Enabled | True |
| LogonCount | 1 |
| UserName | Administrator |
| | |
| 7 oobeSystem
Microsoft-Windows-Shell-Setup => AutoLogon => Password | |
| Value | <Password> |
| | |
| 7 oobeSystem
Microsoft-Windows-Shell-Setup => OOBE | |
| HideEULAPage | True |
| NetworkLocation | Work |
| ProtectYourPC | 3 |
| SkipMachineOOBE | True |
| SkipUserOOBE | True |
| | |
| 7 oobeSystem
Microsoft-Windows-Shell-Setup => UserAccounts => AdministratorPassword | |
| Value | Password1 |
|
Be careful when using the
SkipMachineOOBE setting. By specifying a value of TRUE, you will not be
prompted to create any user accounts. Because the local Administrator
account is disabled by default, this may leave your installation in an
unusable state. If specifying SkipMachineOOBE as true, be sure to enable
the local Administrator account, create an alternate local
Administrative account, or join the computer to a domain.
|
|
|
You may have looked
and noticed that there is no answer file setting to enable the local
Administrator account. Microsoft has omitted this setting as part of
Vista's increased security and it's recommended that you create a new
local account for administration. If you are required to enable the
Administrator account as part of your answer file, it can be done by
assigning the Administrator account a password and configuring it to
auto logon during setup. |