The default configuration of Windows Server 2003, and
all Microsoft Windows operating systems, is that the computer belongs
to a workgroup. In a workgroup, a Windows NT–based computer (which
includes Windows NT 4, Windows 2000, Windows XP, and Windows Server
2003) can authenticate users only from its local Security Accounts
Manager (SAM) database. It is a stand-alone system, for all intents and
purposes. Its workgroup membership plays only a minor role, specifically
in the browser service. Although a user at that computer can connect to
shares on other machines in a workgroup or in a domain, the user is
never actually logged on to the computer with a domain account.
Before you can log on to a
computer with your domain user account, that computer must belong to a
domain. The two steps necessary to join a computer to a domain are,
first, to create an account for the computer and, second, to configure
the computer to join the domain using that account. This lesson will
focus on the skills related to the creation of computer accounts and
joining computers to domains. The next lesson will explore, in more
depth, the computer accounts themselves.
Computers maintain
accounts, just as users do, that include a name, password, and security
identifier (SID). Those properties are incorporated into the computer
object class within Active Directory. Preparing for a computer to be
part of your domain is therefore a process strikingly similar to
preparing for a user to be part of your domain: you must create a
computer object in Active Directory.
Creating Computer Accounts
You must be a member of
the Administrators or Account Operators groups on the domain controllers
to create a computer object in Active Directory. Domain Admins and
Enterprise Admins are, by default, members of the Administrators group.
Alternatively, it is possible to delegate administration so that other
users or groups can create computer objects.
However,
domain users can also create computer objects through an interesting,
indirect process. When a computer is joined to the domain and an account
does not exist, Active Directory creates a computer object
automatically, by default, in the Computers OU. Each user in the
Authenticated Users group (which is, in effect, all users) is allowed to
join 10 computers to the domain, and can therefore create as many as 10
computer objects in this manner.
Creating Computer Objects Using Active Directory Users and Computers
To create a
computer object, or “account,” open Active Directory Users And Computers
and select the container or OU in which you want to create the object.
From the Action menu or the right-click shortcut menu, choose the
New–Computer command. The New Object–Computer dialog box appears, as
illustrated in Figure 1.
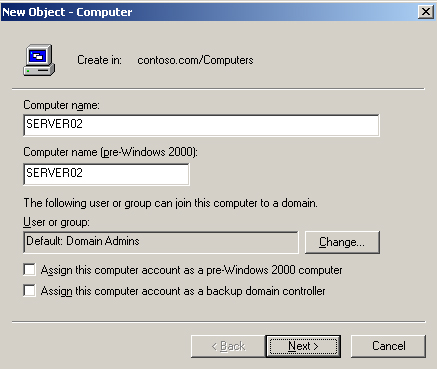
In the New
Object–Computer dialog box, type the computer name. Other properties in
this dialog box will be discussed in the following lesson. Click Next.
The following page of the dialog box requests a GUID. A GUID is used to
prestage a computer account for Remote Installation Services (RIS)
deployment, which is beyond the scope of this discussion. It is not
necessary to enter a GUID when creating a computer account for a machine
you will be joining to the domain using other methods. So just click
Next and then click Finish.
Creating Computer Objects Using DSADD
Chances are, this
is something you’ve done before. But before you decide there’s nothing
new under the sun, Windows Server 2003 provides a useful command-line
tool, DSADD, which allows you to create computer objects from the
command prompt or a batch file.
To create computer objects, simply type dsadd computer ComputerDN, where ComputerDN is the distinguished name (DN) of the computer, such as CN=Desktop123,OU=Desktops,DC=contoso,DC=com.
If the computer’s DN includes a space, surround the entire DN with quotation marks. The ComputerDN...
parameter can include more than one distinguished name for new computer
objects, making DSADD Computer a handy way to generate multiple objects
at once. The parameter can be entered in one of the following ways:
By piping a list of DNs from another command, such as dsquery.
By typing each DN on the command line, separated by spaces.
By
leaving the DN parameter empty, at which point you can type the DNs,
one at a time, at the keyboard console of the command prompt. Press
ENTER after each DN. Press CTRL+Z and ENTER after the last DN.
The DSADD Computer command can take the following optional parameters after the DN parameter:
-samid SAMName
-desc Description
-loc Location
Creating a Computer Account with NETDOM
The NETDOM command
is available as a component of the Support Tools, installable from the
Support\Tools directory of the Windows Server 2003 CD. The command is
also available on the Windows XP and Windows 2000 CDs. Use the version
that is appropriate for the platform. NETDOM allows you to perform
numerous domain account and security tasks from the command line.
To create a computer account in a domain, type the following command:
netdom add ComputerName /domain:DomainName /userd:User /PasswordD:UserPassword
[/ou:OUDN]
Joining a Computer to a Domain
A
computer account alone is not enough to create the secure relationship
required between a domain and a machine. The machine must join the
domain.
To join a computer to the domain, perform the following steps:
1. | Right-click My Computer and choose Properties. Click the Computer Name tab.
Open Control Panel, select System, and in the System Properties dialog box, click the Computer Name tab. Open the computer’s Computer Name properties. These properties can be accessed in several ways: Note The
Computer Name tab is called Network Identification on Windows 2000
systems. The Change button is called Properties. The functionality is,
however, identical. |
|
2. | Open the Network Connections folder from Control Panel and choose the Network Identification command from the Advanced menu.
|
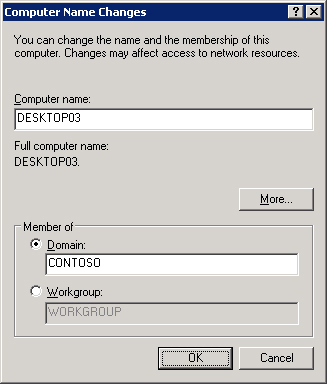
3. | On the Computer Name tab, click Change. The Computer Name Changes dialog box, shown in Figure 2 allows you to change the name and the domain and workgroup membership of the computer.
Tip You
will not be able to change a computer’s name or membership if you are
not logged on with administrative credentials on that system. Only users
who belong to the local Administrators group will find the Change
button enabled and functional. |
|
4. | In the Computer Name Changes dialog box, click Domain and type the name of the domain.
Tip Although
the NetBIOS (flat) domain name may succeed in locating the target
domain, it is best practice to enter the DNS name of the target domain.
DNS configuration is critical to a Windows 2000, Windows XP, or Windows
Server 2003 computer. By using the DNS domain name, you leverage the
preferred name resolution process and test the computer’s DNS
configuration. If the computer is unable to locate the domain you’re
attempting to join, ensure that the DNS server entries configured for
the network connection are correct. |
|
5. | Click
OK. The computer contacts the domain controller. If there is a problem
connecting to the domain, examine network connectivity and
configuration, as well as DNS configuration.
|
When the computer successfully contacts the domain, you will be prompted, as in Figure 3, for a user name and password with privileges to join the domain. Note that the credentials requested are your domain user name and password.
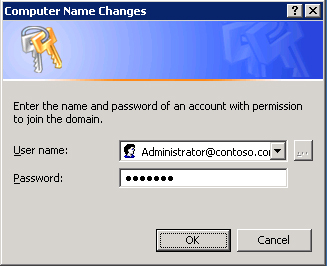
If you have not
created a domain computer account with a name that matches the
computer’s name, Active Directory creates an account automatically in
the default Computers container. Once a domain computer account has been
created or located, the computer establishes a trust relationship with
the domain, alters its SID to match that of the account, and makes
modifications to its group memberships. The computer must then be
restarted to complete the process.
Note
The
NETDOM JOIN command can also be used to join a workstation or server to
a domain. Its functionality is identical to the Computer Name Changes
user interface, except that it also allows you to specify the OU in
which to create an account if a computer object does not already exist
in Active Directory. |
The Computers Container vs. OUs
The
Computers container is the default location for computer objects in
Active Directory. After a domain is upgraded from Windows NT 4 to
Windows 2000, all computer accounts are found, initially, in this
container. Moreover, when a machine joins the domain and there is no
existing account in the domain for that computer, a computer object is
created automatically in the Computers container.
Tip
The Microsoft Windows Server 2003 Resource Kit
includes the REDIRCOMP tool, which allows you to redirect the creation
of automatic computer objects to an OU of your choice. The domain must
be in Windows Server 2003 Domain functionality, meaning that all domain
controllers must be running Windows Server 2003. Such a tool is useful
to organizations in which computer account creation is less tightly
controlled. Because automatically created computer objects are created
in an OU, they can be managed by policies linked to that OU. See the Windows Server 2003 Resource Kit for more information on REDIRCOMP. |
Although the
Computers container is the default container for computer objects, it is
not the ideal container for computer objects. Unlike OUs, containers
such as Computers, Users and Builtin cannot be linked to policies,
limiting the possible scope of computer-focused group policy. A
best-practice Active Directory design will include at least one OU for
computers. Often, there are multiple OUs for computers, based on
administrative division, region, or for the separate administration of
laptops, desktops, file and print servers, and application servers. As
an example, there is a default OU for Domain Controllers in Active
Directory, which is linked to the Default Domain Controller Policy. By
creating one or more OUs for computers, an organization can delegate
administration and manage computer configuration, through group policy,
more flexibly.
If your organization has
one or more OUs for computers, you must move any computer objects
created automatically in the Computers container into the appropriate
OU. To move a computer object, select the computer and choose Move from
the Action menu. Alternatively, use the new drag-and-drop feature of the
MMC to move the object.
Tip
Because
a computer object in the Computers OU will not be governed by the group
policies linked to the OUs your organization has created specifically
for computers; and because it requires an extra step to move a computer
object from the Computers OU into the appropriate OU, it is recommended
to create computer objects before joining the computer to the domain.
You can create the computer object in the correct OU initially, so that
once the system joins the domain it is immediately governed by the
policies linked to that OU. |
You can also move a computer object, or any other object, with the DSMOVE command. The syntax of DSMOVE is:
dsmove ObjectDN [-newname NewName] [-newparent ParentDN]
The -newname parameter
allows you to rename an object. The -newparent parameter allows you to
move an object. To move a computer named DesktopABC from the Computers
container to the Desktops OU, you would type the following:
dsmove "CN=DesktopABC,CN=Computers,DC=Contoso,DC=com" -newparent
"OU=Desktops,DC=Contoso,DC=com"
In this command you again see the distinction between the Computers container (CN) and the Desktops organizational unit (OU).
You must
have appropriate permissions to move an object in Active Directory.
Default permissions allow Account Operators to move computer objects
between containers including the Computers container and any OUs except
into or out of the Domain Controllers OU. Administrators, which include
Domain Admins and Enterprise Admins, can move computer objects between
any containers, including the Computers container, the Domain
Controllers OU, and any other OUs.
Practice: Joining a Computer to an Active Directory Domain
In this practice,
you will create computer accounts using Active Directory Users and
Computers and DSADD. You then can join a computer to the domain, if you
have access to a second system.
Exercise 1: Creating Computer Accounts with Active Directory Users and Computers
1. | Open Active Directory Users And Computers
|
2. | In
the Servers OU, create a computer object for a computer named
“SERVER02.” Configure only the computer name. Do not change any of the
other default properties.
Note that, like a user, a computer has two names—the computer
name and the “Pre–Windows 2000” computer name. It is a best practice to
keep the names the same.
|
Exercise 2: Creating Computer Accounts with DSADD
1. | Open the command prompt.
|
2. | Type the command:
dsadd computer ?cn=desktop03,ou=servers,dc=contoso,dc=com?
|
Exercise 3: Moving a Computer Object
1. | Open Active Directory Users And Computers.
|
2. | Using the Move command, move the Desktop03 computer object from the Servers OU to the Desktops OU.
|
3. | Drag Server02 from the Servers container to the Computers container.
|
4. | Select
the Computers container to confirm that Server02 arrived in the right
place. Drag-and-drop is, of course, subject to user error.
Off the Record The MMC is notorious for causing mild panic attacks. It does not
refresh automatically. You must use the Refresh command or shortcut key
(F5) to refresh the console after making a change such as moving an
object. |
|
5. | Open the properties of the Computers container. You will see that it does not
have a Group Policy tab, unlike an OU such as Servers. This is among
the reasons why organizations create one or more additional OUs for
computer objects.
|
6. | Open a command prompt.
|
7. | Type the command:
dsmove "CN=Server02,CN=Computers,DC=contoso,DC=com" -newparent
"OU=Servers,DC=contoso,DC=com"
This command, as you can deduce, will move the computer object back to the Servers OU.
|
8. | Confirm that the computer is again in the Servers OU.
|
Exercise 4 (Optional): Join a Computer to a Domain
This exercise
requires an additional system with network connectivity to Server01. In
addition, DNS must be configured correctly so that Server01’s service
records (SRV) are created. The additional computer must have DNS
configured so that it can locate Server01 as a domain controller for contoso.com.
1. | If
you have an additional system that you are able to join to the domain
in the next exercise, create an account for it in the Desktops OU using
either Active Directory Users And Computers or DSADD. Be certain that
the name you use is the same name as the computer.
|
2. | Log
on to the computer. You must log on as an account with membership in
the computer’s local Administrators group to change its domain
membership.
|
3. | Locate
the Computer Name tab by opening System from Control Panel, or the
Network Identification command from the Advanced menu of the Network
Connections folder.
|
4. | Click Change.
|
5. | Click Domain and type the DNS domain name, contoso.com.
|
6. | Click OK.
|
7. | When prompted, enter the credentials for the contoso.com domain’s Administrator account.
|
8. | Click OK.
|
9. | The
computer will prompt you that a reboot is necessary. Click OK to each
message and to close each dialog box. Reboot the system.
|