Most data lists are connected to a data source and
populated with data dynamically at runtime. A developer can make this
connection using Adobe Flash Builder. In Flash Catalyst, you can add
placeholder data to display in the Data List component using the
Design-Time Data panel. In fact, five sample records are created
automatically when you first create the Data List component. Each sample
record is a copy of the repeated item in the data list. Using the
Design-Time Data panel, you can replace the sample repeated images and
text with more realistic examples of the actual data that you want
displayed. This dummy data is called design-time data.
Tip
There is nothing stopping
you from creating a finished data list using design-time data and images
in the project library. You don’t have to connect the application to an
external data source. However, if your application is used to display
large amounts of data that change over time, binding your list to
external data is a better choice.
It’s a good idea to include a
representative sample, so that your developer knows exactly how you
want the data to appear in the finished application.
Replace design-time images
Replacing the repeated sample data is easy. Open the Design-Time Data panel and swap the images for new ones.
1. | Select the Data List component in the Layers panel.
The data list is selected in the artboard. Using the Layers panel to
select the data list is a good way to make sure you select only the data
list and not the image below it.
|
2. | Open the Design-Time Data panel and drag the top border of the panel to make it taller.
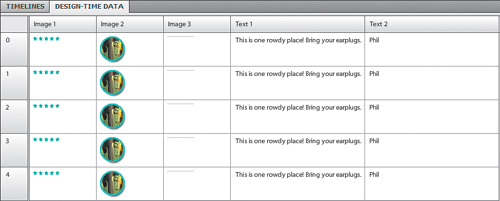
The Design-Time Data panel organizes sample data similarly to a
traditional data table. Each record is listed as a separate row, and the
information in each record (images and text) is listed in columns. In
this list, each item includes three images (stars, a round image, and a
line) and two pieces of text (the review and the reviewer’s name). At first, the design-time data includes five copies of the repeated item, numbered from 0 to 4.
 |
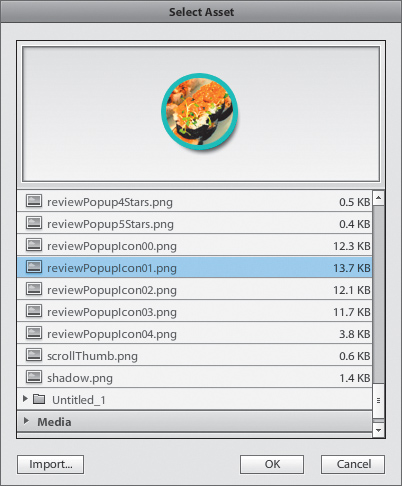
3. | Click
the round image (in the Image 2 column) in row number 1 (the second
row). Be sure to select the image in row number 1, not row number 0.
The Select Asset dialog box appears. You can choose an image in the project library or choose Import to add another image.
|
4. | Select reviewPopupIcon01.png and click OK.
The new image appears in the Design-Time Data panel.
|
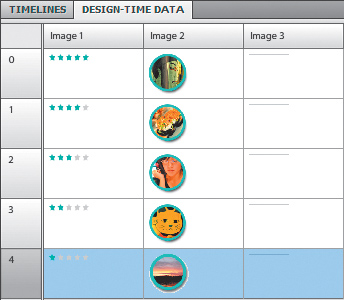
5. | Click the stars (in the Image 1 column) in row 1.
|
6. | In the Select Asset dialog box, select reviewPopup4Stars.png and click OK.
The second review now has a four-star rating.
|
7. | Replace the round image in row 2 with reviewPopupIcon02.png.
|
8. | Replace the stars in row 2 with reviewPopup3Stars.png.
|
9. | Replace the round image in row 3 with reviewPopupIcon03.png.
|
10. | Replace the stars in row 3 with reviewPopup2Stars.png.
|
11. | Replace the round image in row 4 with reviewPopupIcon04.png.
|
12. | Replace the stars in row 4 with reviewPopup1Star.png.
The design-time data for the restaurant reviews data list now includes a more realistic collection of sample images.
|
Tip
By default, a data list
opens with nothing selected. You can set the list to open with a
specific record selected. To do this, select a row in the Design-Time
Data panel. Then in the Component section of the Properties panel, enter
1 as the value for the Selected Index property. The row you selected
will display its Selected state when the application runs.
Edit design-time text
Replacing sample design-time
text is even easier than swapping images. Open the Design-Time Data
panel, and enter new text for each record.
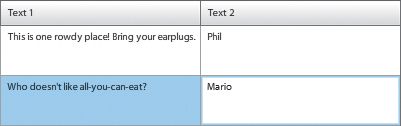
1. | In the Design-Time Data panel, click in the Text 1 column for row 1 and type a new review.
Tip
You can press the Tab key to quickly move between text fields in the Design-Time Data panel.
|
2. | Click in the Text 2 column for row 1 and type a new reviewer name.
|
3. | Add new reviews and reviewer names for the design-time data in rows 2, 3, and 4.
|
4. | Run the project in a browser.
|
5. | Click
any of the restaurants in the horizontal list, and then click Reviews
to see the updated data list with its new design-time data.
|
6. | Close the browser and return to Flash Catalyst. |