Understanding the interface is the first step in
learning Illustrator. Adobe has kept its products looking consistent so
that using all its programs together is easy. The tools, panels, and
menus are pretty similar when using Illustrator, Photoshop, and
InDesign.
Illustrator's interface
offers many elements that let you work in optimum productivity. After
you understand the interface, the creation process is much easier. When
looking at Illustrator, you find the following:
Document window. The document window appears when you open an existing document or start a new document.
Tools panel.
The Tools panel houses the tools you need to create amazing artwork.
The tools are set as icons that represent what the tool looks like.
Panels.
Panels allow you to choose options such as colors, line width, styles,
and so on. You can move panels around (floating) to any location, and
you can also close or open panels as needed. Panels can be somewhat
permanently docked together. If panels are docked together, changing the
size of one panel tends to increase the size of one or more of the
other panels.
Control panel.
The Control panel is a special panel that normally appears just below
the menu bar. This panel allows you to quickly choose applicable
settings to the currently selected tool.
Menu.
The main menu is across the top of the window in Windows and across the
top of the main monitor on a Mac. The main menu allows you to access
many of Illustrator's powerful commands. Illustrator also makes use of
popup context menus that appear when you right-click (Ctrl+click) many
objects.
Zoom control.
The zoom control provides a quick method of zooming in or out in the
document window so that you can see fine details or the entire drawing.
Status bar.
The status bar typically shows you what tool is currently being used.
You can also choose from several status bar options if you prefer to see
other information, such as the current date and time, the number of
undo levels that are available, the color profile that's being used, or
the status of shared documents.
Artboards.
Artboards are the part of the document window that contains the art you
want to print. They are typically shown as thin black rectangles.
1. Working in the document window
The document window, as shown in Figure 1, is where you perform all your work. It contains two main elements: the artboard and the pasteboard.
|
You can move the
printable area represented by the dashed lines using the Print Tiling
tool (one of the two optional modes of the Hand tool).
|
|
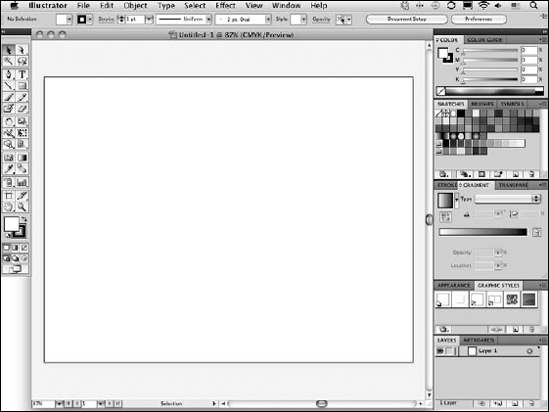
Illustrator windows act like
windows in most other programs. You use the title bar at the top of the
window to move the window around your screen. On the title bar is the
name of the document. If you've not yet saved your document, the name of
the document is Untitled-1, with the number changing for each new
document you create. (Hint: Save it as soon as you create it!) Next to
the title of the document is the current viewing percentage relative to
actual size.
NOTE
If you've not
maximized the document window in Windows, the document's name appears in
the document window's title bar rather than in Illustrator's title bar.
This extra document window title bar reduces the size of your
workspace, so you may want to maximize the document window in order to
gain a little more room to work on your document.
|
If you're using a Mac, after you save a document, you can  +click the document name in the title bar to see a full path to its location. +click the document name in the title bar to see a full path to its location.
|
|
The scroll bars let you see
what is above and below or right and left of the current viewing area.
Three vital buttons help
you close, minimize, and maximize the various windows you open in
Illustrator. You find these buttons in the upper-left corner on a Mac
and in the upper-right corner in Windows. In Windows, you also find a
second set of these buttons — the upper set controls the entire
Illustrator window, while the lower set controls the document window.
In addition to these
buttons, Illustrator offers three options that help you quickly access
your files. The Cascade, Tile, and Arrange Icons commands are all
accessible via the Window menu:
Cascade.
When you have multiple files open, this command lines up all the title
bars in a staggered (stairstep) arrangement going down and to the right.
Tile. With multiple files open, this command tiles the windows next to one another to fill the application window.
Arrange Icons. This command arranges your open files into neat rows.
1.1. Understanding the artboard
The artboard is the area of
your document that prints. The area of the artboard doesn't have to be
the same as the printed document. The artboard is designated by black
lines that form a rectangle in the document window and shows the largest
area in which you can print. To set the size for the artboard, click
the Artboard tool, which allows you to change the size of the artboard
by dragging handles just as you would with the Bounding Box (where you
also drag the handles to resize length and width of a selection). If you
don't want to see the artboard (perhaps because you're working on a
large document that doesn't entirely fit on the Artboard), choose View => Hide Artboard. To show the artboard again, choose View => Show Artboard. Hiding the artboard doesn't impact your art. It remains in view when the artboard is hidden.
Because each
Illustrator document can contain multiple artboards, you might see more
than one artboard in your document. Choose Window => Artboards to see all the artboards in your document, and double-click on each of them to quickly view each individual artboard.
|
To change the printing page size, use the Media options in the Print dialog box. To access the Print dialog box, choose File => Print.
|
|
If you're placing your
Illustrator files into another application, such as Photoshop or
InDesign, the size of the artboard limits the size of your artwork;
anything extending outside the artboard doesn't appear in other
applications.
1.2. Getting to know the work area
When using Illustrator, the
worst thing that can happen is for you to lose an illustration on which
you're working. "Where'd it all go?" you cry. This can happen very
easily in Illustrator. Just click a few times on the gray parts of the
scroll bars at the bottom of the document window. Each time you click,
you move about half the width (or height) of your window, and a few
clicks later, your page and everything on it is no longer in front of
you. Instead, you see the work area's scratch area, usually a vast
expanse of white nothingness.
The work area measures 227.5 ×
227.5 inches, which works out to about 360 square feet of drawing
space. At actual size, you see only a very small section of the
artboard. A little letter-size document looks extremely tiny on a work
area this big. If you get lost in the work area, a quick way back is to
choose View =>
Actual Size. This puts your page in the center of the window, with a
100% view, at which time you can see at least part of your drawing. To
see the whole page quickly, choose View => Fit in Window, which resizes the view down to where you can see the entire page.
NOTE
Although the View => Actual Size and View =>
Fit in Window commands may seem to do the same thing, look closely and
you'll see a subtle difference between the two. The View =>
Fit in Window command always shows the entire artboard, which,
depending on your monitor's resolution setting, may not be the same as
the 100% view produced by the View => Actual Size command.
This discussion assumes, of
course, that you've actually drawn artwork on the artboard. If you've
drawn your artwork way off to the side of the work area, away from the
artboard, you may have more difficulty finding your drawing. At this
point, you probably want to choose View => Fit All in Window, which takes you directly to all the art in your document.
1.3. Using the Print Tiling tool
The Print Tiling tool, which
you access via the Hand tool ,
changes how much of your document prints. It does this by moving the
printable area of the document without moving any of the printable
objects in the document. Clicking and dragging the lower-left corner of
the page relocates the printable area of the page to the place where you
release the mouse button.
|
Double-clicking the Print Tiling tool slot resets the printable-area dotted line to its original position on the page.
|
|
The Print Tiling tool is
useful when your document is larger than the biggest image area that
your printer can print. The tool allows you to tile several pages to create one large page out of several sheets of paper. Tiling
is the process by which an image is assembled by using several pieces
of paper arranged in a grid formation. A portion of the image prints on
each page, and when you fit the pages together, you can view the image
in its entirety. Tiling is good only for rough prints because you
typically need to manually trim about a quarter-inch around the edge of
each sheet of paper; most printers don't print to the edge of the paper.
2. Working with the Tools panel
The Tools panel, as shown in Figure 2,
contains all the tools that you use to draw objects in your documents.
The Tools panel normally appears as a panel on the left edge of the
document window. To close the Tools panel, you can either click the
Close button (the x on a Windows computers or the little circle on a
Mac) at the top of the Tools panel or choose Window =>
Tools. You make the Tools panel visible by placing a check mark next to
the Window menu's Tools menu item. You hide the Tools panel by clicking
the checkmarked item so that no check mark appears next to the Tools
menu item.
If you drag the Tools panel to
the right of its sticky panel location, it becomes a floating panel. To
turn it back into a panel, drag it to the left edge of the document.
|
You can quickly swap
between single- and double-column views of the Tools panel by clicking
the arrows just above the top of the Tools panel.
|
|
|
To toggle the display of all
panels, not just the Tools panel, press Tab. Each time you press Tab,
the panels either hide or are redisplayed — depending on their current
state. This won't work if you're using the Type tool with an active
insertion point, of course.
|
|
|
You can show and hide all
the panels except the Tools panel by pressing Shift+Tab (again, don't
try this when you're using the Type tool with an active insertion
point).
|
|
To choose a tool, click the
tool you want to use in its slot within the Tools panel and then release
the mouse button. This highlights it on the Tools panel. You can also
choose tools by pressing a key on the keyboard. For example, pressing P
selects the Pen tool. You can deactivate a tool only by selecting
another one.

Many tools have additional
popup tools, which are tools that appear only when you click and hold
(or right-click) the mouse on the default tool. Illustrator denotes the
default tools that have popup tools with a little triangle in the
lower-right corner of the tool. To choose a popup tool, click and hold a
tool with a triangle until the popup tools appear and then drag to the
popup tool you want. The new popup tool replaces the default tool in
that tool slot and stays there until you choose another tool from that
tool slot.
|
You can browse through the popup tools by pressing Alt (Option) while clicking a tool. Each click displays the next tool.
|
|
|
You can customize
the tool shortcuts under the Keyboard Shortcuts dialog box found under
the Edit menu. In this dialog box, simply choose the tool you want to
change and then type the new shortcut letter, number, or symbol. You can
also do this in Adobe Photoshop and Adobe InDesign.
|
|
Any tool with a popup option
also has a tearoff tab on the right side. You can make the fly-out a
free-floating panel by clicking this tearoff tab. Use this feature if
you find that you're constantly switching between tools in that tearoff.
Then, you won't have to click+hold and drag to the next tool.