1. Adjusting Line Spacing
Depending on the theme, PowerPoint leaves varying
amounts of space between lines and between paragraphs. The default blank
theme leaves some extra space between each paragraph to make the
divisions between them clearer; other themes tighten this up.
If the chosen theme doesn't provide the line spacing
you want, open it up in Slide Master view and make changes to the text
placeholders on the slide master(s). For example:
If most of your bulleted lists are
single-line, you can eliminate any extra space between paragraphs to
make them seem closer together.
If most of your bulleted lists are multiline paragraphs, you can add space between paragraphs to help differentiate them.
If you want to make a large paragraph easier to read, you can add extra space between the lines.
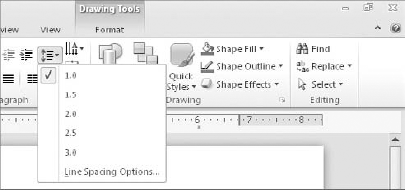
To set basic line spacing, open the Line Spacing
button's menu in the Paragraph group on the Home tab and select one of
the presets, as shown in Figure 1.
If you want more line spacing options, click the
dialog box launcher for the Paragraph group on the Home tab or choose
Line Spacing Options at the bottom of the Line Spacing button's menu.
The Paragraph dialog box contains the line spacing controls, as shown in
Figure 2. There are three line spacing settings you can adjust:
Before: Space before the paragraph
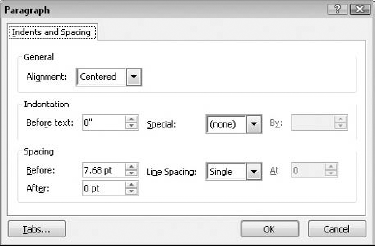
After: Space after the paragraph
Line Spacing: Space between the lines within the paragraph
Before and After are pretty straightforward; you can
set their values in points. (Remember, one point is 1/72 of an inch on a
printed page.) It may be helpful to think about the spacing in relation
to the font size that you are using. For example, if you are using
24-point text, an After setting of 8 points would leave 1/3 of a line
between paragraphs.
You can set the Line Spacing to a preset value of
Single, 1.5 Lines, or Double. You can also set it to Multiple and then
enter a custom value in the At box. For example, a Multiple value of 1
is single spacing; a Multiple value of 0.9 is slightly less than single
spacing, for just a bit of extra tightness in the layout.
All of the previously mentioned line spacing values
are based on the text size in the paragraph, and not fixed amounts. As
the text size changes, the line spacing will adjust automatically. If
you need fixed line spacing that does not change when the font changes,
choose Exactly from the Line Spacing list. Then you can enter an exact
number of points for the spacing in the At box.
2. Changing Horizontal Alignment
You can set horizontal alignment on a
paragraph-by-paragraph basis. The default alignment is Left, but you can
also have Centered, Right, Justified, and Distributed:
Left, Centered, and Right:
These are fairly self-explanatory. They refer to the point at which
each line of text aligns with the other lines of text.
Justified:
Aligns with both the right and left margins of the text box. Space is
added between words and letters to make that happen. The final line of
the paragraph is not justified; it is left-aligned. Many newspapers use
this alignment. It works best for long lines of text where there is a
lot of text in which to spread out the extra spacing. Although justify
looks good with large paragraphs, it is of limited usefulness for the
brief bullet points that are the hallmark of most slides because it does
not affect the last line, and in brief bullets the first line is the last line.
Distributed:
This is just like Justified, except it includes the last line of the
paragraph. You can use it to apply the Justified look to a single-line
paragraph.
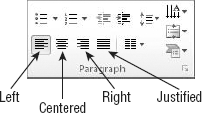
The Paragraph group on the Home tab contains buttons
for Left, Centered, Right, and Justified. Click a button to change the
alignment of the selected paragraph(s), as shown in Figure 3.
To use Distributed alignment, you must use the
Paragraph dialog box. Click the dialog box launcher for the Paragraph
group, and then choose the alignment from the Alignment drop-down list.
Distributed appears on that list along with the other alignments.
|
Alignment refers to
the text's position in its text box, not on the slide. If you want a
text box centered on the slide, but the text is left-aligned within the
box, simply move the text box where you want it. |