2.2 Editing a Document in Word Web App
If you want to make changes to a document you’re
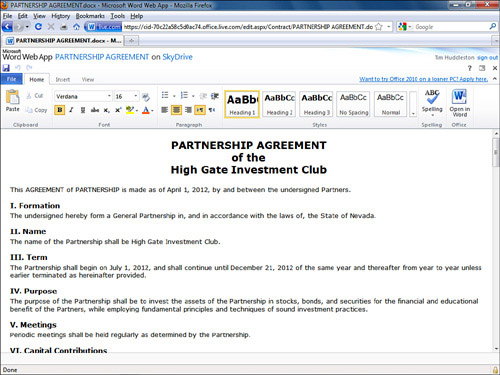
viewing in Word Web App, you can make your edits right in the browser
window. Here’s how:
1. | Log in to Windows Live and open a document in Word Web App.
|
2. | In the Word Web App, click Edit in Browser. A “light” version of Word opens in your browser window, as shown in Figure 16.
This version of Word includes an abbreviated Ribbon with the Home,
Insert, and View tabs. These tabs do not include all the tools found in
your full copy of Word, but they are enough to perform basic formatting
and editing tasks.
|
3. | Make whatever editing and formatting changes you want, within the limits of the Word Web App’s tools.
|
4. | When you finish, click the Save button in the Quick Access Toolbar (right above the File tab); then close the document.
|
2.3 Switching from Word Web App to Word
When you view a document in Word Web App, you can
open it for editing in Word 2010 on your PC. Your changes are saved to
SkyDrive. Here’s how to switch from Word Web App to Word:
1. | Log in to Windows Live and open a document in Word Web App.
|
2. | On
the Word Web App toolbar, click Open in Word. A confirmation box
appears, asking if you trust the file; click OK. You may be asked to
provide your Windows Live username and password again.
When Word opens, a yellow warning bar may appear just below the Ribbon, as shown in Figure 17.
The bar notifies you that the file is open in Protected view, in case
it contains any malicious code (such as a virus or malware) that could
harm your computer. Word’s editing tools are not available in Protected
view.

|
3. | Click Enable Editing. Word’s editing tools become available.
|
4. | Make
any desired changes to the document; then save it. Word saves the file
to SkyDrive and merges your changes into the shared document.
|
5. | Close Word. Your changes may not be visible in Windows Live until you log in to the service again.
|
2.4 Downloading a Document from SkyDrive
If you prefer to work in Word rather than Word Web
App, you can download a copy of the document from SkyDrive to your PC’s
disk. Here’s how:
1. | Log in to your Windows Live account and go to the SkyDrive page.
|
2. | Open the folder that contains the document.
|
3. | Point to the document’s name to see the menu of options, point to the More link, and then click Download.
The File Download dialog box opens, asking whether you want to open or save the file.
|
4. | Do one of the following:
- Click Open to download the file and open it in Word 2010. The
document opens in Protected view (as described in the preceding section,
“Switching from Word Web App to Word”).
- Click Save to download the file and save it to a disk on your computer.
|
5. | Click OK. The document is opened or saved as you specified in step 4.
|
2.5 Deleting a Document from SkyDrive
When you no longer need a document that’s stored in a SkyDrive folder, you can delete it. Here’s how:
1. | Log in to your Windows Live account and go to the SkyDrive page.
|
2. | Open the folder that contains the document.
|
3. | Point to the document’s name to see the menu of options.
|
4. | Click Delete. A message box appears, asking you to confirm that you want to permanently delete the file from SkyDrive.
|
5. | Click OK, and the file is gone.
|
|
Make sure you have an up-to-date copy of the document
on a local disk before deleting it from SkyDrive; otherwise, you’ll be
left with nothing. If you want to delete a shared file, be sure to
notify all other users who have access to it, to make sure they want you
to delete it. Other users may want to save a copy of the document to
their own computers before you delete it from the web.
|
You can also move a SkyDrive document to a different
folder, copy the document to paste into another document or folder, and
rename the file. All this can be done from the menu of options that
appears when you point to the document’s name in its SkyDrive folder. To
perform any of these tasks, just click the appropriate link.
You
can add comments about the document in SkyDrive. Comments can be helpful
reminders to you or anyone who shares the document. To add a comment,
point to the document’s name to see the menu of options; then click the
Comments link. Type your comment in the Comments text box, and then
click Add.