IT tutorials
 
Office
 

Microsoft PowerPoint 2010 : Formatting Text Boxes (part 1) - Applying Fills and Outlines, Setting Fill Transparency

- Free product key for windows 10
- Free Product Key for Microsoft office 365
- Product Key Free : Microsoft Office 2019 – Serial Number
6/16/2013 7:36:55 PM
1. Applying Fills and Outlines

Text boxes are just like any other object in their fill and outline formatting.

The fill is the center of the text box, and the outline is the border. Each can have separate formatting. For example, you can have a transparent fill with a solid border or vice versa. You can apply 
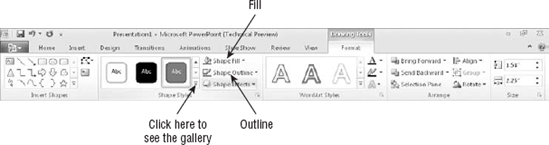
one of the Shape Styles presets from the Format tab to apply both at once, or you can adjust them separately with their respective menus on the Format tab. See Figure 1.

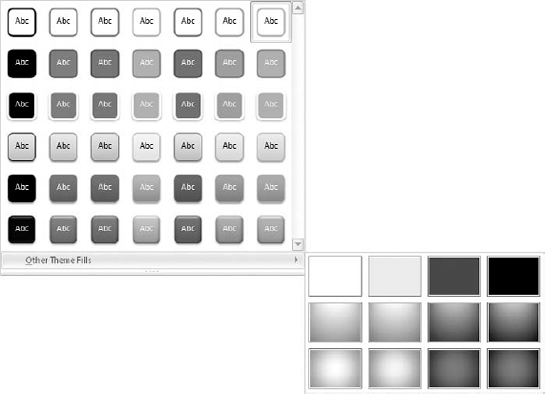
To apply one of the presets, click it, or open the gallery if the one you want doesn't appear. At the bottom of the gallery is Other Theme Fills, as shown in Figure 1. The fills on this submenu are the same as the background fills available from the Design tab. If you switch themes such that the background fill presets change, the background of the text box changes, too, if it is formatted with one of these.

Figure 1. Format a text box using the Shape Styles group on the Format tab.

Figure 2. Choose Other Theme Fills to select one of the theme's backgrounds for the fill of the text box.

For the fill, you can choose a solid color, a gradient, a picture, or a texture. For the outline, you can select a color, thickness, and dash style.

Selecting one of the background fills in Figure 7-15 fills the text box separately with one of the background presets. It does not necessarily pick the same background preset as is applied to the slide master. If you want the text box to always have the same fill as the current background, you can either leave it set to No Fill (the default fill), or you can set its fill to match the background:

  1. Right-click the text box and choose Format Shape.

  2. Click Fill if it is not already selected.

  3. Click Slide Background Fill.

  4. Click OK.

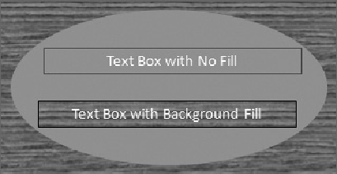
There is only one minor difference between No Fill and a Slide Background Fill. If there are any objects stacked behind the text box, the text box obscures them when set to Background, but shows them when set to No Fill. Figure 3 shows the difference for two text boxes placed on a wood grain background with a filled oval overlaid.

NOTE

After you've set the text box's fill to Background, the Shape Styles presets no longer work on it until you go back into the Format Shape dialog box and set the fill to Solid Fill or one of the other fills.

2. Setting Fill Transparency

Fill transparency determines how much of the background (or whatever is layered behind the text box) shows through it. By default, it is set to 0, which means the text box is not transparent at all when it has a fill assigned to it. 
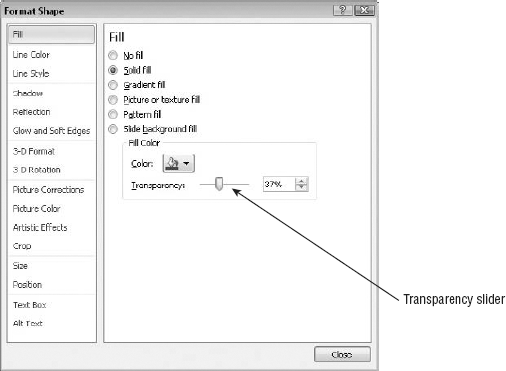
To set the fill transparency, follow these steps:

  1. Apply the desired fill.

  2. Right-click the text box and choose Format Shape. The Format Shape dialog box opens.

  3. Click Fill if the fill controls are not already displayed. See Figure 4.

  4. Drag the Transparency slider or enter a percentage in its text box.

  5. Click Close.

If the fill is a gradient, you must set the transparency separately for each of the gradient stops. (A stop is a color in the gradient.) Set the Gradient Stops drop-down list to Stop 1, adjust the transparency, set it to Stop 2, adjust the transparency, and so on. 


Figure 3. A slide background fill ignores any intervening objects.

Figure 4. Set a text box's transparency in the Format Shape dialog box.

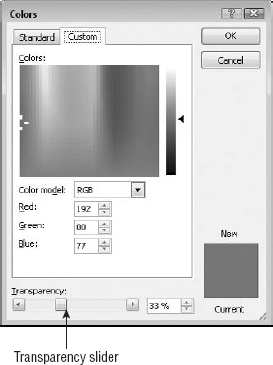
There is another way to set transparency, but it only works when you are applying solid fixed colors as follows:

  1. Select the text box.

  2. On the Drawing Tools Format tab, click Shape Fill and choose More Fill Colors.

  3. Select the desired color.

  4. Drag the Transparency slider at the bottom of the dialog box to a new value, as shown in Figure 5.

  5. Click OK.

Figure 5. You can set fill transparency for solid-colored text boxes in the Color dialog box.

 
Others
 
- Microsoft PowerPoint 2010 : Formatting Paragraphs and Text Boxes - Adjusting Line Spacing, Changing Horizontal Alignment
- Microsoft Excel 2010 : Collaborating with Colleagues - Saving Workbooks for the Web
- Microsoft Excel 2010 : Collaborating with Colleagues - Authenticating Workbooks
- Microsoft Word 2010 : Sharing a Document Through Windows Live and Word Web App (part 4) - Using Word Web App - Editing a Document in Word Web App, Switching from Word Web App to Word
- Microsoft Word 2010 : Sharing a Document Through Windows Live and Word Web App (part 3) - Using Word Web App - Opening a Document with Word Web App
- Microsoft Word 2010 : Sharing a Document Through Windows Live and Word Web App (part 2) - Working with SkyDrive - Saving a Document in a Custom Windows Live Folder
- Microsoft Word 2010 : Sharing a Document Through Windows Live and Word Web App (part 1) - Working with SkyDrive - Saving a Document in a Default Windows Live Folder
- Microsoft OneNore 2010 : Inserting Pictures and Screen Clippings (part 4) - Collecting All Future Screen Clippings in One Place
- Microsoft OneNore 2010 : Inserting Pictures and Screen Clippings (part 3) - Inserting a Screen Clipping with Quick Filing
- Microsoft OneNore 2010 : Inserting Pictures and Screen Clippings (part 2) - Inserting a Picture from a Scanner, Inserting a Screen Clipping on the Current Page
 
 
Top 10
 
- Microsoft Visio 2013 : Adding Structure to Your Diagrams - Finding containers and lists in Visio (part 2) - Wireframes,Legends
- Microsoft Visio 2013 : Adding Structure to Your Diagrams - Finding containers and lists in Visio (part 1) - Swimlanes
- Microsoft Visio 2013 : Adding Structure to Your Diagrams - Formatting and sizing lists
- Microsoft Visio 2013 : Adding Structure to Your Diagrams - Adding shapes to lists
- Microsoft Visio 2013 : Adding Structure to Your Diagrams - Sizing containers
- Microsoft Access 2010 : Control Properties and Why to Use Them (part 3) - The Other Properties of a Control
- Microsoft Access 2010 : Control Properties and Why to Use Them (part 2) - The Data Properties of a Control
- Microsoft Access 2010 : Control Properties and Why to Use Them (part 1) - The Format Properties of a Control
- Microsoft Access 2010 : Form Properties and Why Should You Use Them - Working with the Properties Window
- Microsoft Visio 2013 : Using the Organization Chart Wizard with new data
Technology FAQ
- Is possible to just to use a wireless router to extend wireless access to wireless access points?
- Ruby - Insert Struct to MySql
- how to find my Symantec pcAnywhere serial number
- About direct X / Open GL issue
- How to determine eclipse version?
- What SAN cert Exchange 2010 for UM, OA?
- How do I populate a SQL Express table from Excel file?
- code for express check out with Paypal.
- Problem with Templated User Control
- ShellExecute SW_HIDE
programming4us programming4us