IT tutorials
 
Office
 

Microsoft PowerPoint 2010 : Formatting Text Boxes (part 2) - Controlling Vertical Alignment

- Free product key for windows 10
- Free Product Key for Microsoft office 365
- Product Key Free : Microsoft Office 2019 – Serial Number
6/16/2013 7:39:06 PM

3. Controlling Vertical Alignment

The vertical alignment is the positioning of the text vertically within the text box. The default vertical alignment is Top, which means that if there is extra space in the text box, it congregates at the bottom.

For the main text placeholders in a presentation, Top alignment is usually the best because it prevents the first line of text on each slide from looking like it is inconsistently placed. However, for a manual text box on an individual slide, Middle alignment often looks better, especially in a text box that has an outline or fill defined.

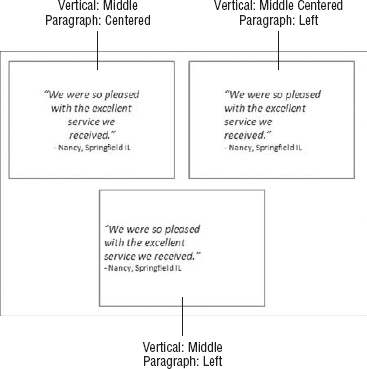
You can choose Top, Middle, or Bottom alignment, or centered versions of each (Top Centered, Middle Centered, or Bottom Centered). The centered versions center the text horizontally within the text box, but it's not the same thing as horizontal alignment on a paragraph level. The text remains left-aligned with itself, but it scoots over to the center of the text box. Figure 6 shows the difference.

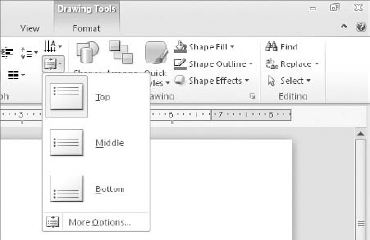
If you want one of the basic three alignments, click Align Text in the Paragraph group on the Home tab and select Top, Middle, or Bottom, as shown in Figure 7.

If you want one of the centered-type alignments, you must use the Paragraph dialog box. Follow these steps:

  1. Right-click the text box and choose Format Shape to open the Format Shape dialog box or choose More Options at the bottom of the Align Text button's menu. (ES)

  2. Click Text Box.

  3. In the Text Layout section, choose a Vertical Alignment setting. See Figure 8.

  4. In the AutoFit section, choose Do Not AutoFit or Shrink Text on Overflow.

    Figure 6. Vertical centering combinations with paragraph-level horizontal alignment.
    Figure 7. Select a vertical alignment from the Align Text button's menu.
    Figure 8. Choose a vertical alignment option.

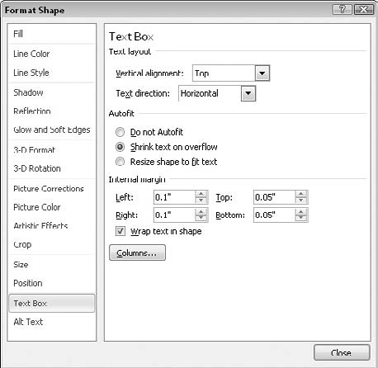
    If Resize Shape to Fit Text is selected here, the text box can't be made any taller than is necessary to accommodate the text in it, so there will be no blank space to allocate vertically and no difference between the vertical alignment settings.

  5. Click Close.

 
Others
 
- Microsoft PowerPoint 2010 : Formatting Text Boxes (part 1) - Applying Fills and Outlines, Setting Fill Transparency
- Microsoft PowerPoint 2010 : Formatting Paragraphs and Text Boxes - Adjusting Line Spacing, Changing Horizontal Alignment
- Microsoft Excel 2010 : Collaborating with Colleagues - Saving Workbooks for the Web
- Microsoft Excel 2010 : Collaborating with Colleagues - Authenticating Workbooks
- Microsoft Word 2010 : Sharing a Document Through Windows Live and Word Web App (part 4) - Using Word Web App - Editing a Document in Word Web App, Switching from Word Web App to Word
- Microsoft Word 2010 : Sharing a Document Through Windows Live and Word Web App (part 3) - Using Word Web App - Opening a Document with Word Web App
- Microsoft Word 2010 : Sharing a Document Through Windows Live and Word Web App (part 2) - Working with SkyDrive - Saving a Document in a Custom Windows Live Folder
- Microsoft Word 2010 : Sharing a Document Through Windows Live and Word Web App (part 1) - Working with SkyDrive - Saving a Document in a Default Windows Live Folder
- Microsoft OneNore 2010 : Inserting Pictures and Screen Clippings (part 4) - Collecting All Future Screen Clippings in One Place
- Microsoft OneNore 2010 : Inserting Pictures and Screen Clippings (part 3) - Inserting a Screen Clipping with Quick Filing
 
 
Top 10
 
- Microsoft Visio 2013 : Adding Structure to Your Diagrams - Finding containers and lists in Visio (part 2) - Wireframes,Legends
- Microsoft Visio 2013 : Adding Structure to Your Diagrams - Finding containers and lists in Visio (part 1) - Swimlanes
- Microsoft Visio 2013 : Adding Structure to Your Diagrams - Formatting and sizing lists
- Microsoft Visio 2013 : Adding Structure to Your Diagrams - Adding shapes to lists
- Microsoft Visio 2013 : Adding Structure to Your Diagrams - Sizing containers
- Microsoft Access 2010 : Control Properties and Why to Use Them (part 3) - The Other Properties of a Control
- Microsoft Access 2010 : Control Properties and Why to Use Them (part 2) - The Data Properties of a Control
- Microsoft Access 2010 : Control Properties and Why to Use Them (part 1) - The Format Properties of a Control
- Microsoft Access 2010 : Form Properties and Why Should You Use Them - Working with the Properties Window
- Microsoft Visio 2013 : Using the Organization Chart Wizard with new data
Technology FAQ
- Is possible to just to use a wireless router to extend wireless access to wireless access points?
- Ruby - Insert Struct to MySql
- how to find my Symantec pcAnywhere serial number
- About direct X / Open GL issue
- How to determine eclipse version?
- What SAN cert Exchange 2010 for UM, OA?
- How do I populate a SQL Express table from Excel file?
- code for express check out with Paypal.
- Problem with Templated User Control
- ShellExecute SW_HIDE
programming4us programming4us