4. Changing Text Box Rotation
PowerPoint 2010 provides several types of rotation.
You can spin things around a center point (the traditional 2-D type of
rotation), or you can apply several 3-D rotation effects. However, the
3-D type is not well suited for text boxes because it tends to distort
the text.
You can rotate a text box in 2-D by dragging its
rotation handle, the green circle at the top of the text box. The text
stays with it, so you can create upside-down text, sideways text, or
text at whatever angle you like, as shown in Figure 9.
If you want to rotate the text box only, but not the text within it, here's how to accomplish that:
Right-click the text box and choose Format Shape.

Select the Keep Text Flat check box.
Click the buttons on the Z: row to rotate the text box while leaving the text as is.
5. Changing Text Direction
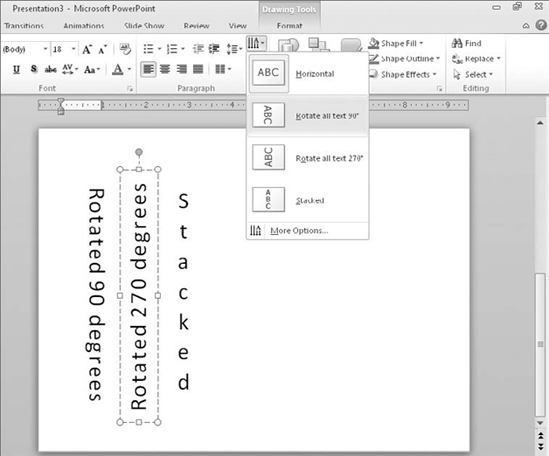
Instead of rotating the text box, you might prefer to
just rotate the text within it. Text can run vertically on its side,
facing either to the left or right, or the letters can be at normal
orientation individually but stacked vertically. To set a text
direction, use the Text Direction button in the Paragraph group on the
Home tab. Figure 7-23 shows the menu and some examples of the text direction settings.
NOTE
After changing the text direction, you might need to resize the text box so that the text flows in the new direction.
|
When text is rotated 90 or 270 degrees, as in Figure 10,
it often looks better if you use the Character Spacing button in the
Font group to set its spacing to Loose. Conversely, Stacked text often
looks better when set to Very Tight.
|
|

6. Setting Internal Margins
A text box's internal margins control the amount of
blank space between the edge of the box and the text inside it. It's
just like the margins in a word-processing document except that each
text box has its own individual margin settings. To set a text box's
internal margins, follow these steps:
Right-click the text box's border and choose Format Shape. The Format Shape dialog box opens.
Click Text Box. The Text Box settings appear, as shown in Figure 8.
In the Internal Margin section, change the Left, Right, Top, and Bottom settings as needed.
7. Creating Multiple Columns
In earlier versions of PowerPoint, if you wanted two
columns of text, you had to place them in separate text boxes. This was
awkward because the text boxes were not linked, so if you added or
deleted in one box, the text did not flow into the other. In PowerPoint
2010, you can set up a text box to create multiple linked columns within
a single text frame. This provides an easy way to convert a
single-column layout into a multicolumn one, and solves the problem with
awkward editing. To adjust the number of columns used in a text box,
follow these steps:
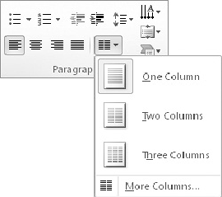
Click the Columns button in the Paragraph group on the Home tab.
Select a number of columns from the menu, as shown in Figure 11.
If you need a different number of columns, or you
want to specify the spacing between them, choose More Columns from the
menu. Then in the Columns dialog box (see Figure 12), enter a Number to specify the number of columns, and set an amount of spacing in inches.

