Shooting at a wide-open aperture (like f/4, f/2.8, or
f/2, etc.) is very popular with outdoor portraits, because it creates a
very shallow depth of field, putting the background out of focus, which
adds separation and helps your subject stand out from a busy
background. The problem is that you can’t always shoot at wide-open
apertures—especially in bright sunlight—but luckily for us, there’s a
fix we can apply in Photoshop to create that “shot wide open” look.
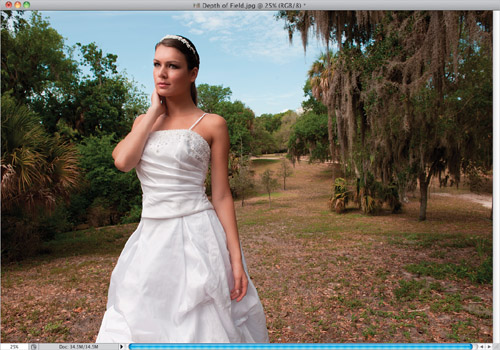
Step One. | Here’s
a photo I shot in the middle of the day, using an off-camera flash with
a shoot-through umbrella (up high, aiming down toward my subject, and
placed to the left of my camera position) to add some dimension and
depth to the light. The problem is that the scene was too bright to
shoot it at f/2.8 without stacking a bunch of neutral density filters on
my lens (which I didn’t have with me at the time), so my f-stop wound
up being f/13, which means everything is in sharp focus (great for
landscape shots, or in-studio portraits, but not so great here on
location with a busy, and fairly unattractive, background).
 | Step Two. | Start
by getting the Quick Selection tool (shown circled here), and paint
over the bride. As you do, it does all the hard work for you, and
selects the bride . The one problem area is the gap beside her arm on the
right—it selects that area, too (which shouldn’t be selected), so
press-and-hold the Option (PC: Alt) key, then use the Left Bracket key to shrink your brush size way down, and paint over that area (as seen here) and it gets deselected.
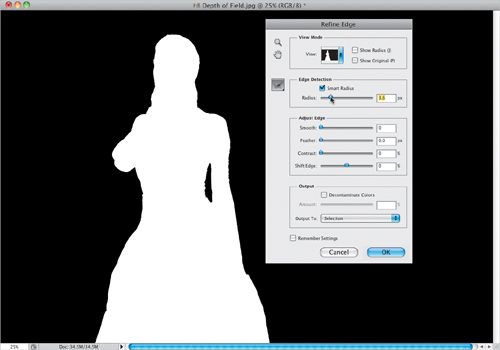
 | Step Three. | By
itself, the Quick Selection tool doesn’t always make nice, smooth
selections, so once your selection is in place, click the Refine Edge
button up in the Options Bar. In the View pop-up menu, choose Black & White (so you see a white/black mask view, as seen here), then turn on the Smart Radius checkbox . Now, since this is a
fairly simple selection (no fine hair blowing in the wind, etc.), you’ll
just drag the Radius slider a little bit to the right (as shown here,
where I dragged it to 3.6 pixels) to smooth out the selection and make
it less jaggy. Down in the Output section, make sure Output To is set to
Selection, then click OK.
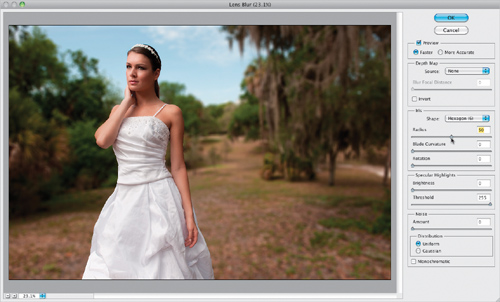
 | Step Four. | This returns you to your image with your smoother, more refined selection in place. Press Command-Shift-I (PC: Ctrl-Shift-I)
to Inverse your selection, so the background is selected. Now it’s time
to add the blurring. The Gaussian Blur filter looks too fake and tends
to smear things a bit, so go under the Filter menu, under Blur, and
choose Lens Blur, which gives a more
lens-like blur. When the Lens Blur dialog appears, drag the Radius
slider to around 50, then click OK (this isn’t the fastest filter, so
it’ll take a minute or so), and press Command-D (PC: Ctrl-D) to Deselect. Note:
We’re not putting her up on her own separate layer, then blurring the
Background layer, because the original image of her would still be on
the Background layer. She would blur back there, then you’d have to
clone away her smeared edges.
 | Step Five. | If
this was a close-up head-and-shoulders type shot, you could get away
with leaving the entire background behind her really blurry, but because
this shot is a ¾-length, it looks kind of weird seeing the ground a
foot behind her totally out of focus, so we’re going to tweak this just a
bit to get a more realistic effect for this particular image. Get the
History Brush tool (Y), which I think
of as “undo on a brush,” and choose a really huge, soft-edged brush tip
size from the Brush Picker up in the Options Bar (like the one you see
here—I used the Right Bracket key on
my keyboard to jump up to a 900-pixel brush), then paint a single stroke
from the far left, straight across to the far right. This removes the
blurring from this area right behind the bride, and because you used
such a huge brush, it fades off behind her into the blurriness.
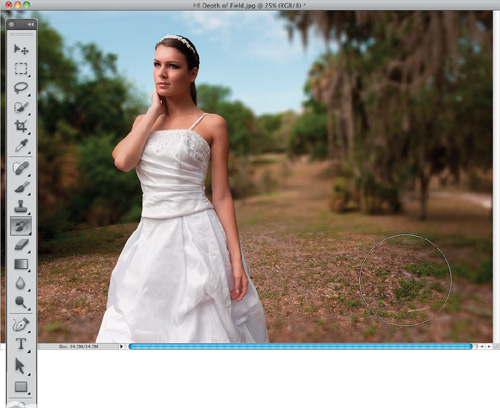 | Step Six. | When
you’re painting with that brush, don’t paint all the way to the bottom
of the photo—leave a little bit blurry at the bottom to mimic what real
shallow depth of field would create, which is a little bit of shallow
focus right at the front of the image. Lastly, I would finish this photo
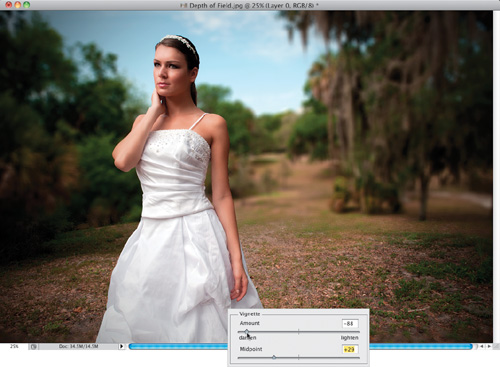
off by adding a dark edge vignette. Go under the Filter menu and choose
Lens Correction. When the dialog
appears, click on the Custom tab, then in the Vignette section (shown at
the bottom here), drag the Amount to –88 to darken the edges, and the
Midpoint to +29 to extend that darkening farther in toward the center,
then click OK. If your bride looks a bit dark, press Command-L (PC: Ctrl-L) to bring up Levels and click the Auto button. That should do the trick.
 |
Before

After
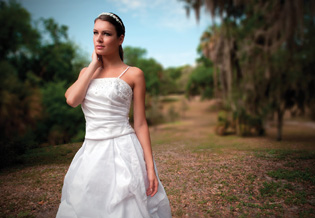
|